Apple Rumored To Begin AR Glasses Production This Year


It has been rumored for a couple of years that Apple is working on iPhone-powered augmented reality glasses. The company hasn’t acknowledged the existence of such a product but a well-regarded Apple analyst is now claiming that the company could begin production of its AR glasses later this year.

Apple hasn’t produced any dedicated augmented reality hardware as yet even though it released ARkit, its first augmented reality software, back in 2017. Much of its work has been focused on creating AR software solutions for existing devices.

Analyst Ming-Chi Kuo predicts that Apple may begin production of its iPhone-powered augmented reality glasses by the end of this year. It’s said that the company might launch the glasses as an accessory for the iPhone. Kuo further predicts that the augmented reality glasses will have their own display but the processing, networking, and positional tracking duties will be taken care of by the iPhone that’s hooked up to the glasses.

Multiple reports over the past couple of years have claimed that Apple is going to release augmented reality glasses by the end of 2019 or by early 2020. The company itself hasn’t confirmed anything at this point in time. If this is due to happen, we may continue to hear more reports and rumors about the AR glasses in the coming weeks. Apple’s new iPhones aren’t due before the fall this year.

Apple Rumored To Begin AR Glasses Production This Year

, original content from Ubergizmo. Read our Copyrights and terms of use.

The best wireless TV headphones

By Daniel Varghese and Lauren Dragan

This post was done in partnership with Wirecutter. When readers choose to buy Wirecutter’s independently chosen editorial picks, Wirecutter and Engadget may earn affiliate commission. Read the full wireless tv he…

Critically Endangered (And Adorable) Leopards Born At Connecticut Zoo

One of the cubs has black fur with black rosettes, making her particularly rare.

Martin Shkreli Suspected Of Using Cellphone To Run Company From Prison

An investigation is looking into claims that he posts to social media and fired a chief executive from behind bars.

How To Edit Videos On Android

Modern smartphone cameras are capable of incredibly high-quality video shooting. With 4K recording also becoming the norm for high-end handsets, one could even shoot a short film on his or her device. In this tutorial, we are going to be taking a look at a few editing apps that can genuinely enhance your videos’ quality.

App #1: PowerDirector

The first app in the list is PowerDirector, which is free on Play Store. A pro version is available as well.

Download:

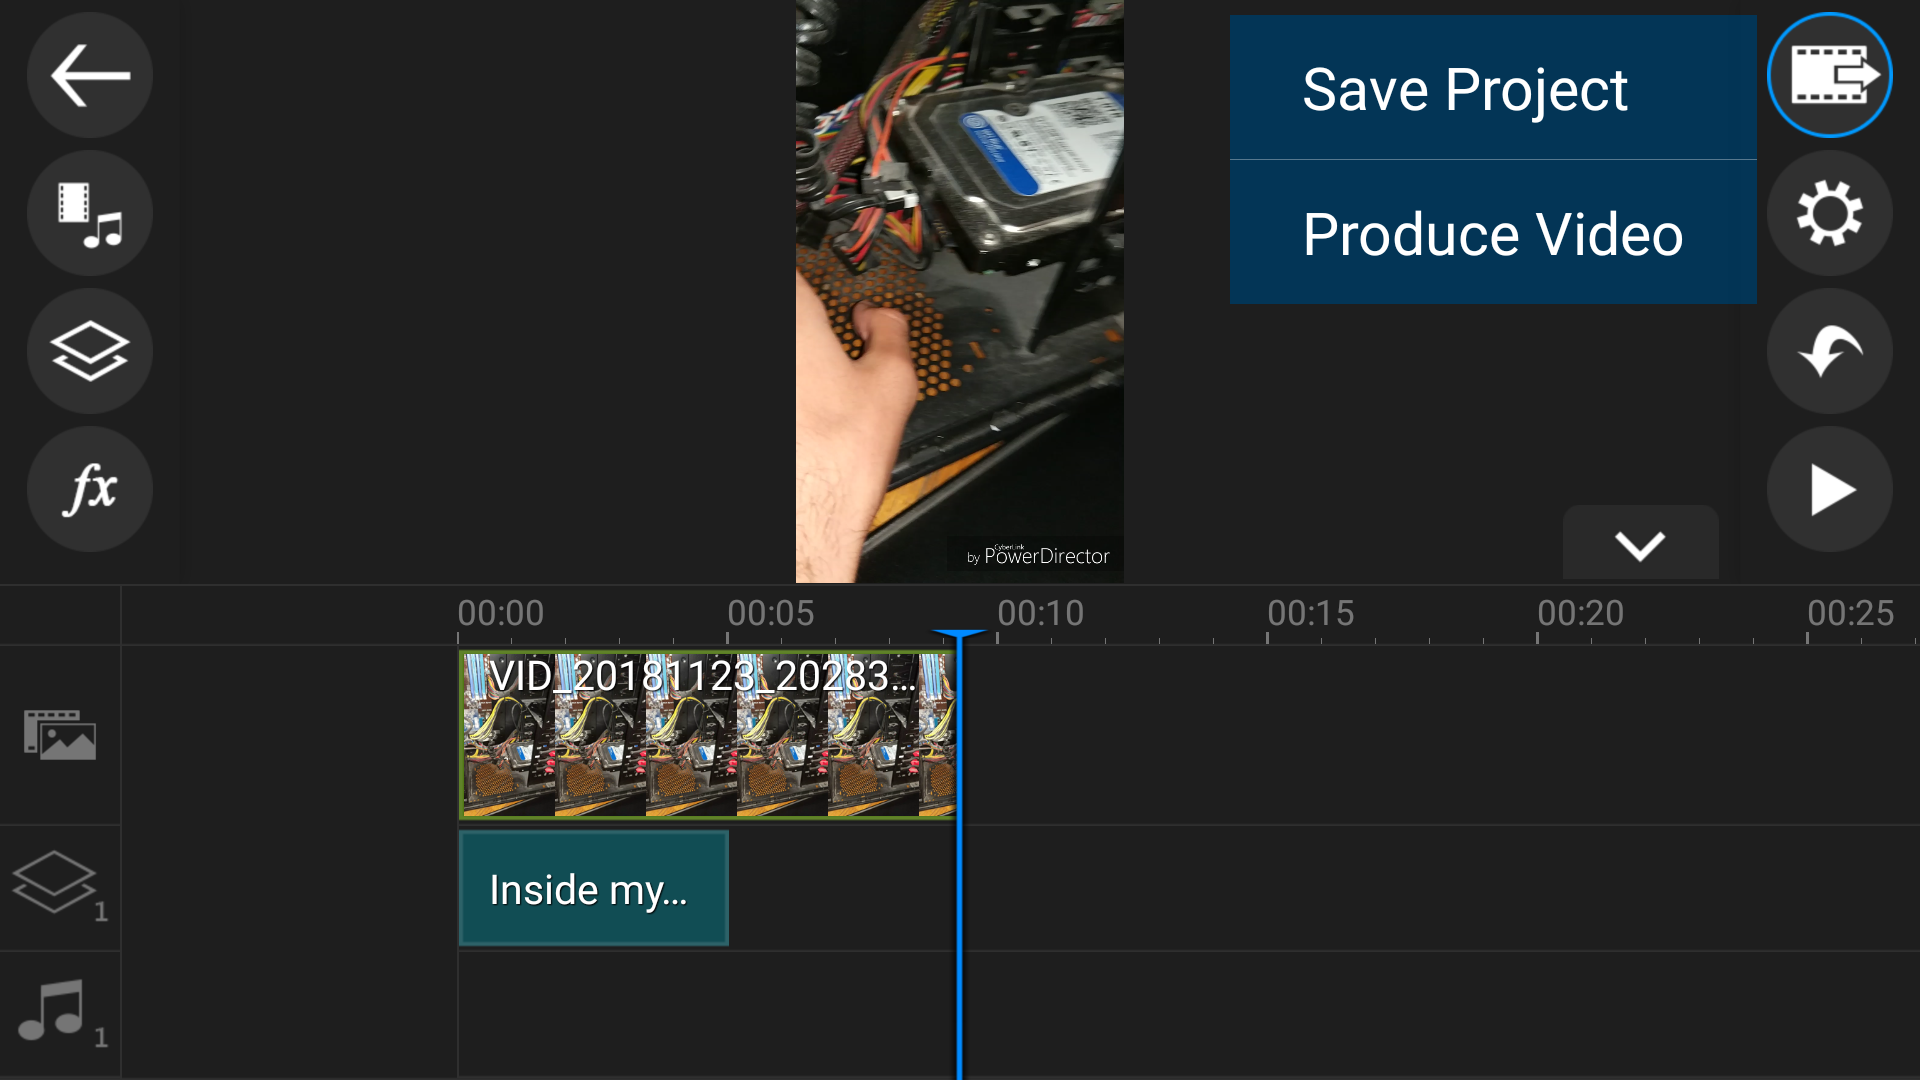
While the app doesn’t have a lot of fancy features, it can handle all of the basic mobile video editing requirements quite alright. Open the app and you will be greeted with the new project interface. Tap on the blue frame located right next to the ad, name the project, select the appropriate aspect ratio and you’ll be good to go.

With respect to the aspect ratio, for our less techy readers, select the 16:9 aspect ratio if the video you wish to edit was shot horizontally and 9:16 if the video was shot vertically.

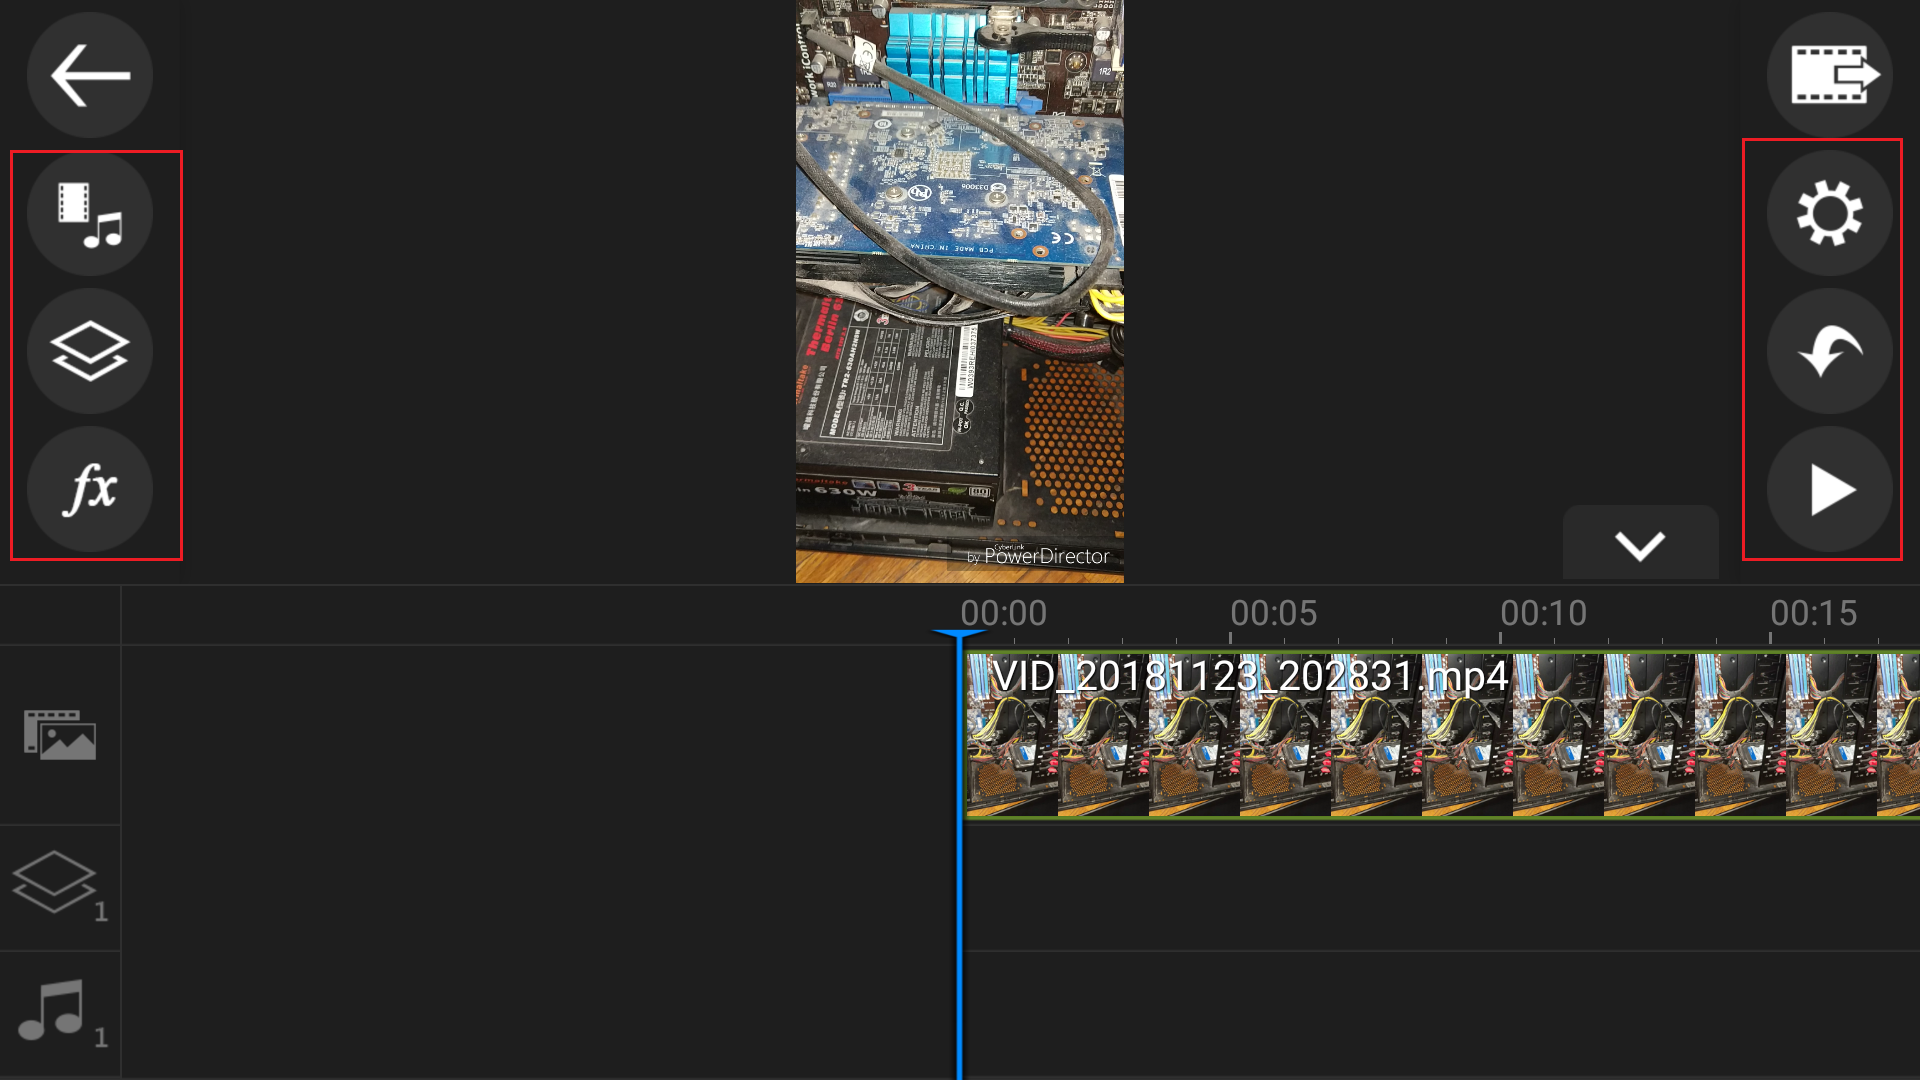
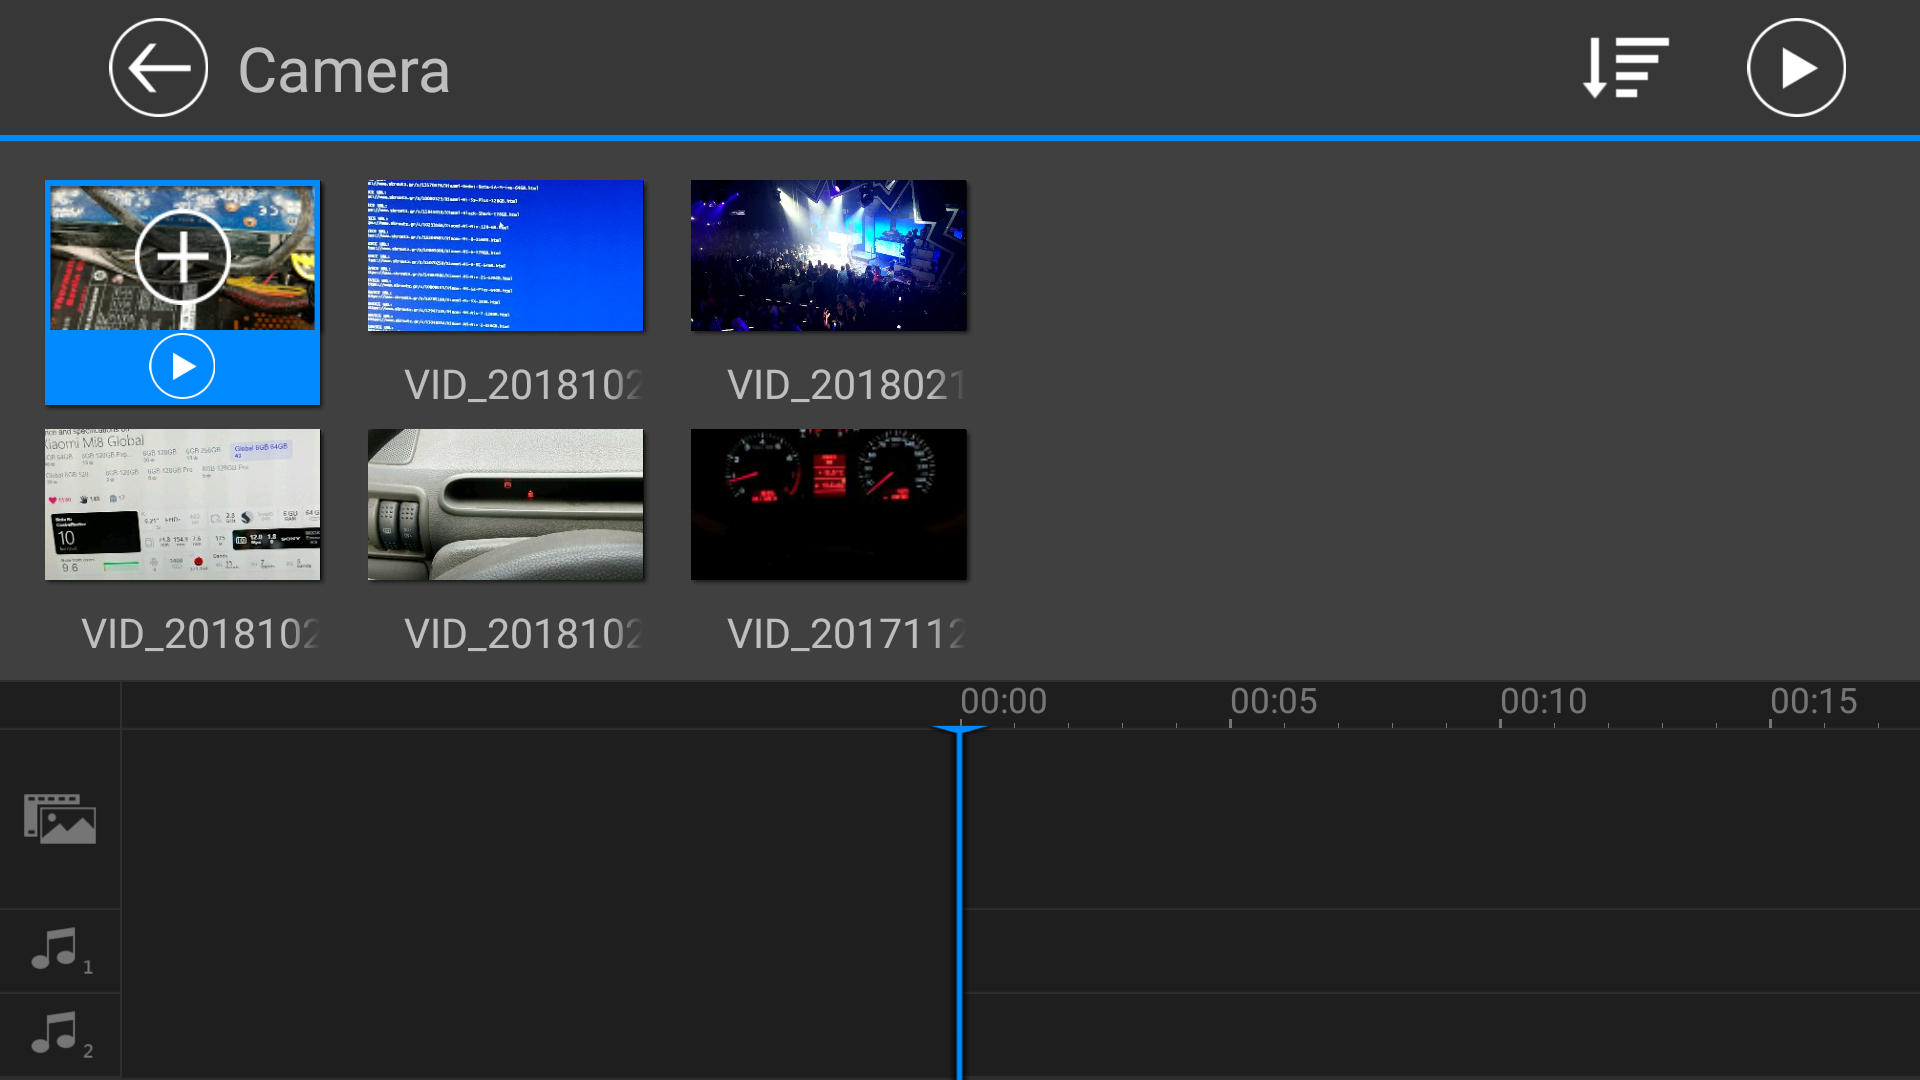
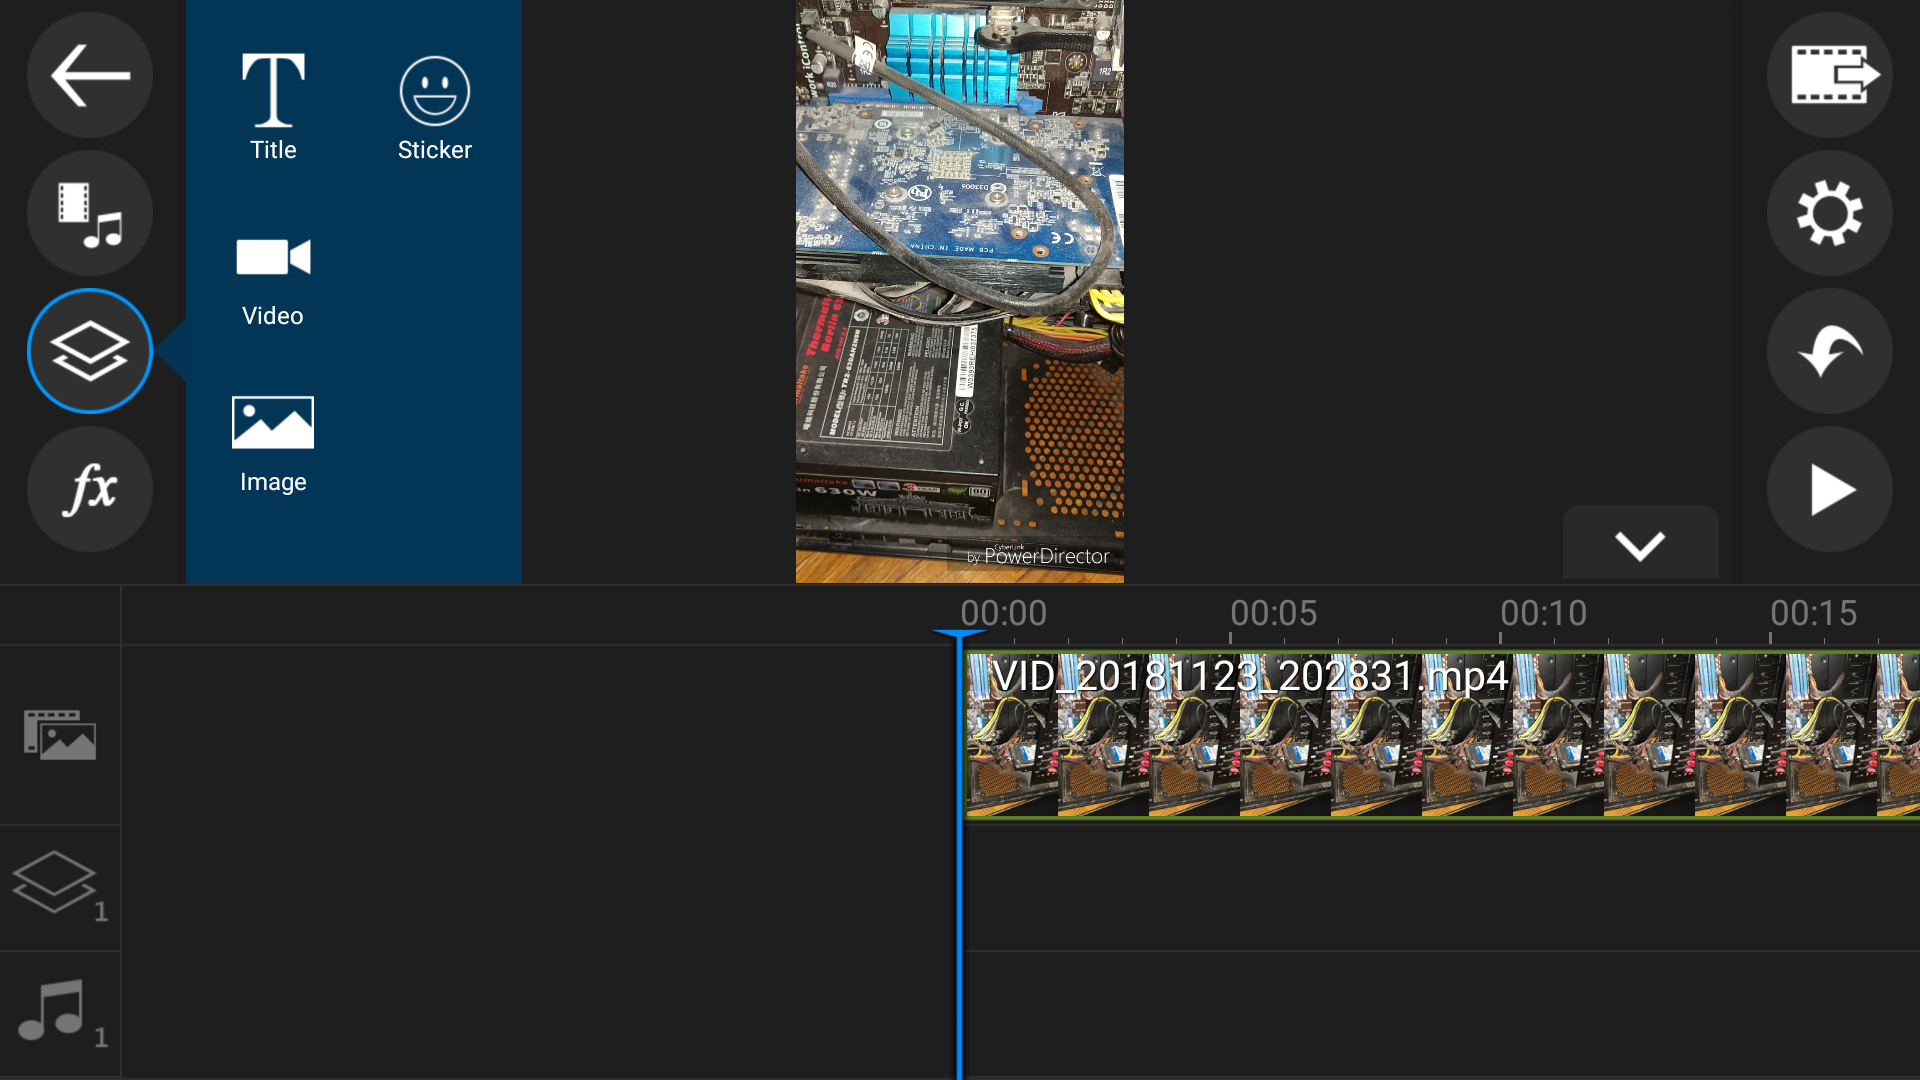
Once that has been taken care of, select the second icon from the left icon-column to add the video you wish to edit. You can select a video from your phone’s gallery, or record one.

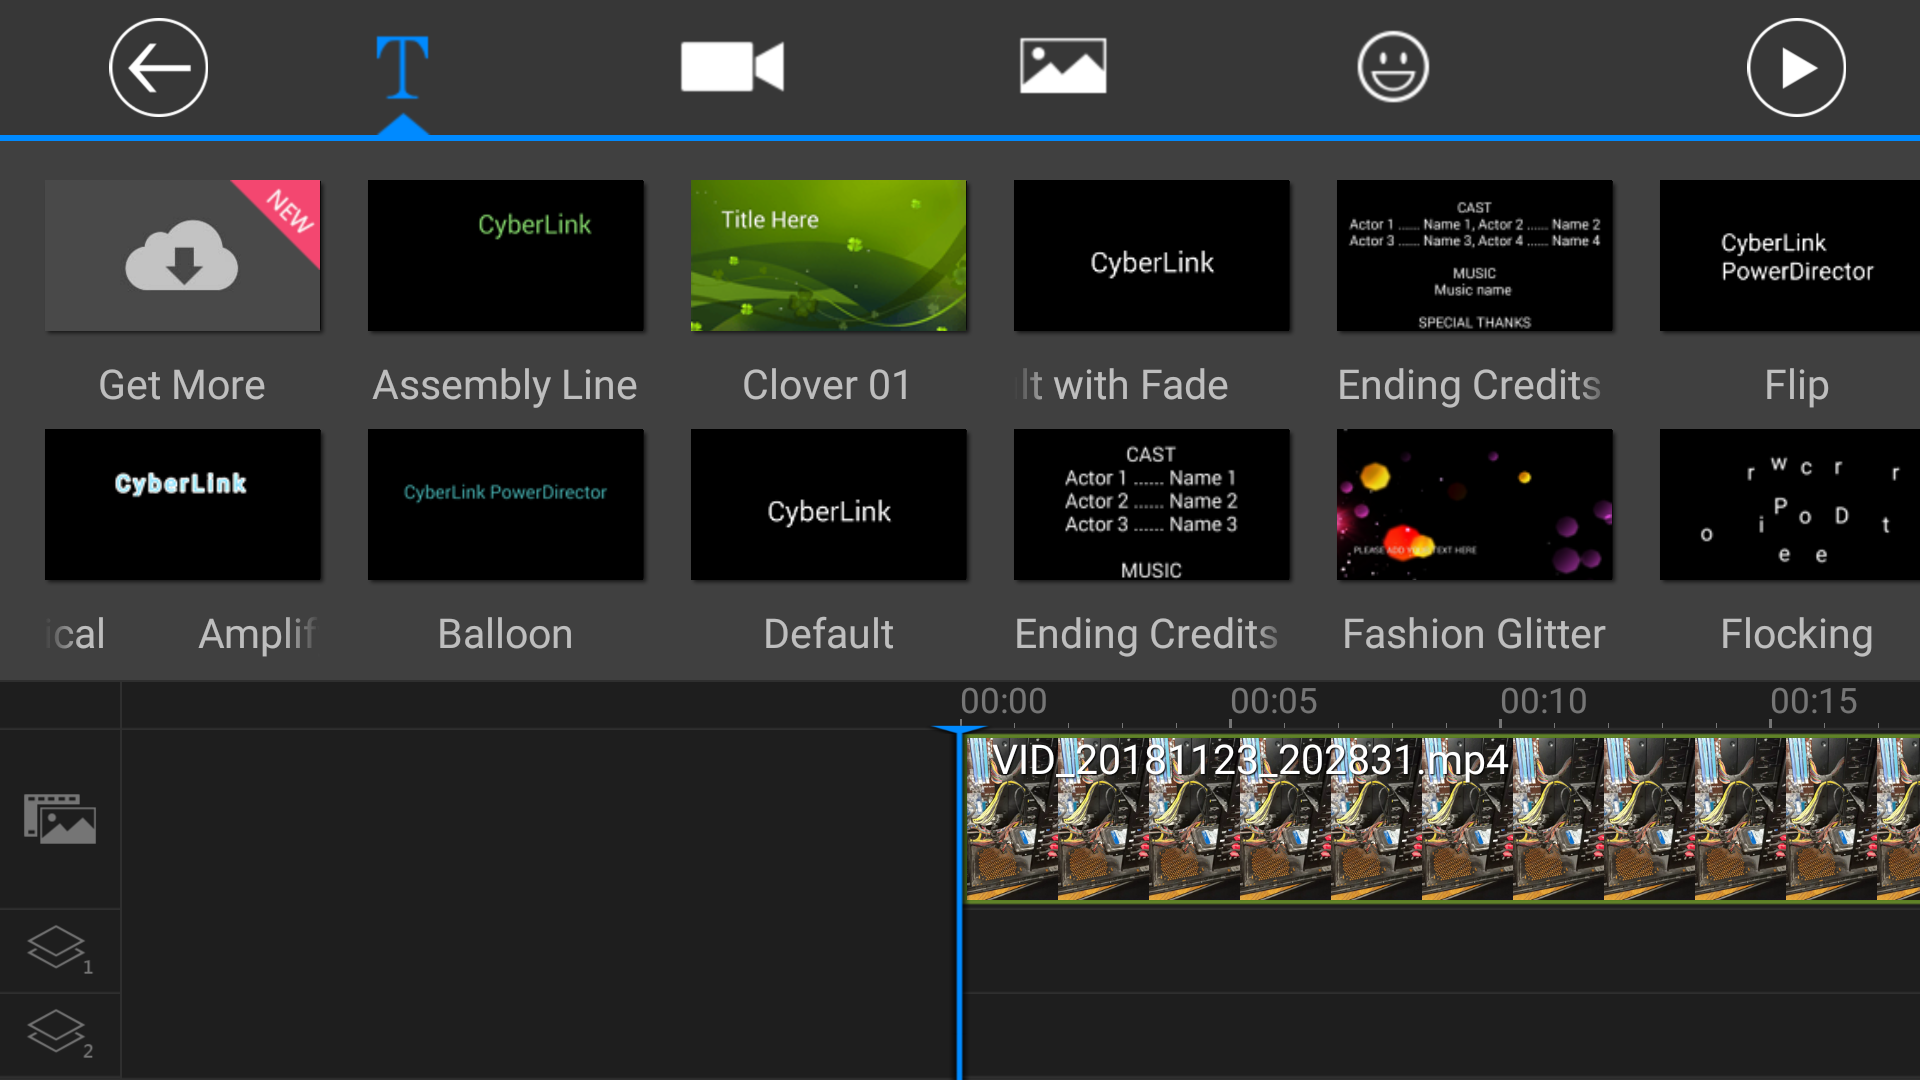
To embellish your video by adding animated text, stickers or images, tap on the left column’s third button. If you select the ‘Title’ option, you’ll find a wide range of animated text options. For instance, if you are shooting a short sketch, you could use the ending credits animation to list the names of the people that play in it.

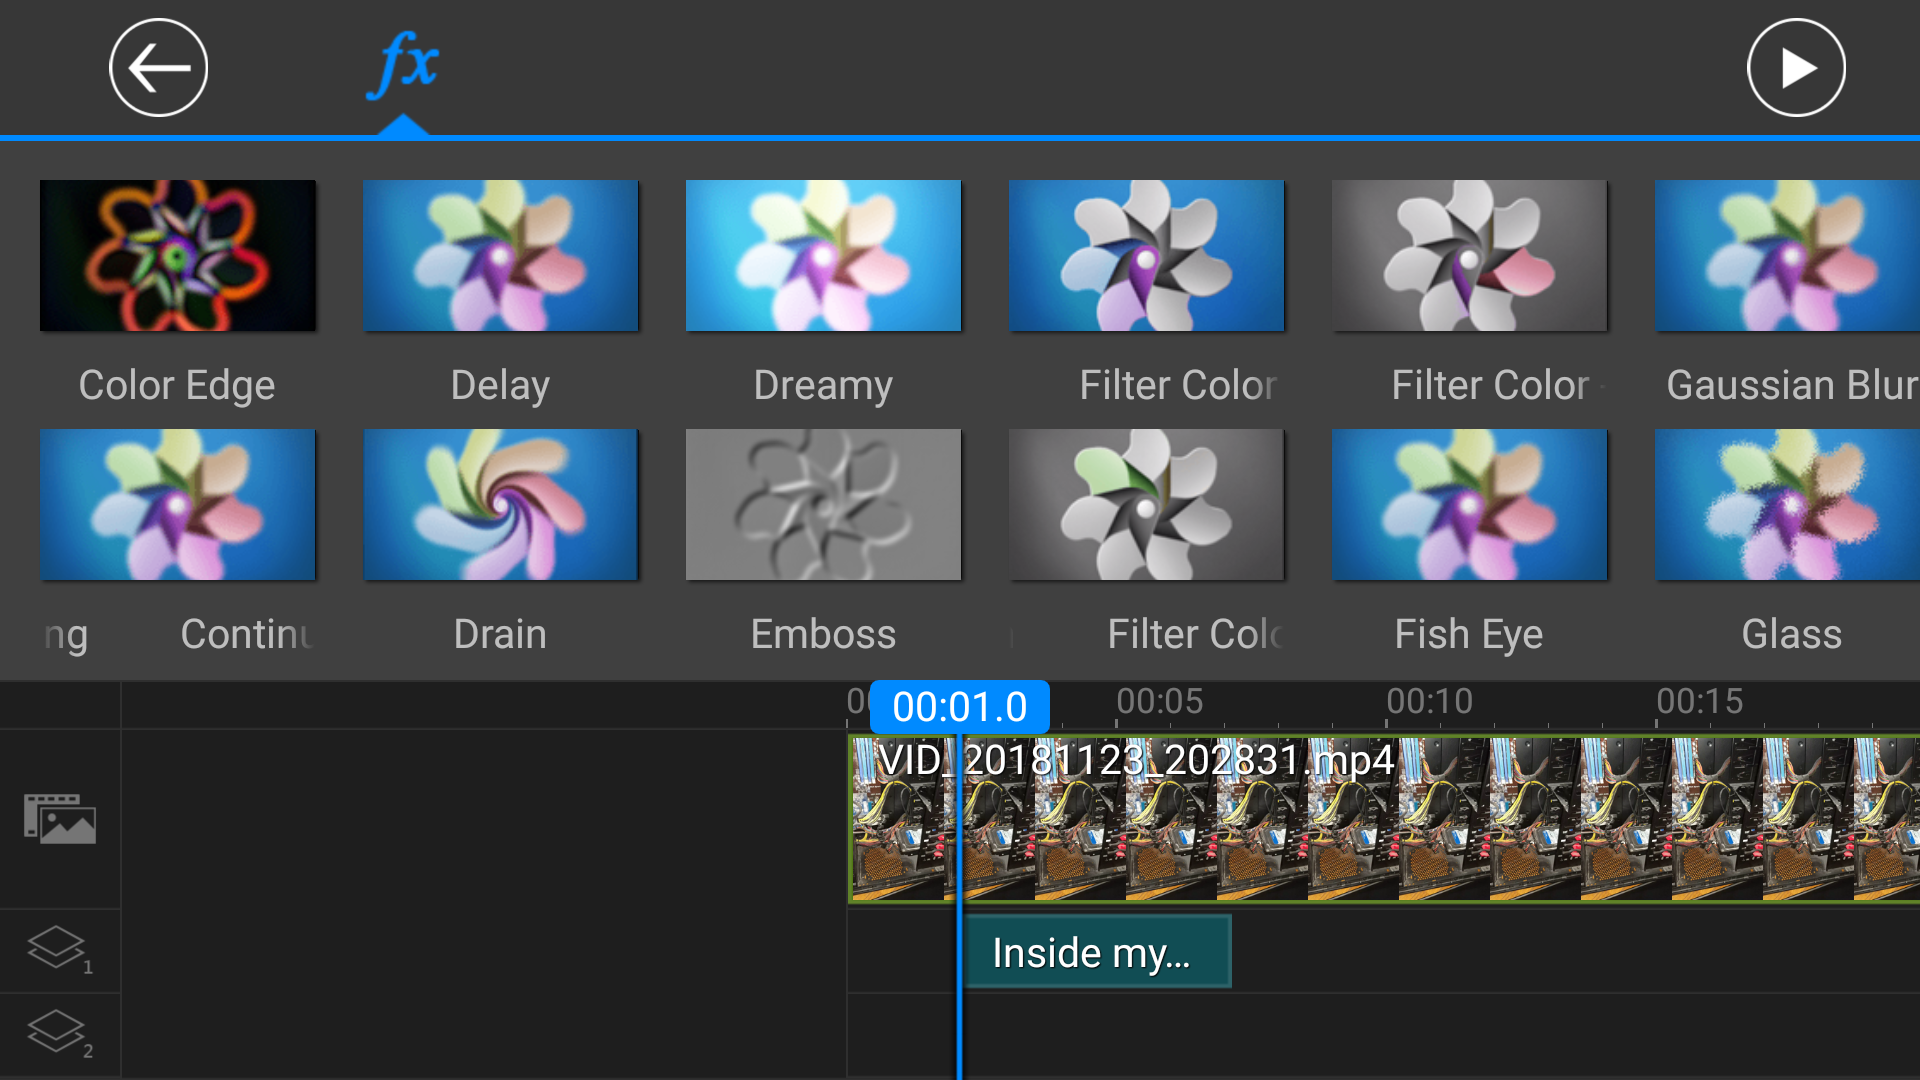
Select the ‘fx’ option to access the app’s wide variety of effects.

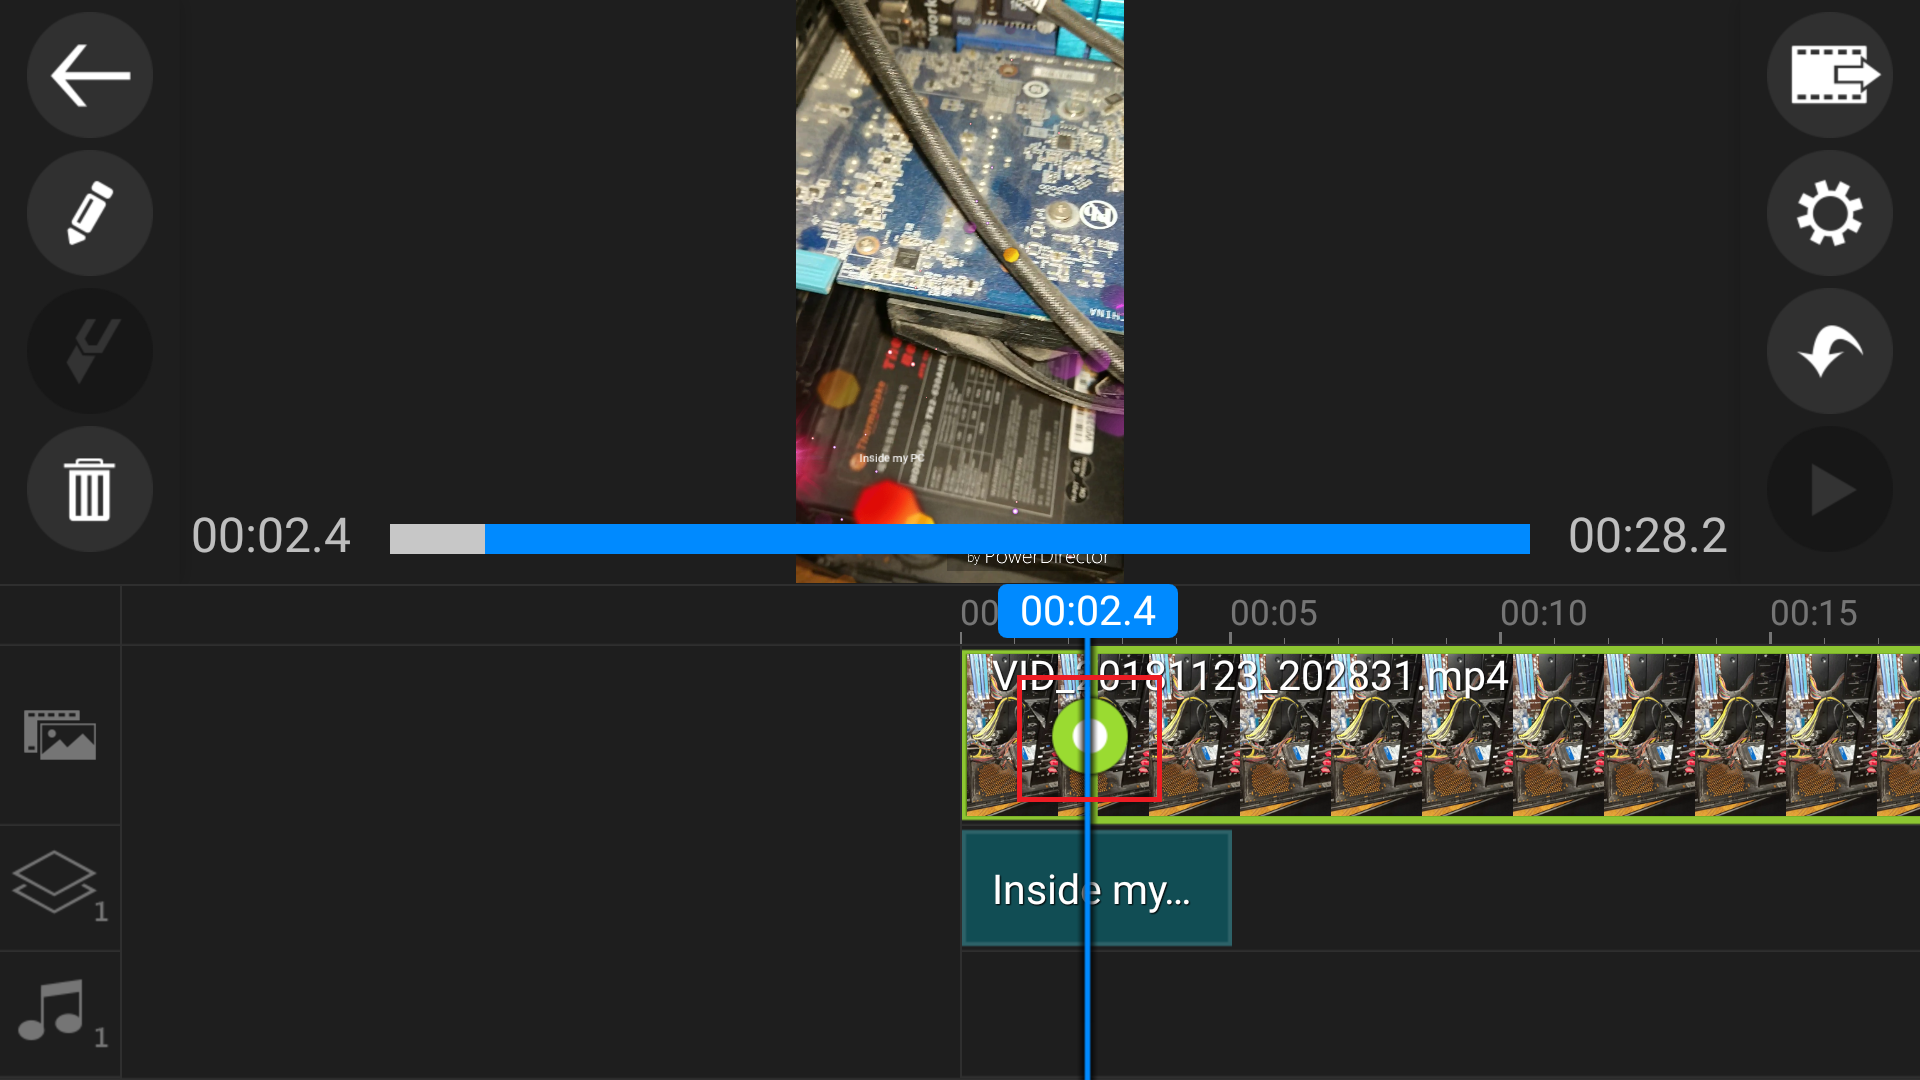
To trim a video with PowerDirector, all you have to do is tap on the video’s frames located in the bottom end of the screen, and wait for a small green circle to emerge. Once it does, drag the little circle left or right to adjust the trimming.

To save the project or export it, just tap on the right column’s first icon.

The premium option allows 4K video editing and export, watermark removal and a wider range of effects and animated text options. A seven-day free trial is available.

App #2: InShot

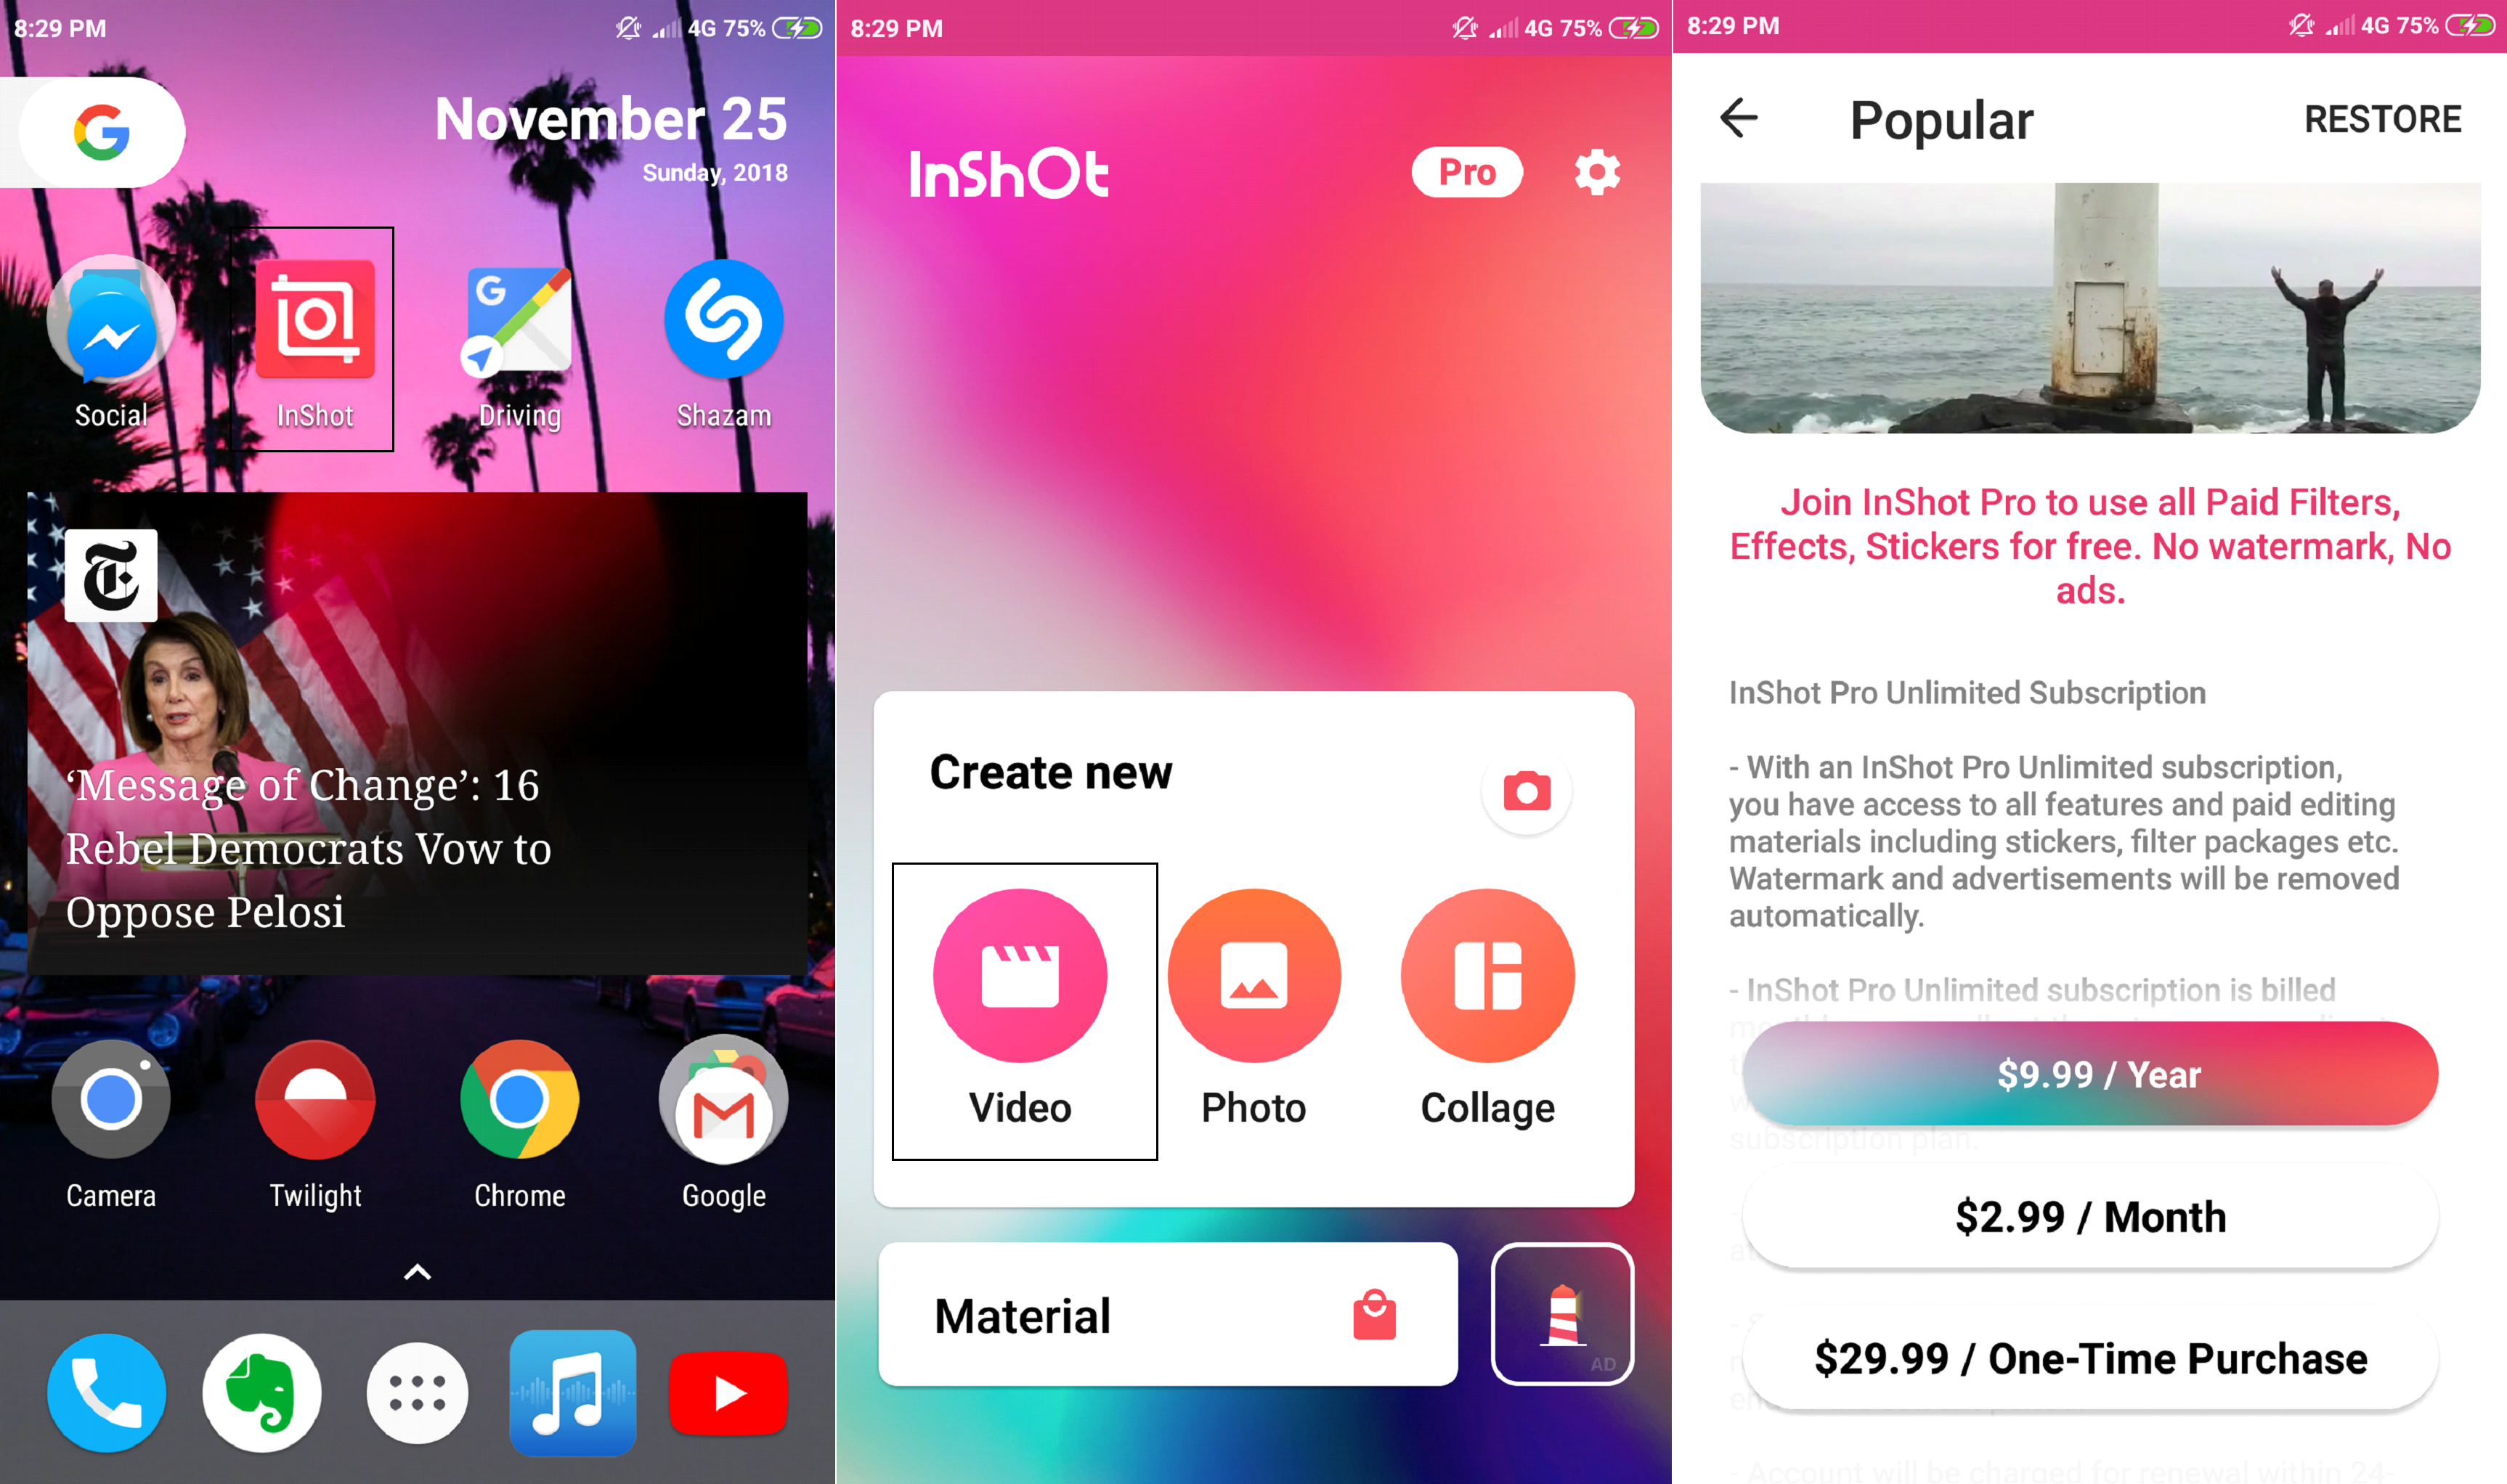
InShot is another excellent video editing option for Android, which is also free on PlayStore.

Download:

Unlike the previous app, InShot has a very elegant and user-friendly design. Open the app and select the video option. Photo editing is also available.

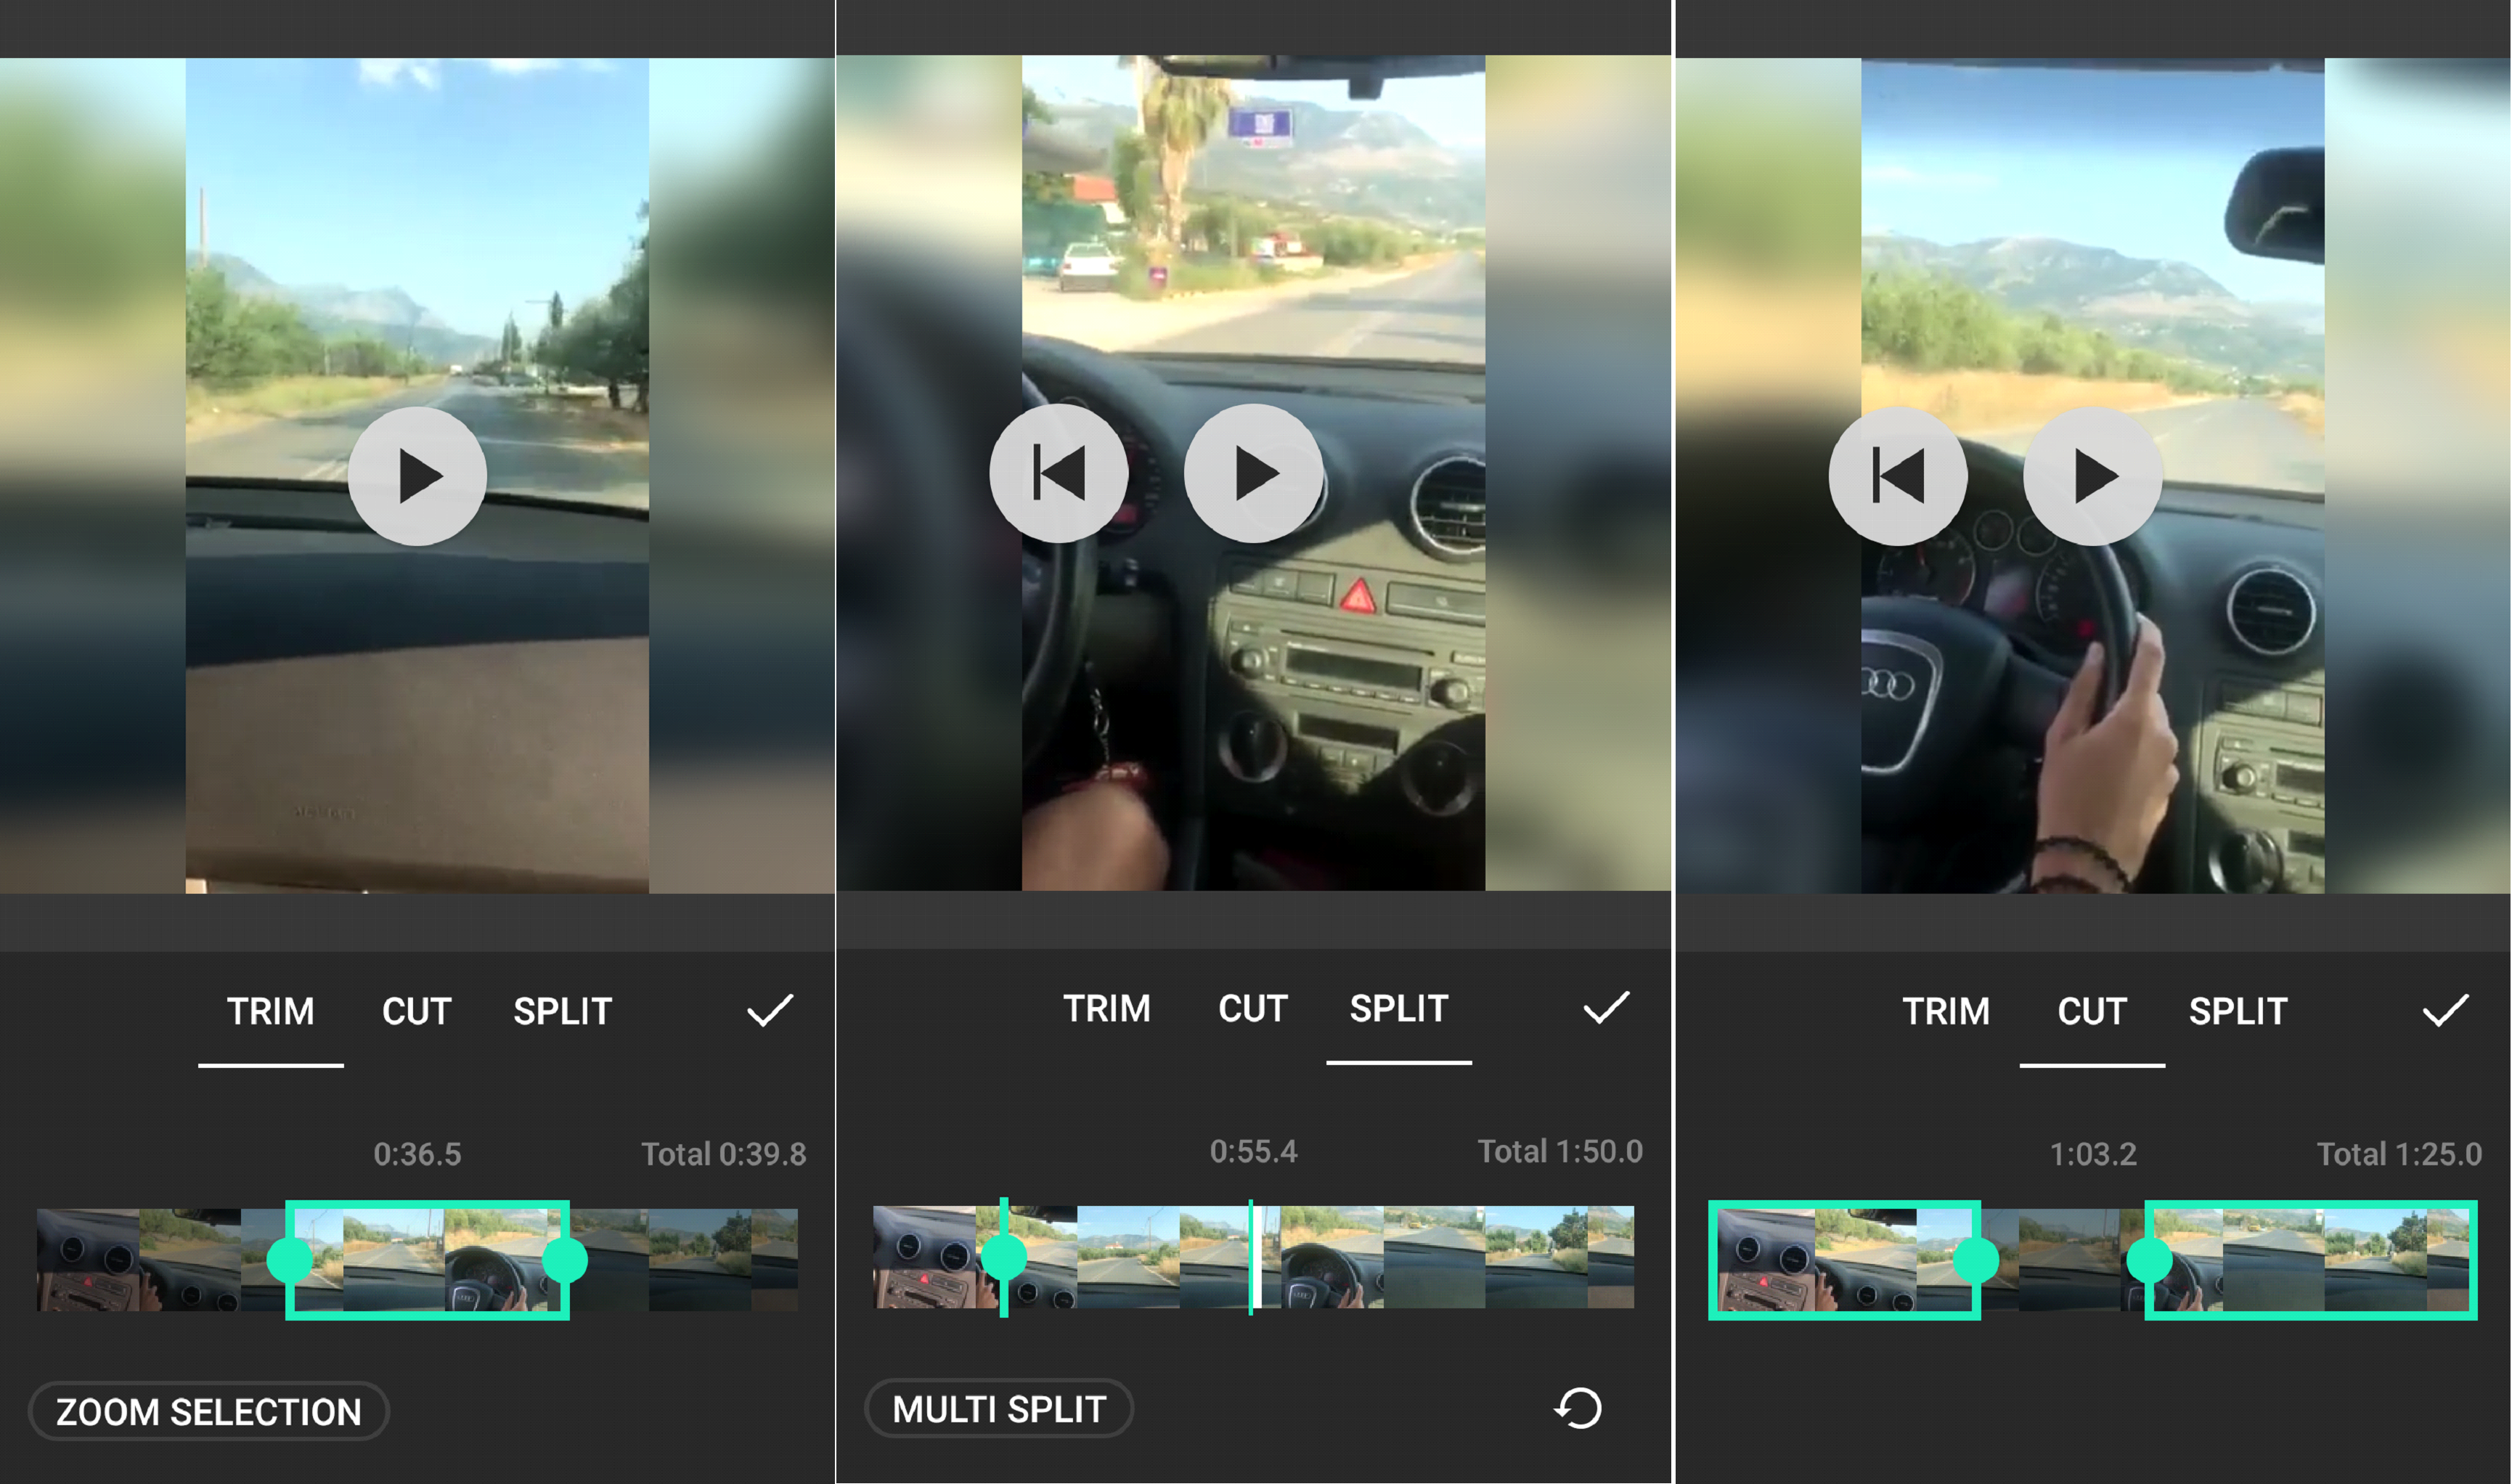
Starting with the most highly-requested feature for mobile video editing apps, trimming, InShot has got you more than covered. Besides the conventional trimming option, users can also cut the video into two different pieces and merge it, or split it into multiple cuts and merge them as well.

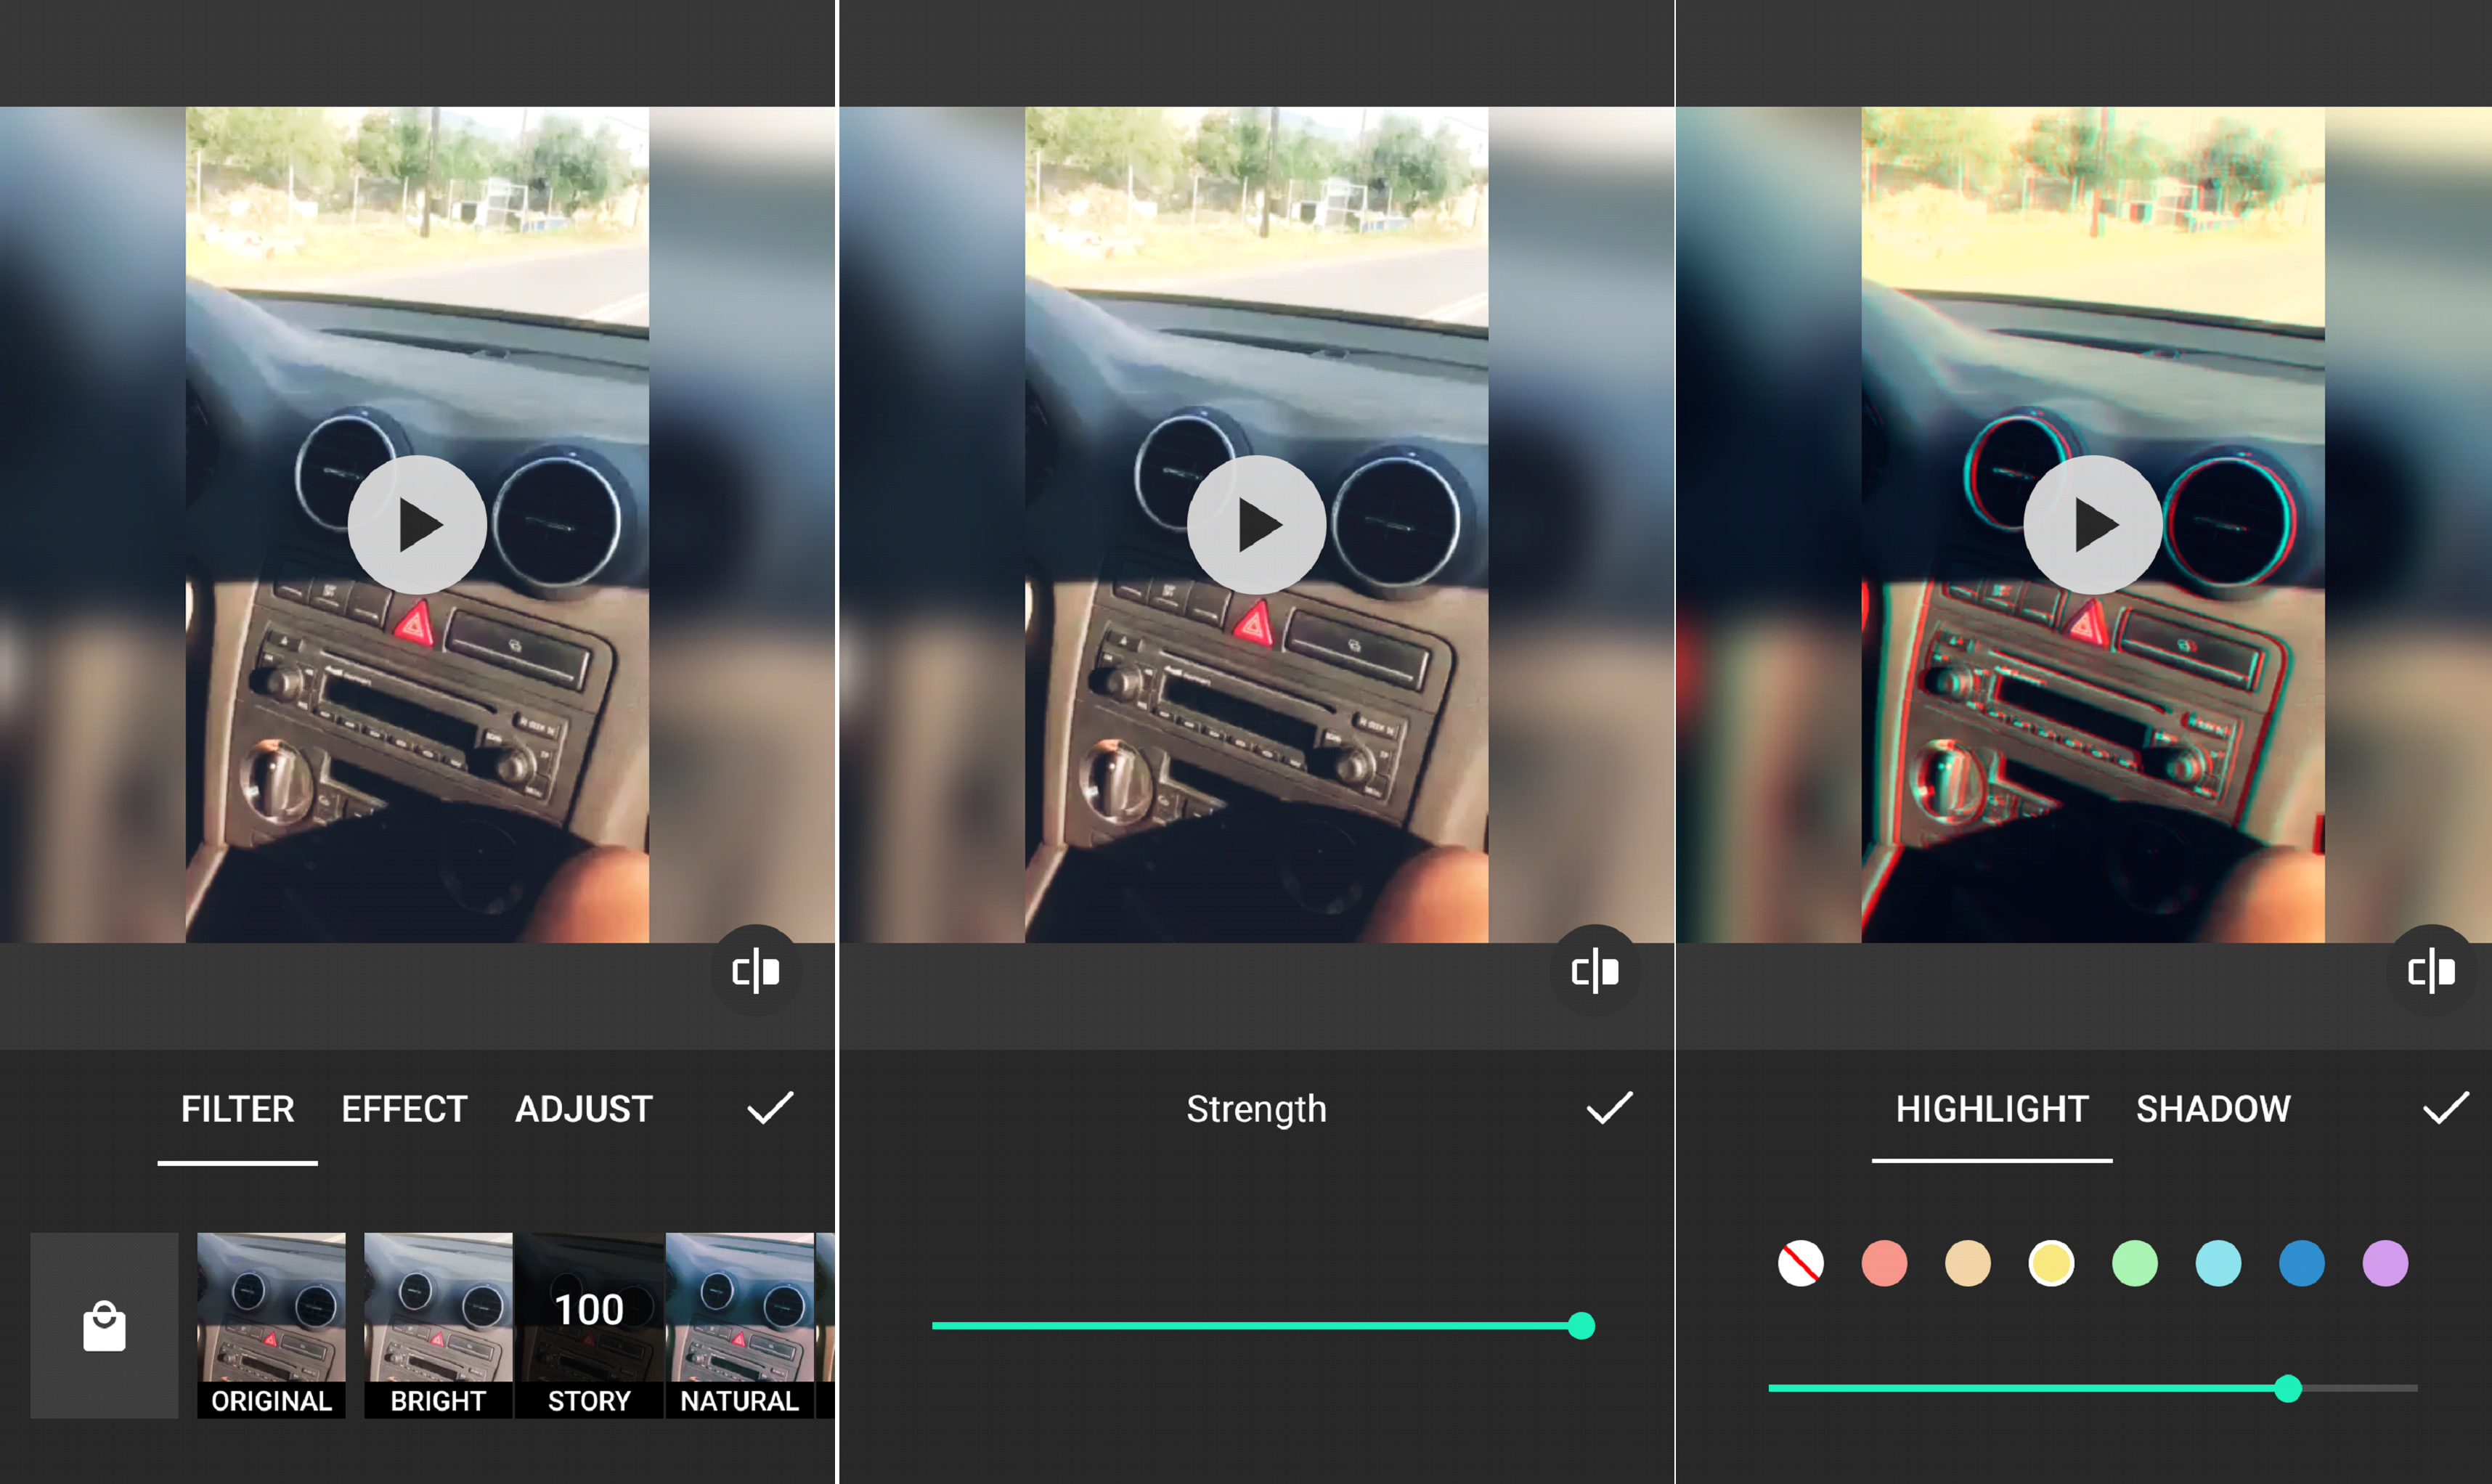
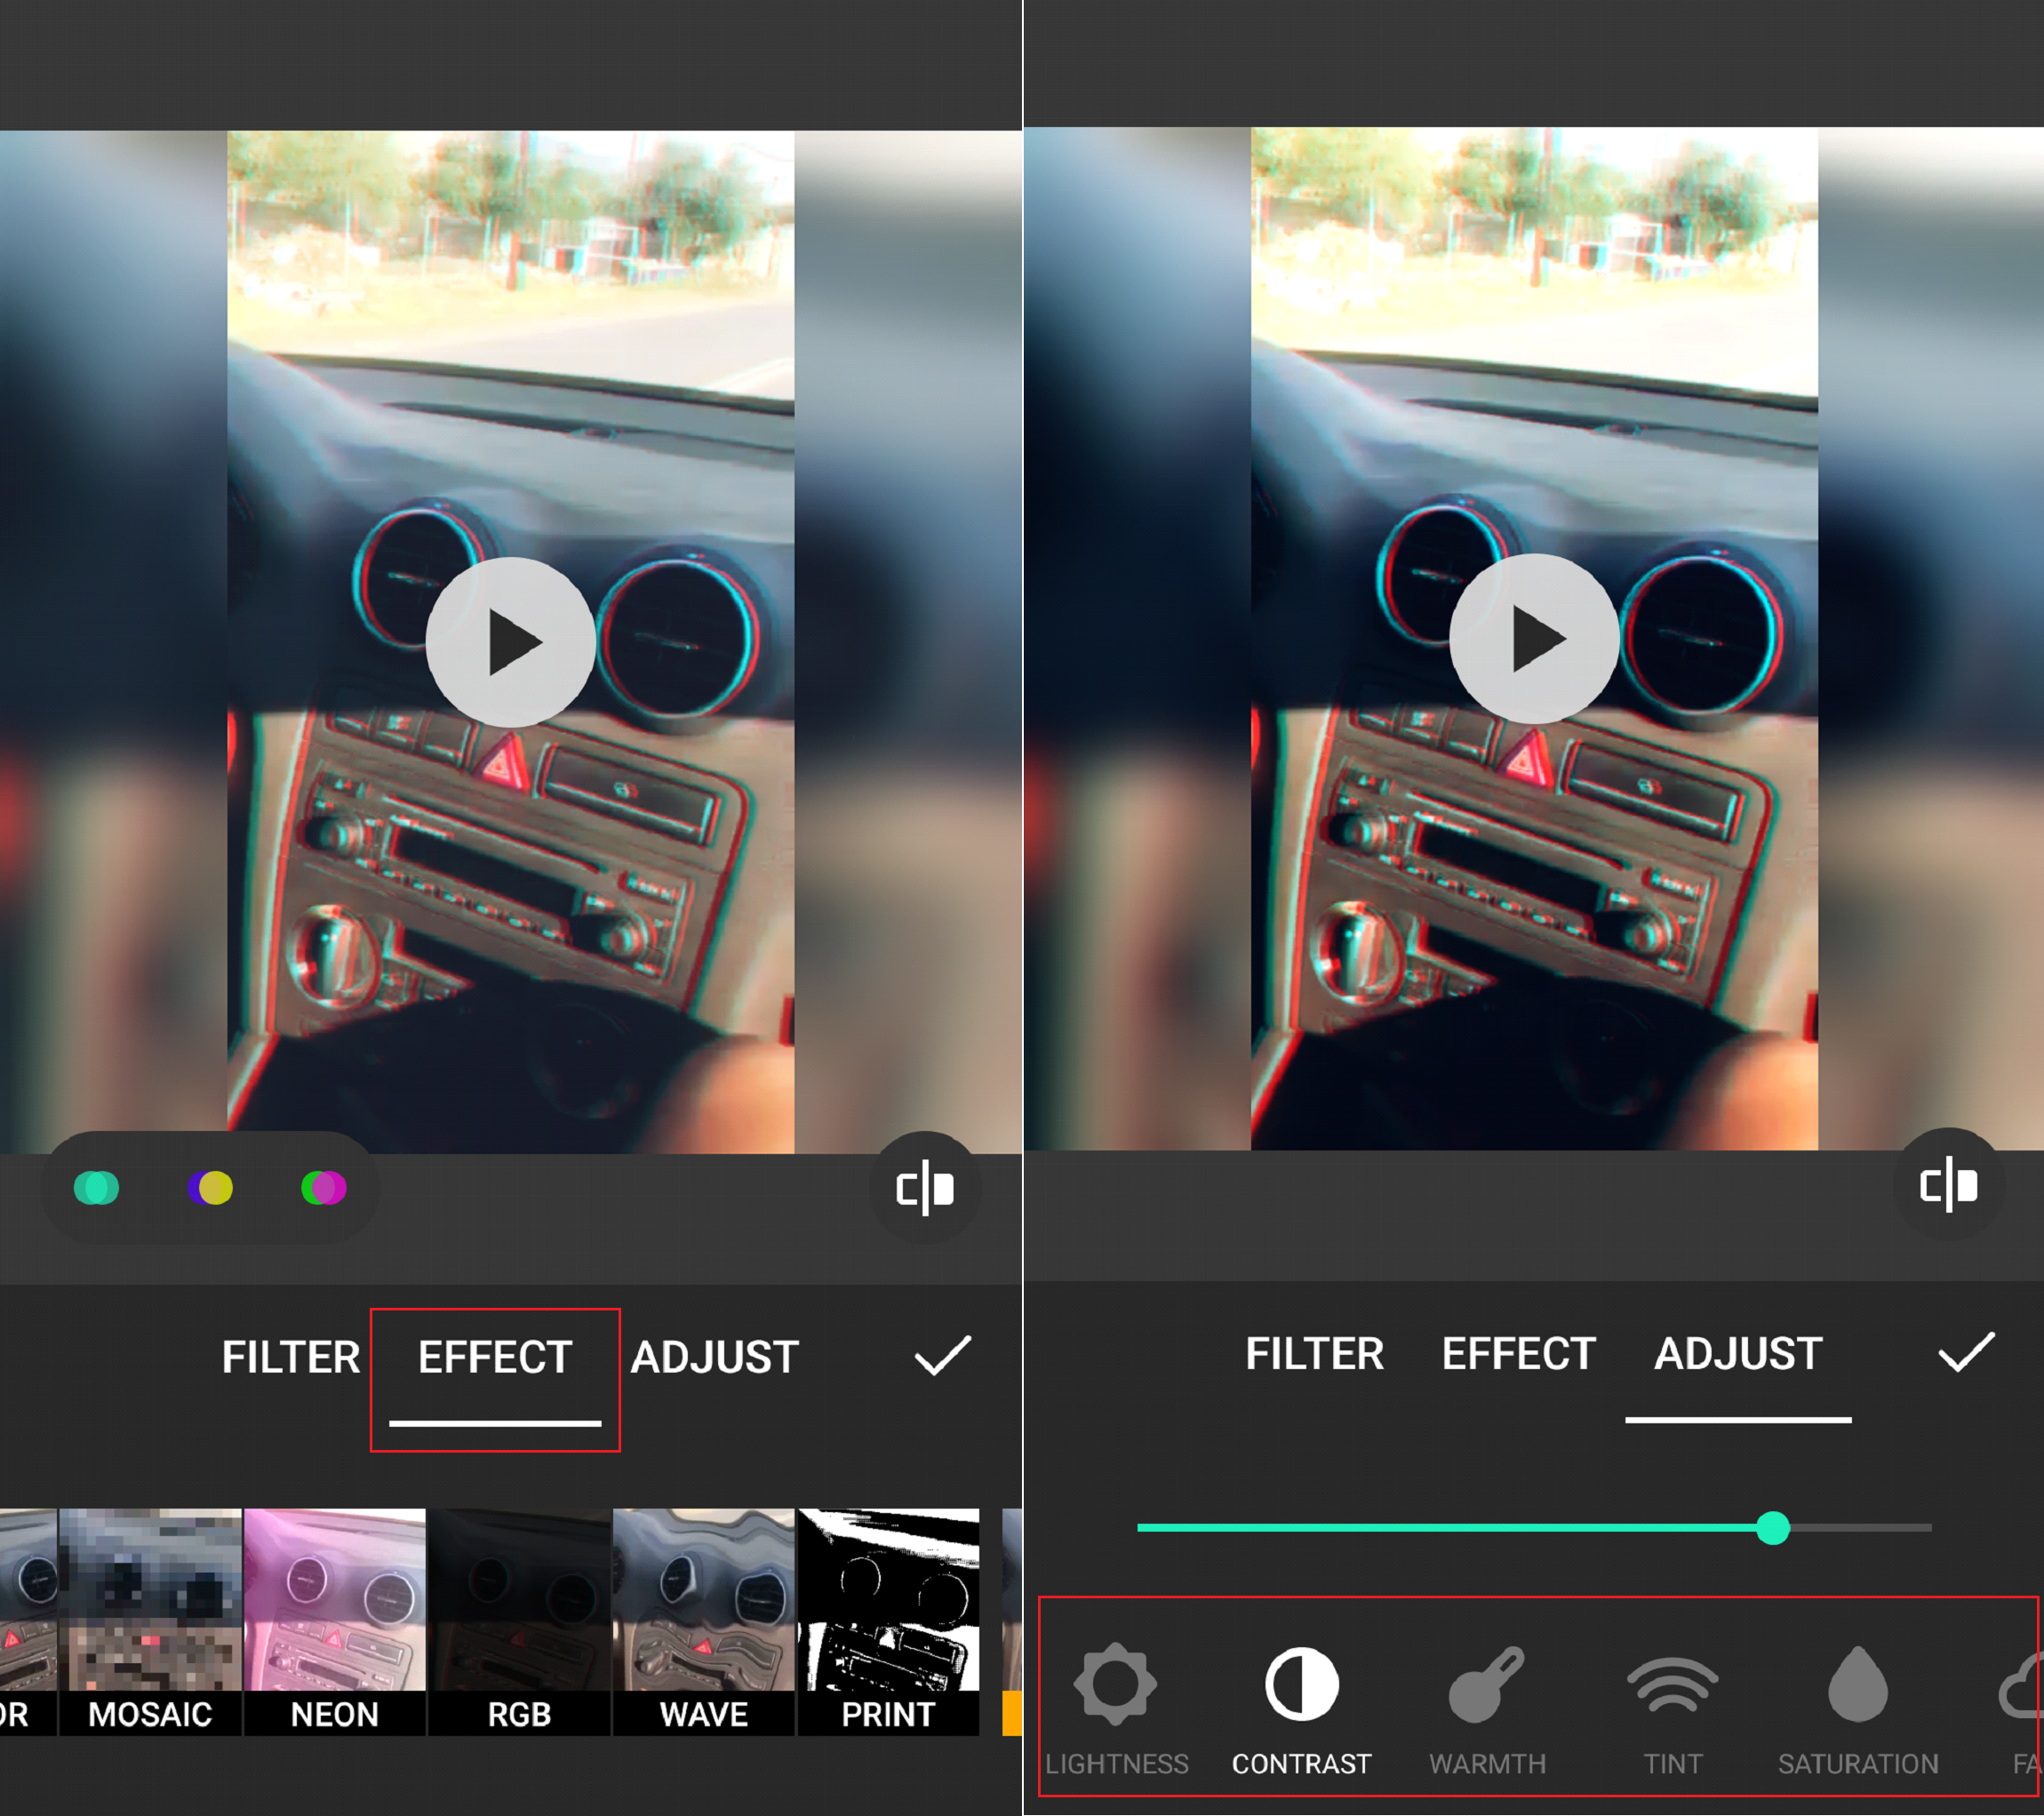
The app features a wide range of filters and effects that one could choose from. What’s impressive though, is how comprehensive the adjustability of both is. Users can adjust everything from contrast and warmth, to lightness and the color of the shadow in the background.

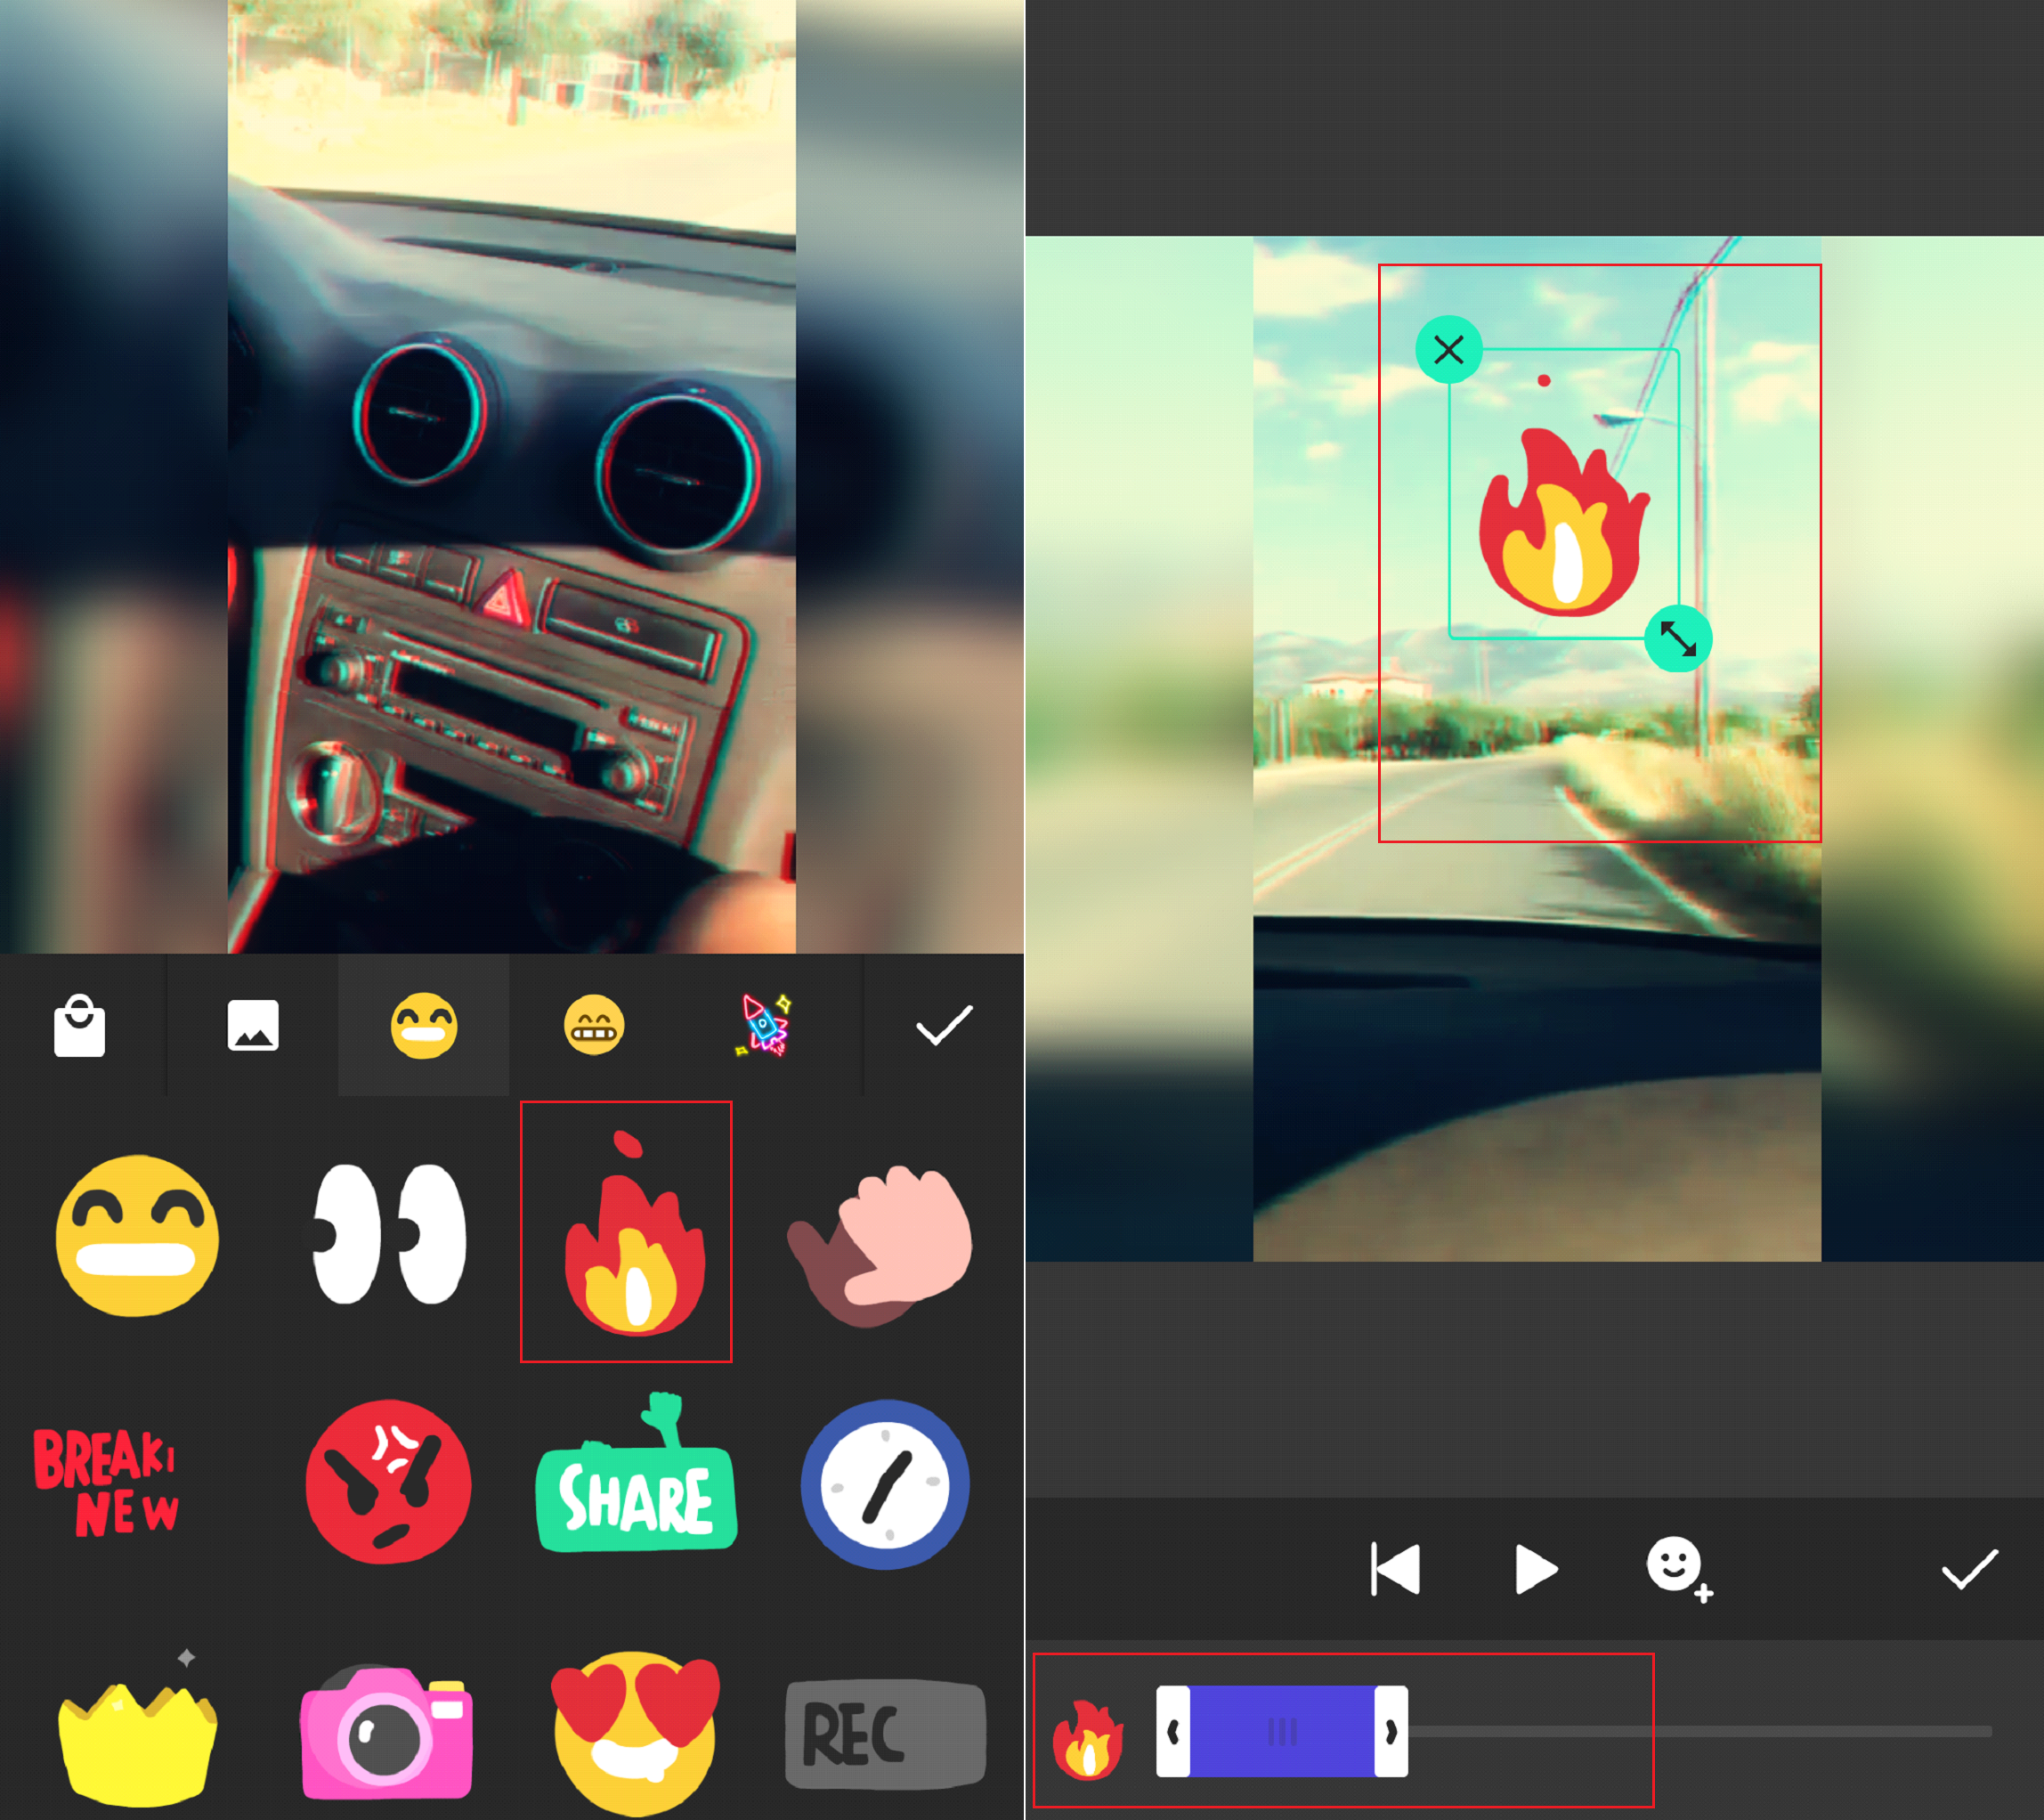
Much like Instagram stories, users can add colorful emoticons to their videos. You can adjust their size and how long they stay on screen.

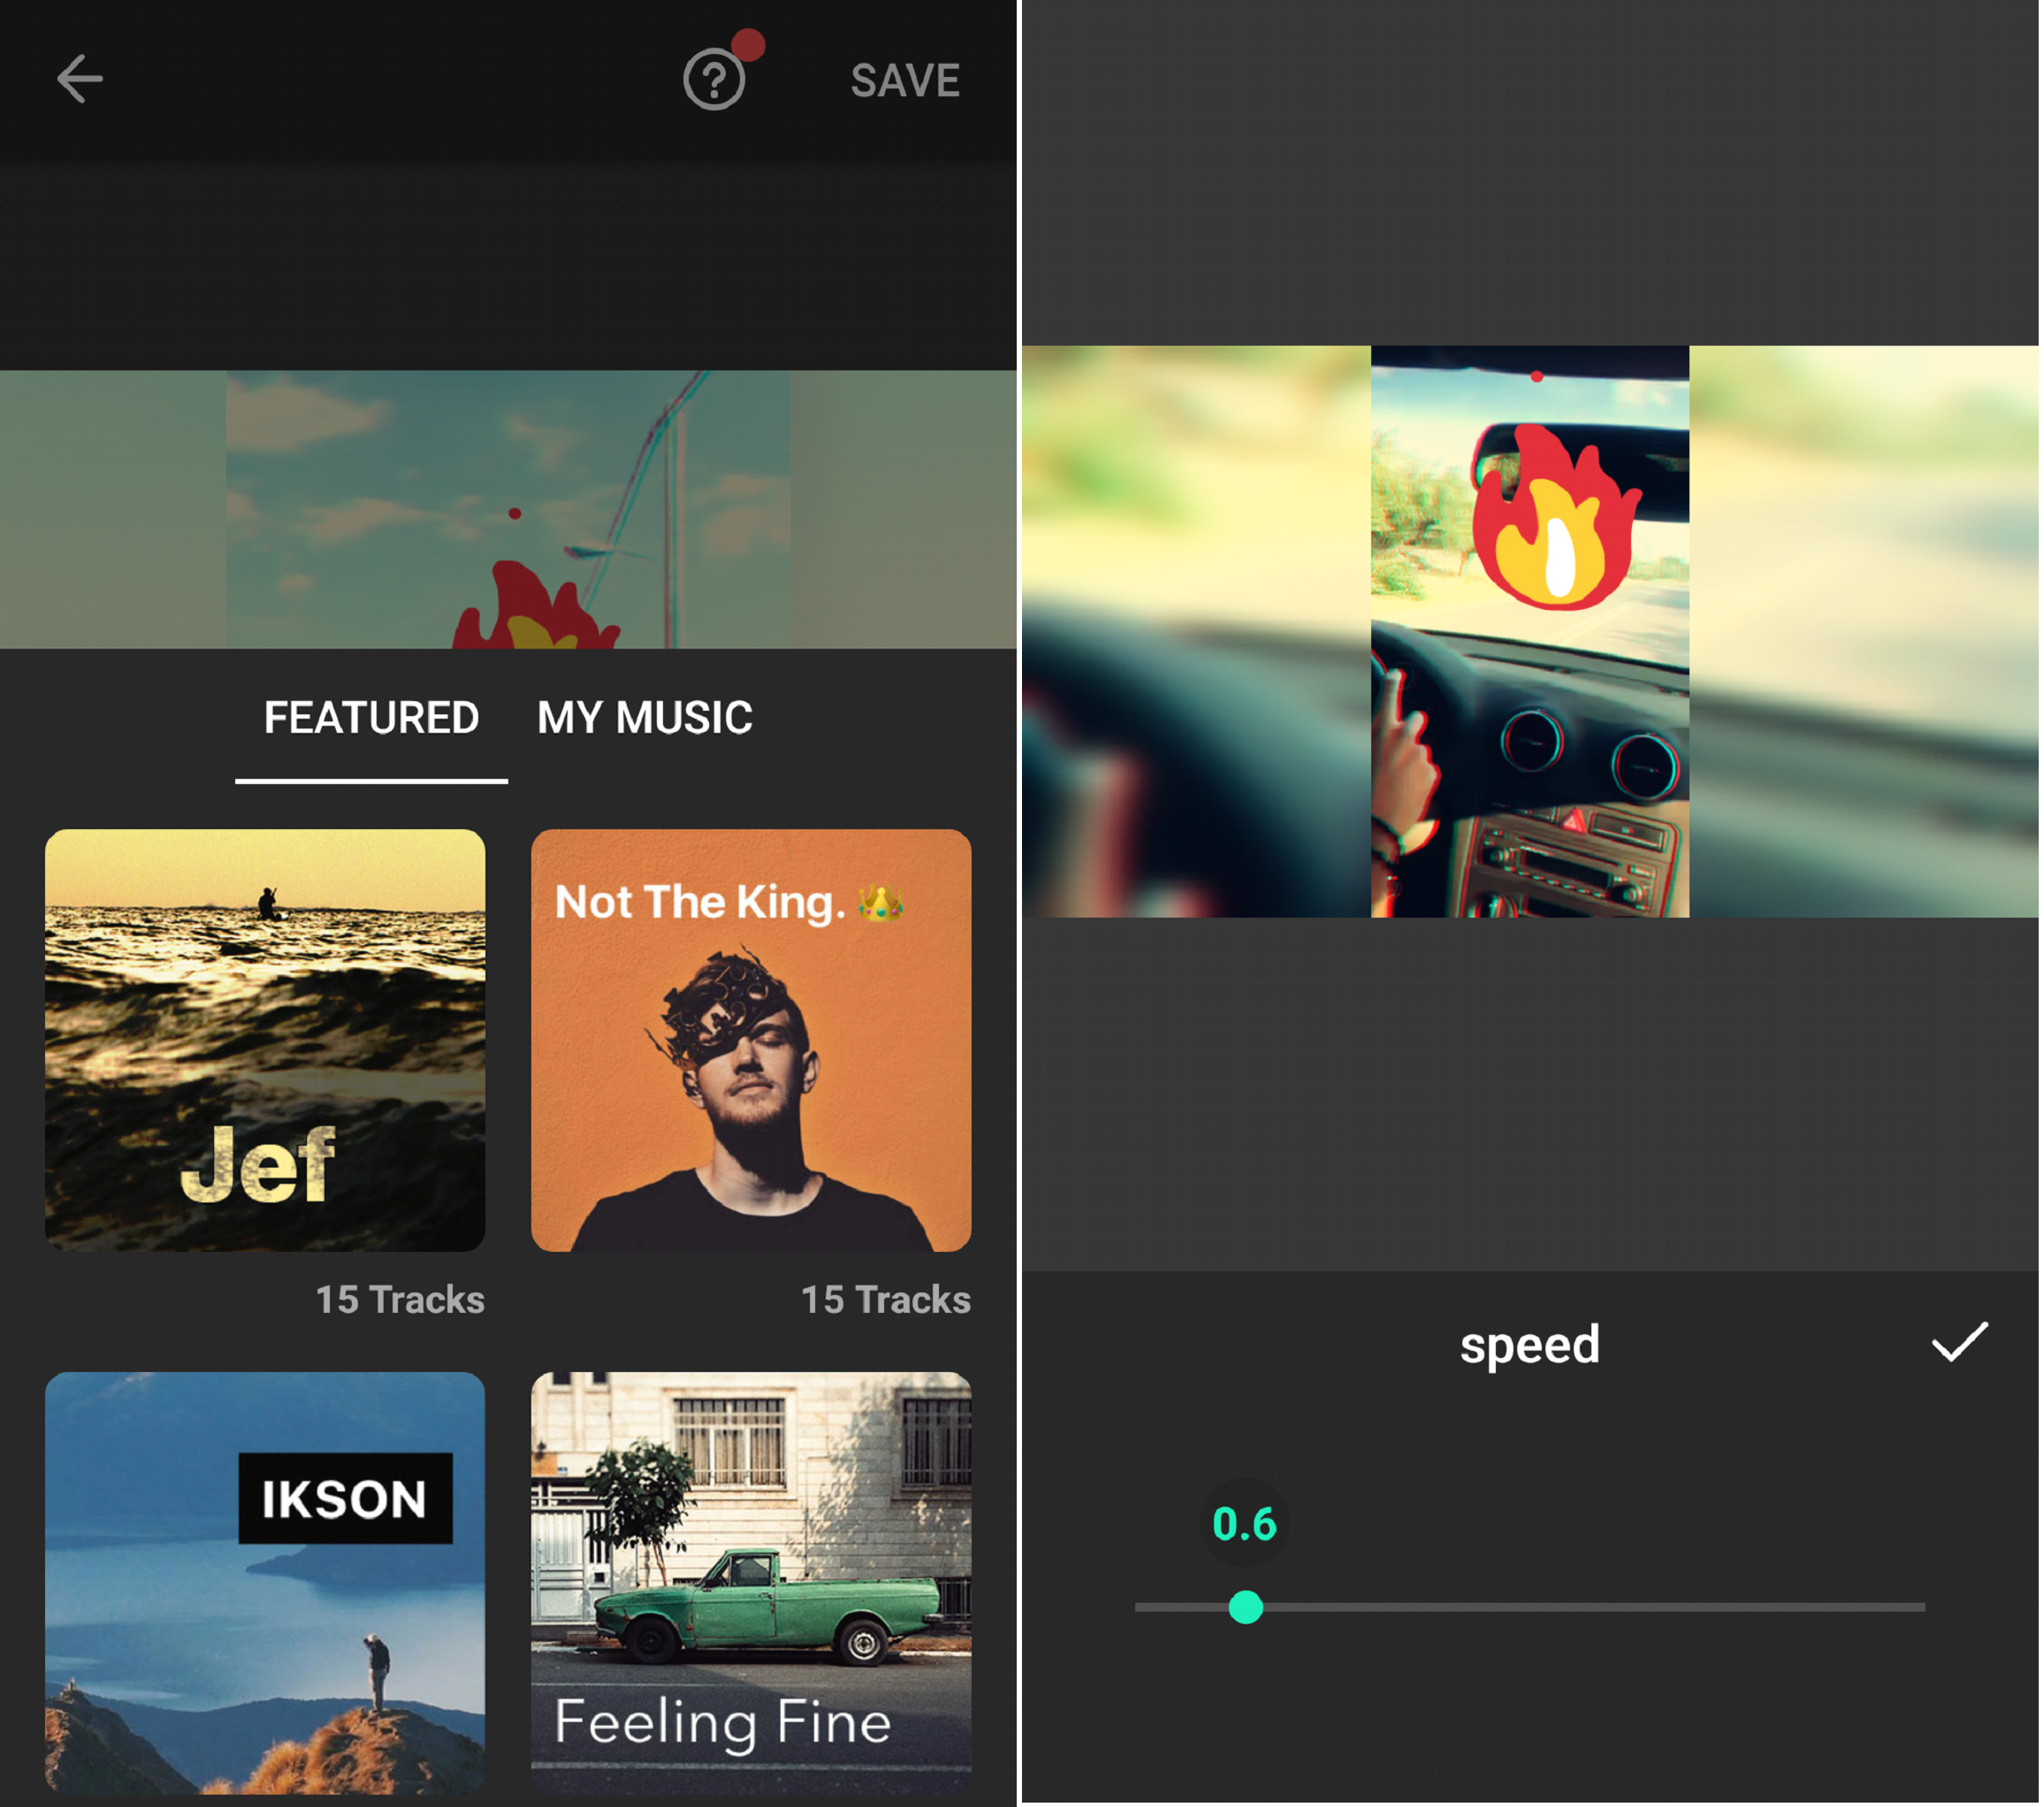
You can also add music to the background by either selecting a track from your music library or the app’s selection.

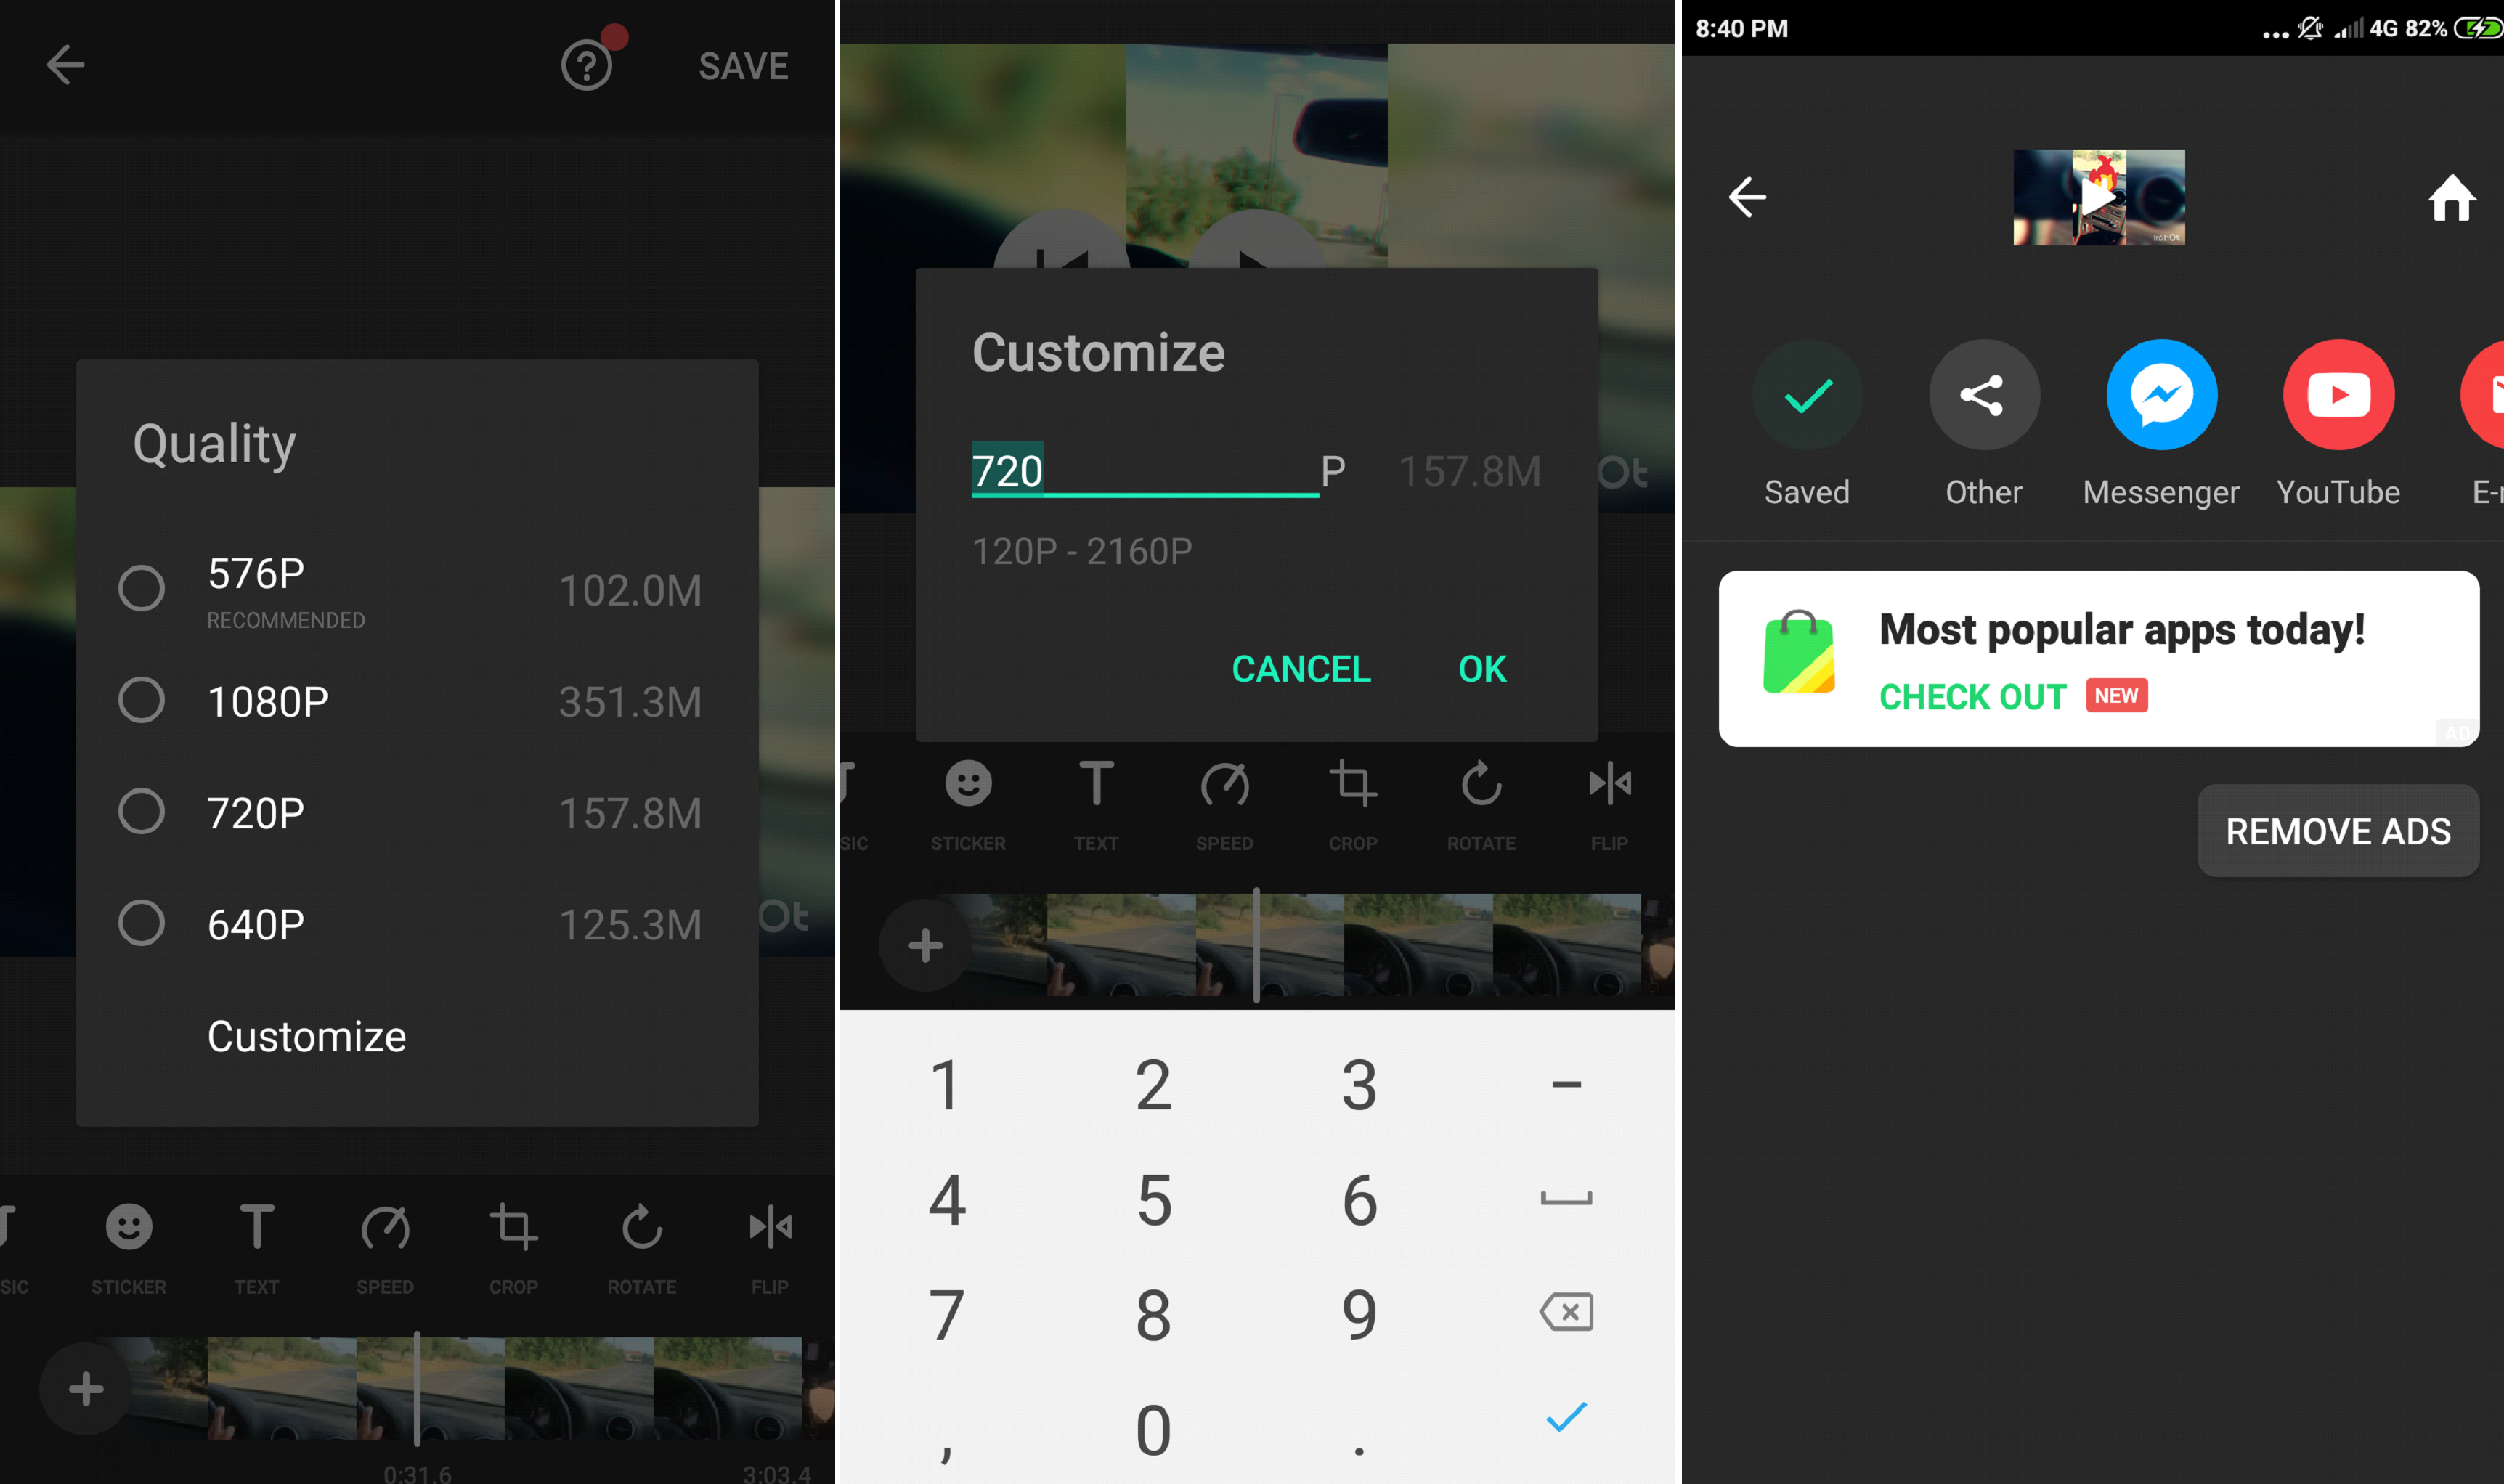
Once you are finished editing, hit the save button located in the top right-hand corner. You’ll then be asked to select the resolution on which you wish to export. While custom resolution is available, unless you are pretty confident about what you are doing, we’d strongly advise you to select one of the default options.

App #3: Videoshop

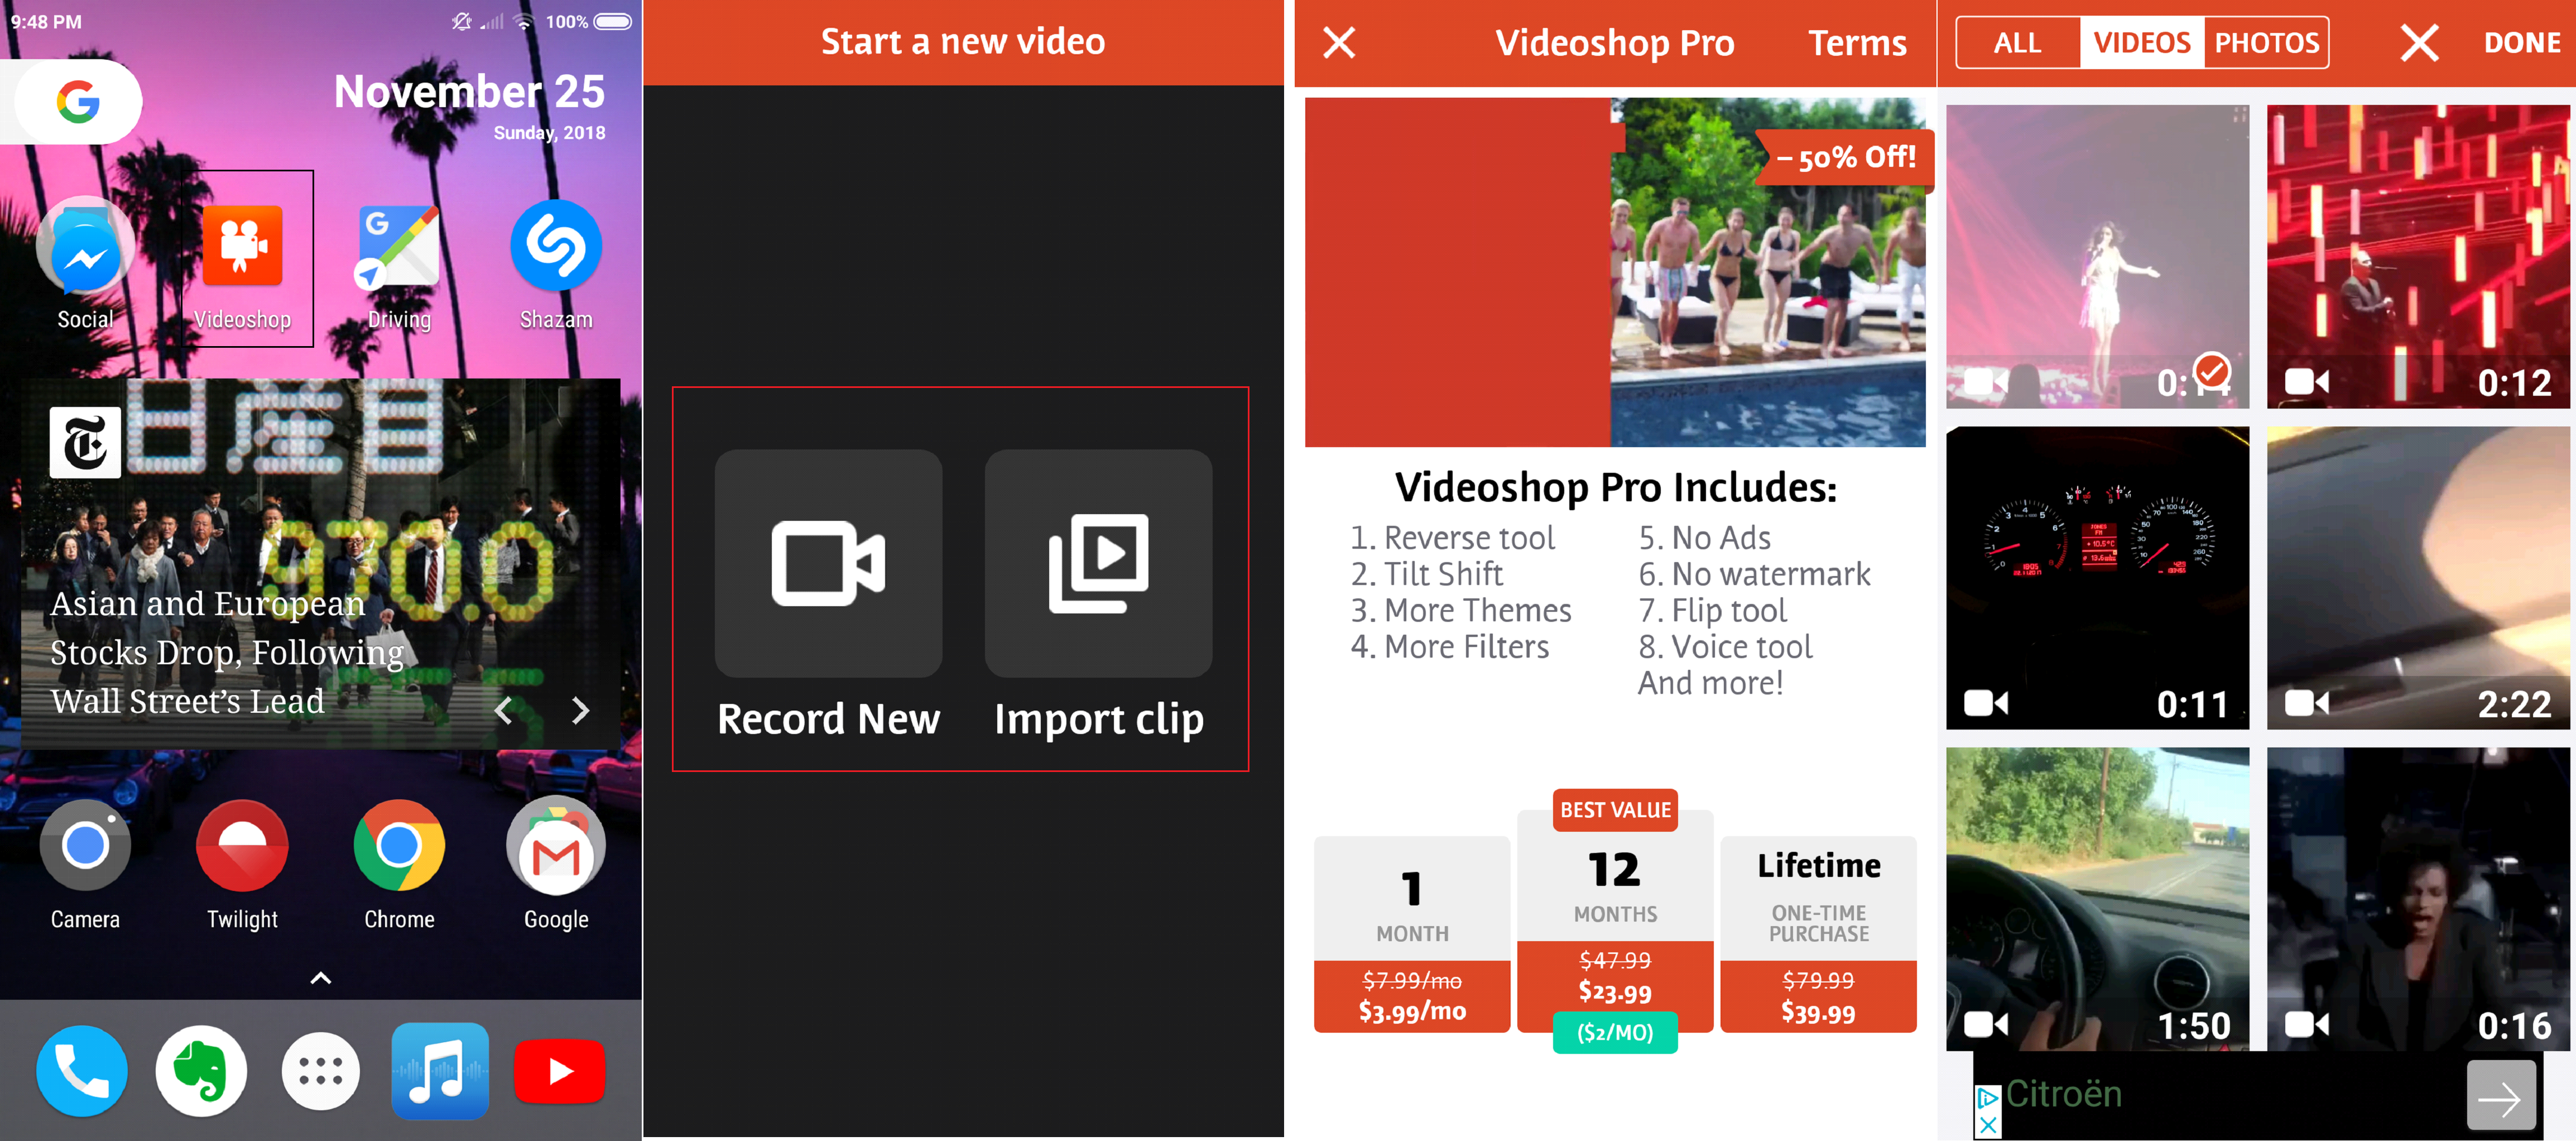
The final app in the list is Videoshop, free on the Play Store. I personally deem it the best option for quick and efficient video editing, made easy by the app’s user-friendly design.

Download:

Like before, open the app and select the video that you wish to edit.

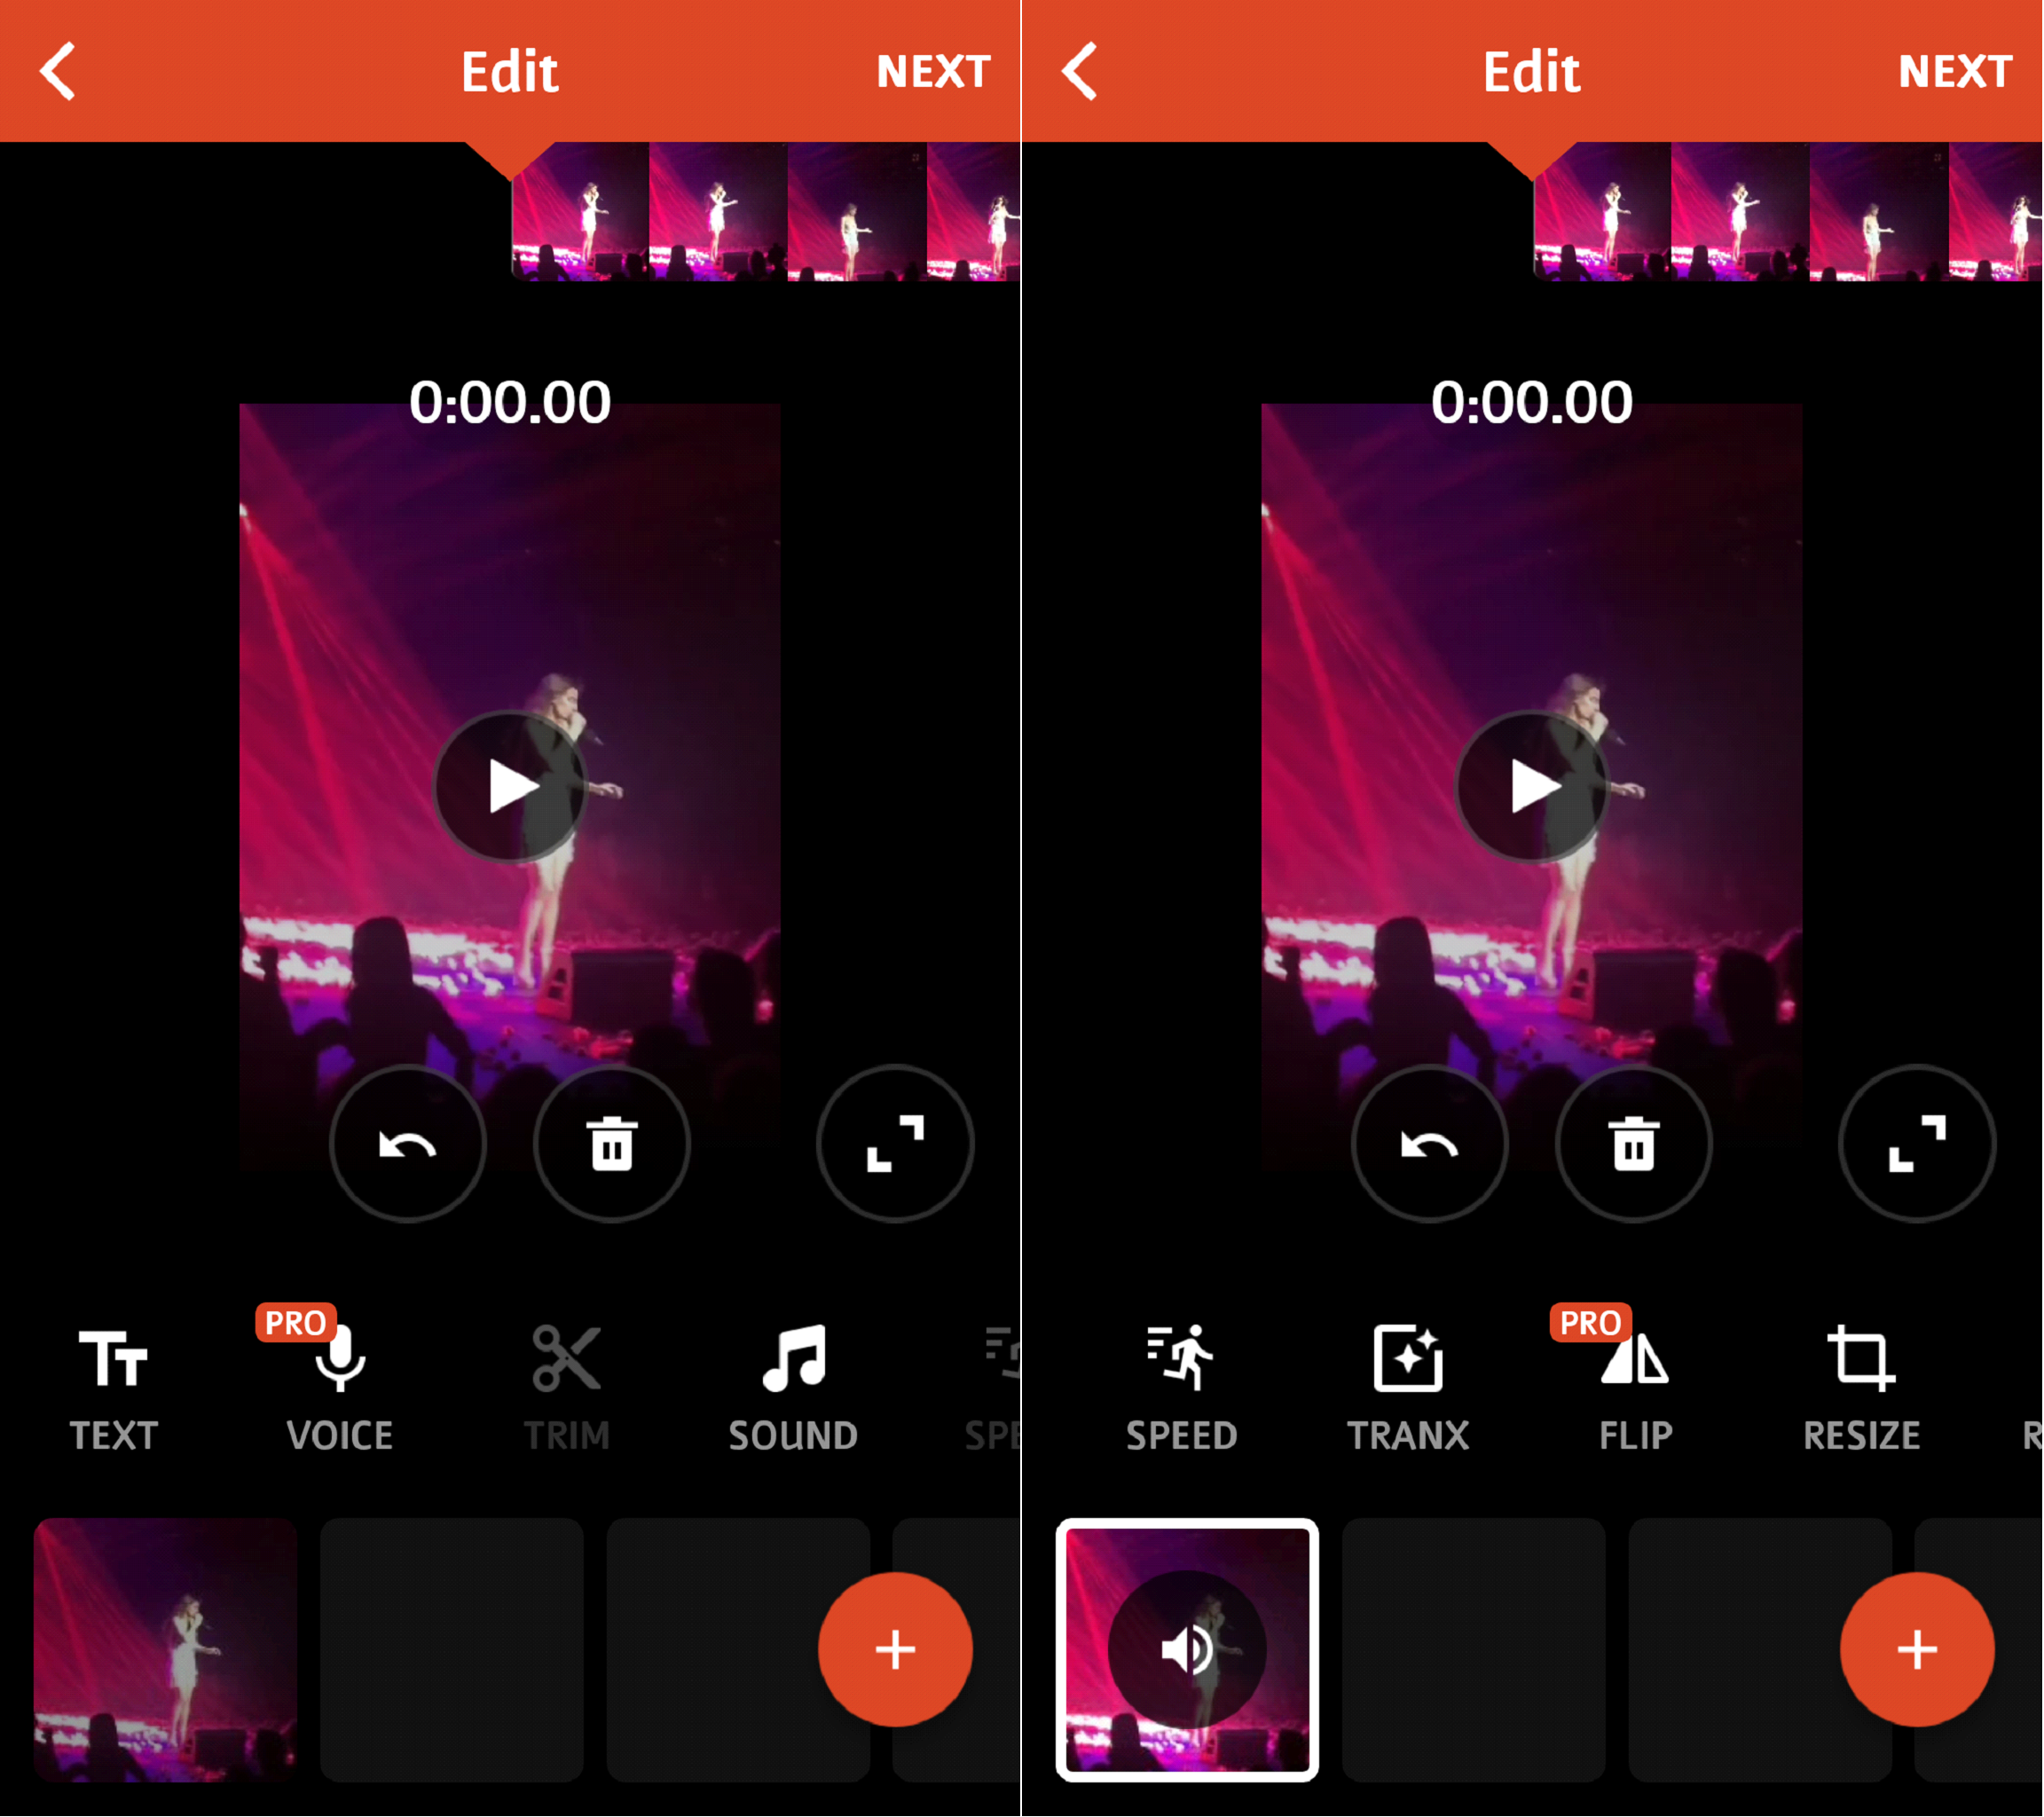
The app’s free version does come with quite many options, such as adding text, resizing and video speed adjustment.

To add text, just tap on the ‘Text’ option. You can change both the font style and color of the text.

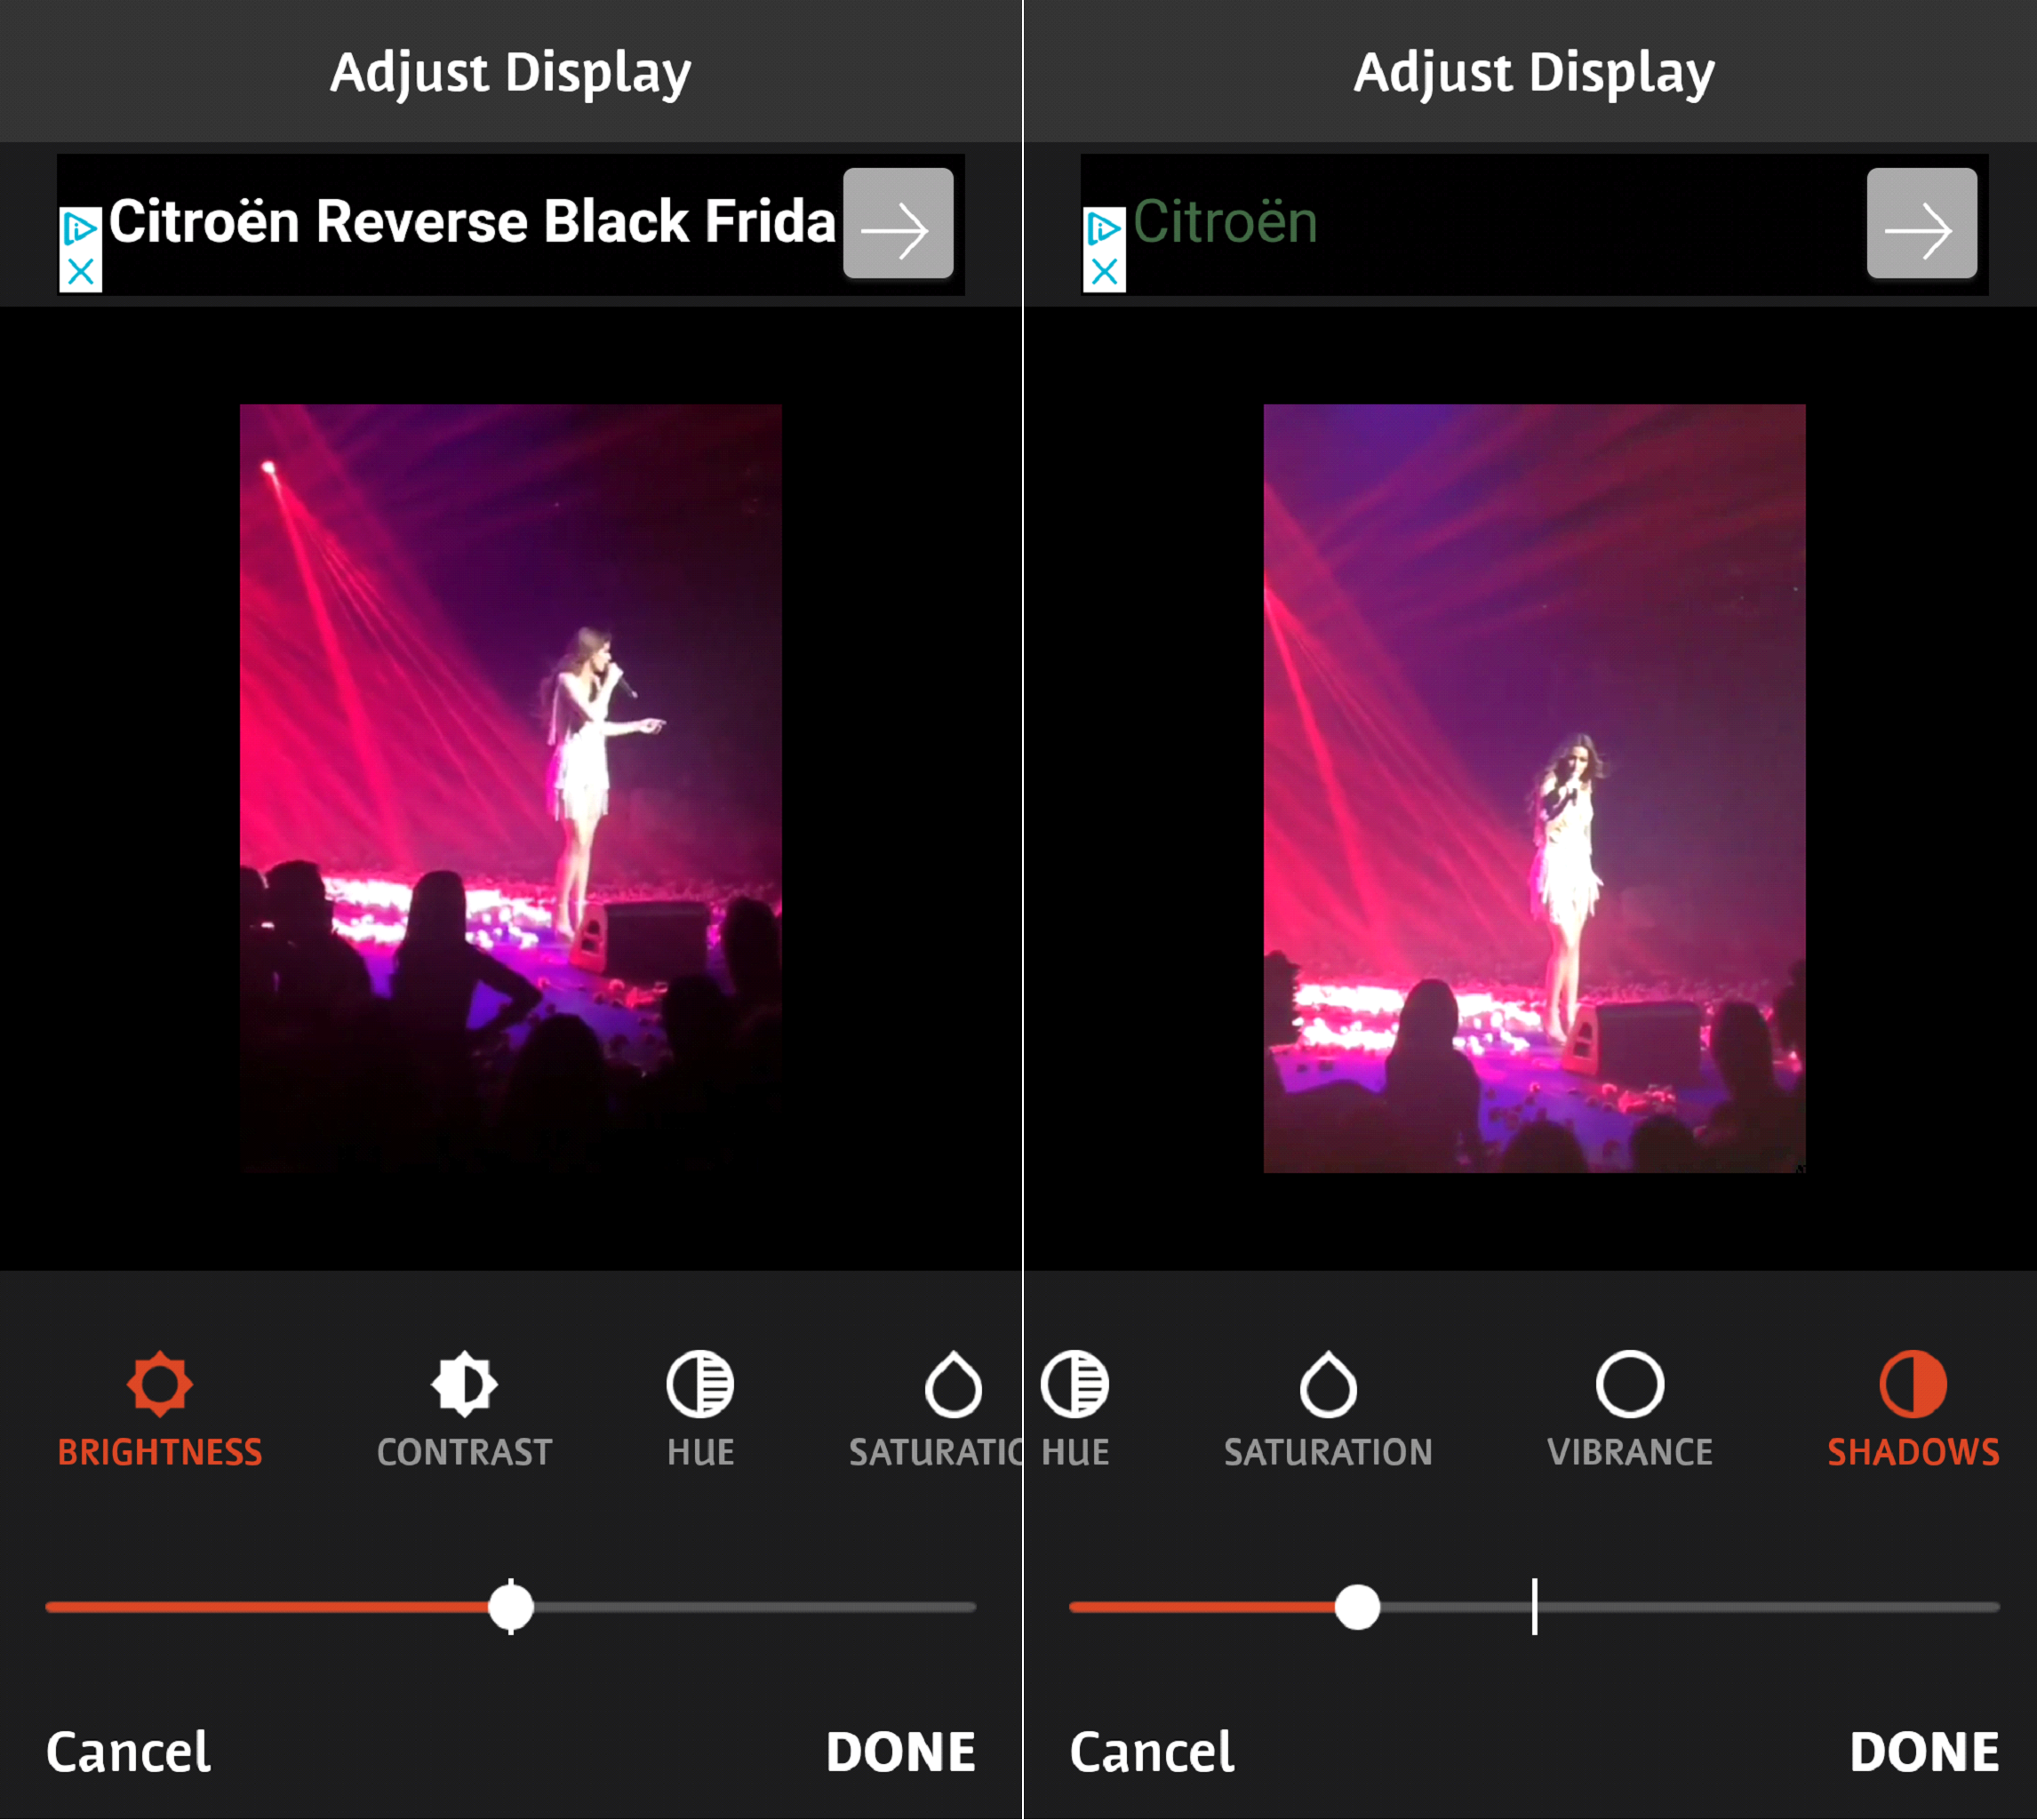
Basic display adjustment can be accessed by tapping on the ‘Display’ option located in the options bar. From there, you can adjust brightness, contrast, vibration and so on.

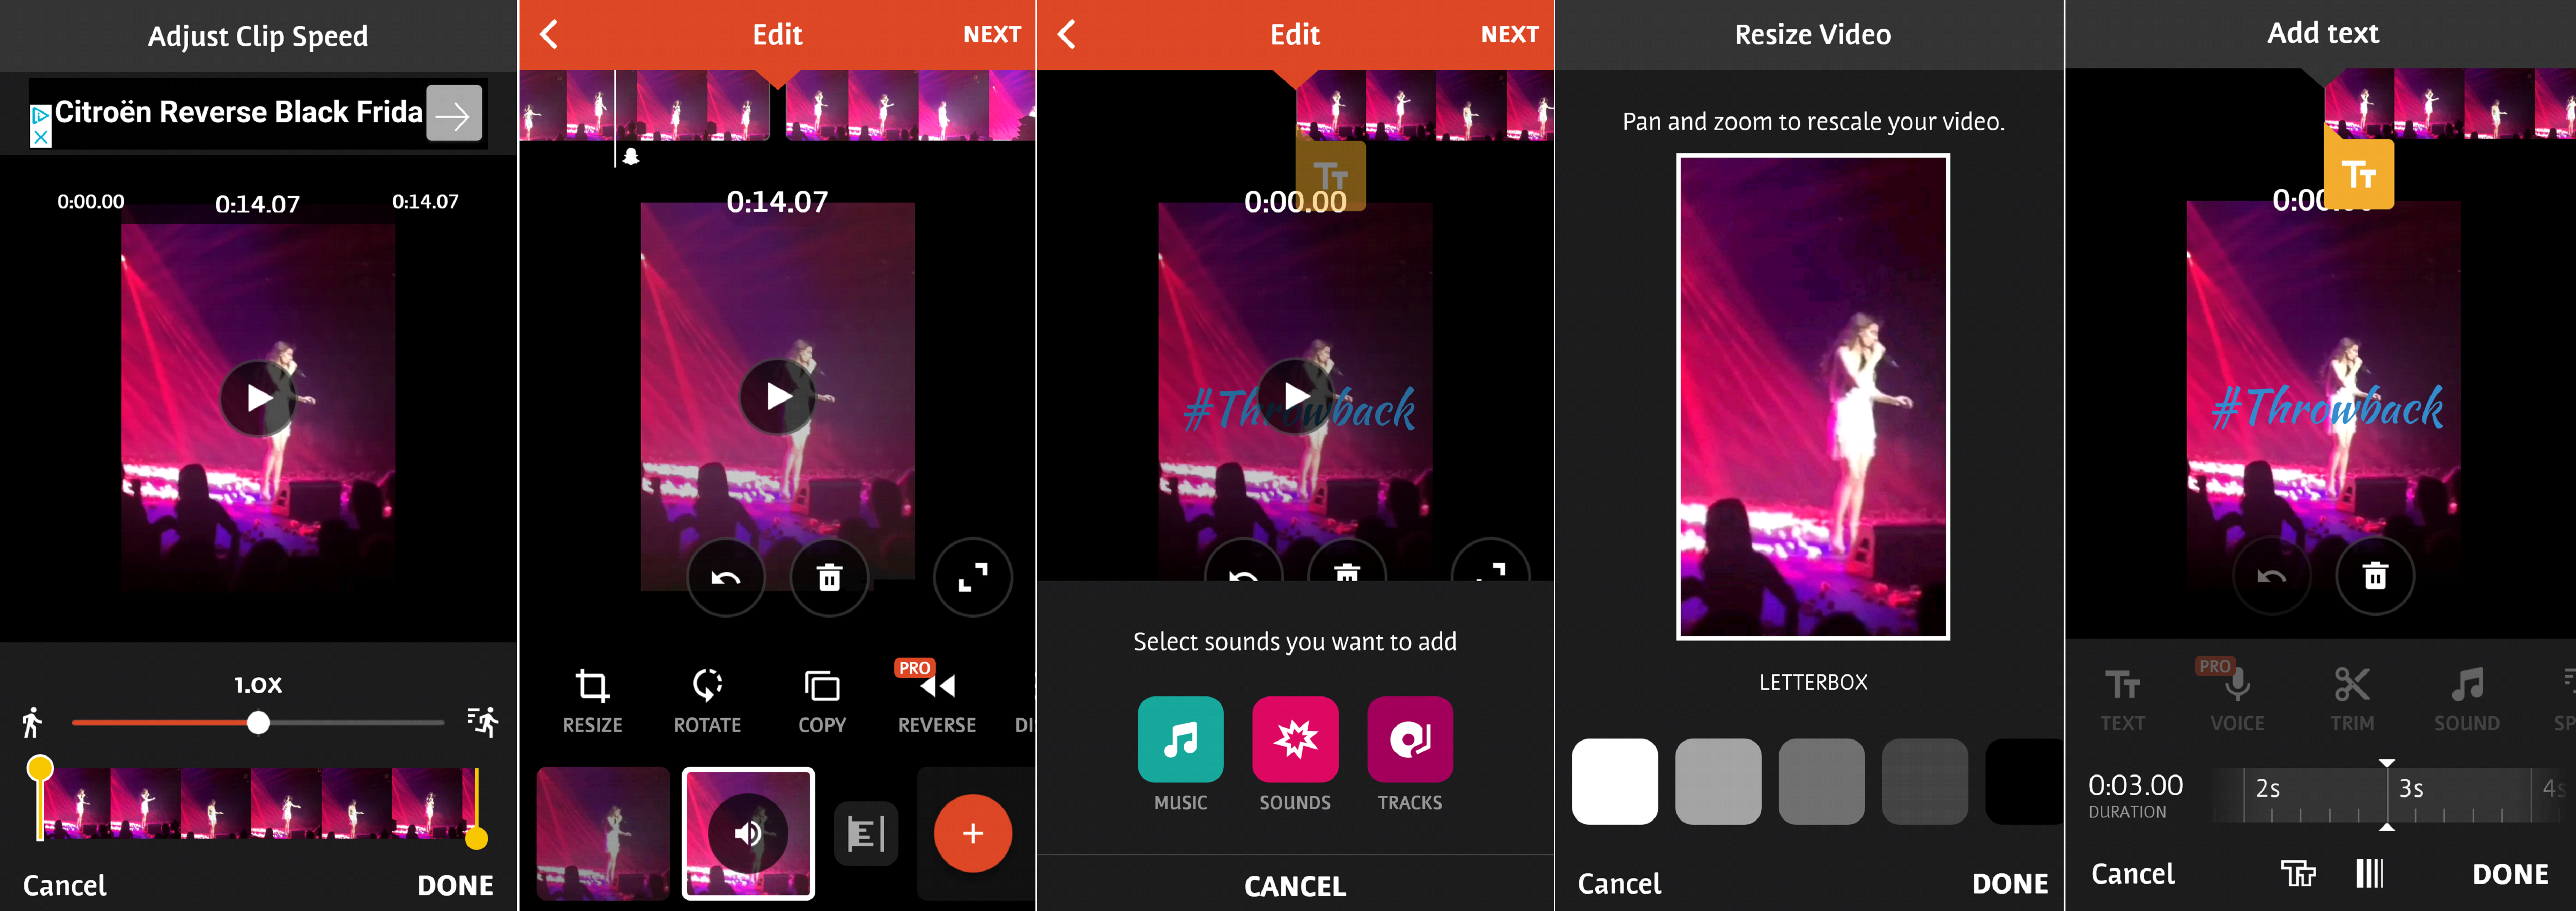
Tap on the ‘Tranx’ option to access a number of cool transitions to add somewhere in the video.

Other editing options available include adjusting the video’s speed, resizing and trimming it, adding music to the background, as well as creating a copy of it on the dashboard. The latter is particularly useful, because one could use the copy as a testing platform.

Once you are ready, hit the next button located in the top right-hand corner. Before saving the clip, users can add filters and animated themes in the background, as well as write-in relevant information, such as location, date etc.

Tap on the share button in the top right-hand corner, select the resolution on which you wish to export, and you’ll be good to go.

If you encounter any problems while trying out the above or have a recommendation to make, feel free to shoot a comment down below.

How To Edit Videos On Android

, original content from Ubergizmo. Read our Copyrights and terms of use.

How To Fix ‘Computer Not Recognizing Android Device’ Problem

Regardless of the operating system, Mac, Windows or Linux, computer not recognizing your Android smartphone or tablet is a pretty common issue. Thankfully though, there are multiple effective ways of dealing with it.

In this tutorial, we are going to be guiding you through the process of figuring out why your Android device fails to connect to your computer.

Method #1: Try another port or cable

While it sounds too obvious, sometimes the issue can be attributed to a malfunctioning USB port or a USB cable that has been designed just for charging. The latter is a pretty rare phenomenon, it is worth considering though.

Method #2: Make sure you have selected the right connection setting

For those unfamiliar, when an Android device is connected to a computer, three connection options are available; ‘Charging’, ‘Transfer files’ and ‘Transfer photos’. Usually ‘Charging’ is the default one.

In order to have your phone show up on your computer, though, you need to select the second one.

  1. Unlock your phone
  2. Slide your finger down from the top, in order for the notifications menu to emerge
  3. Tap on the ‘Android System’ box
  4. Select ‘Transfer files’

Method #3: Enable USB Debugging

Another way of dealing with the issue via your Android is device, is by enabling USB debugging mode. While the particular option is primarily used when one needs to operate his or her device via the computer, plenty of users have reported that it could be a workaround for this problem as well.

  1. Disconnect your Android device from the computer
  2. Go to Settings
  3. Find ‘Developer Options’
  4. Enable ‘USB Debugging’
  5. If you receive a warning message, tap OK
  6. Reconnect your Android device to the computer


Method #4: Try updating or reinstalling your device’s driver

Another common culprit for the issue at hand is the device’s USB drivers. Updating it could fix the connection problem.

  1. Press Windows Key and X
  2. Select ‘Device Manager’ from the Menu
  3. Click on the ‘Portable Device’ section
  4. Click on your device’s name
  5. Click on ‘Update Driver Software’
  6. Click on ‘Browse my computer for driver software’
  7. Click on ‘Let me pick…’
  8. Select the MTP USB Device option and click ‘Next’

Method #5: Try uninstalling your device’s driver

A similar method with the above is to actually uninstall your device’s driver and disconnect it from your computer. Then reconnect the device to the computer, and the latter will reinstall the drivers.

  1. Press Windows Key and X
  2. Select ‘Device Manager’ from the Menu
  3. Click on the ‘Portable Device’ section
  4. Click on your device’s name
  5. Click on ‘Uninstall’
  6. Click on ‘OK’


If you encounter any problems while trying out the above or have a recommendation to make, feel free to shoot a comment down below.

How To Fix ‘Computer Not Recognizing Android Device’ Problem

, original content from Ubergizmo. Read our Copyrights and terms of use.

Hitting the Books: Brotopia

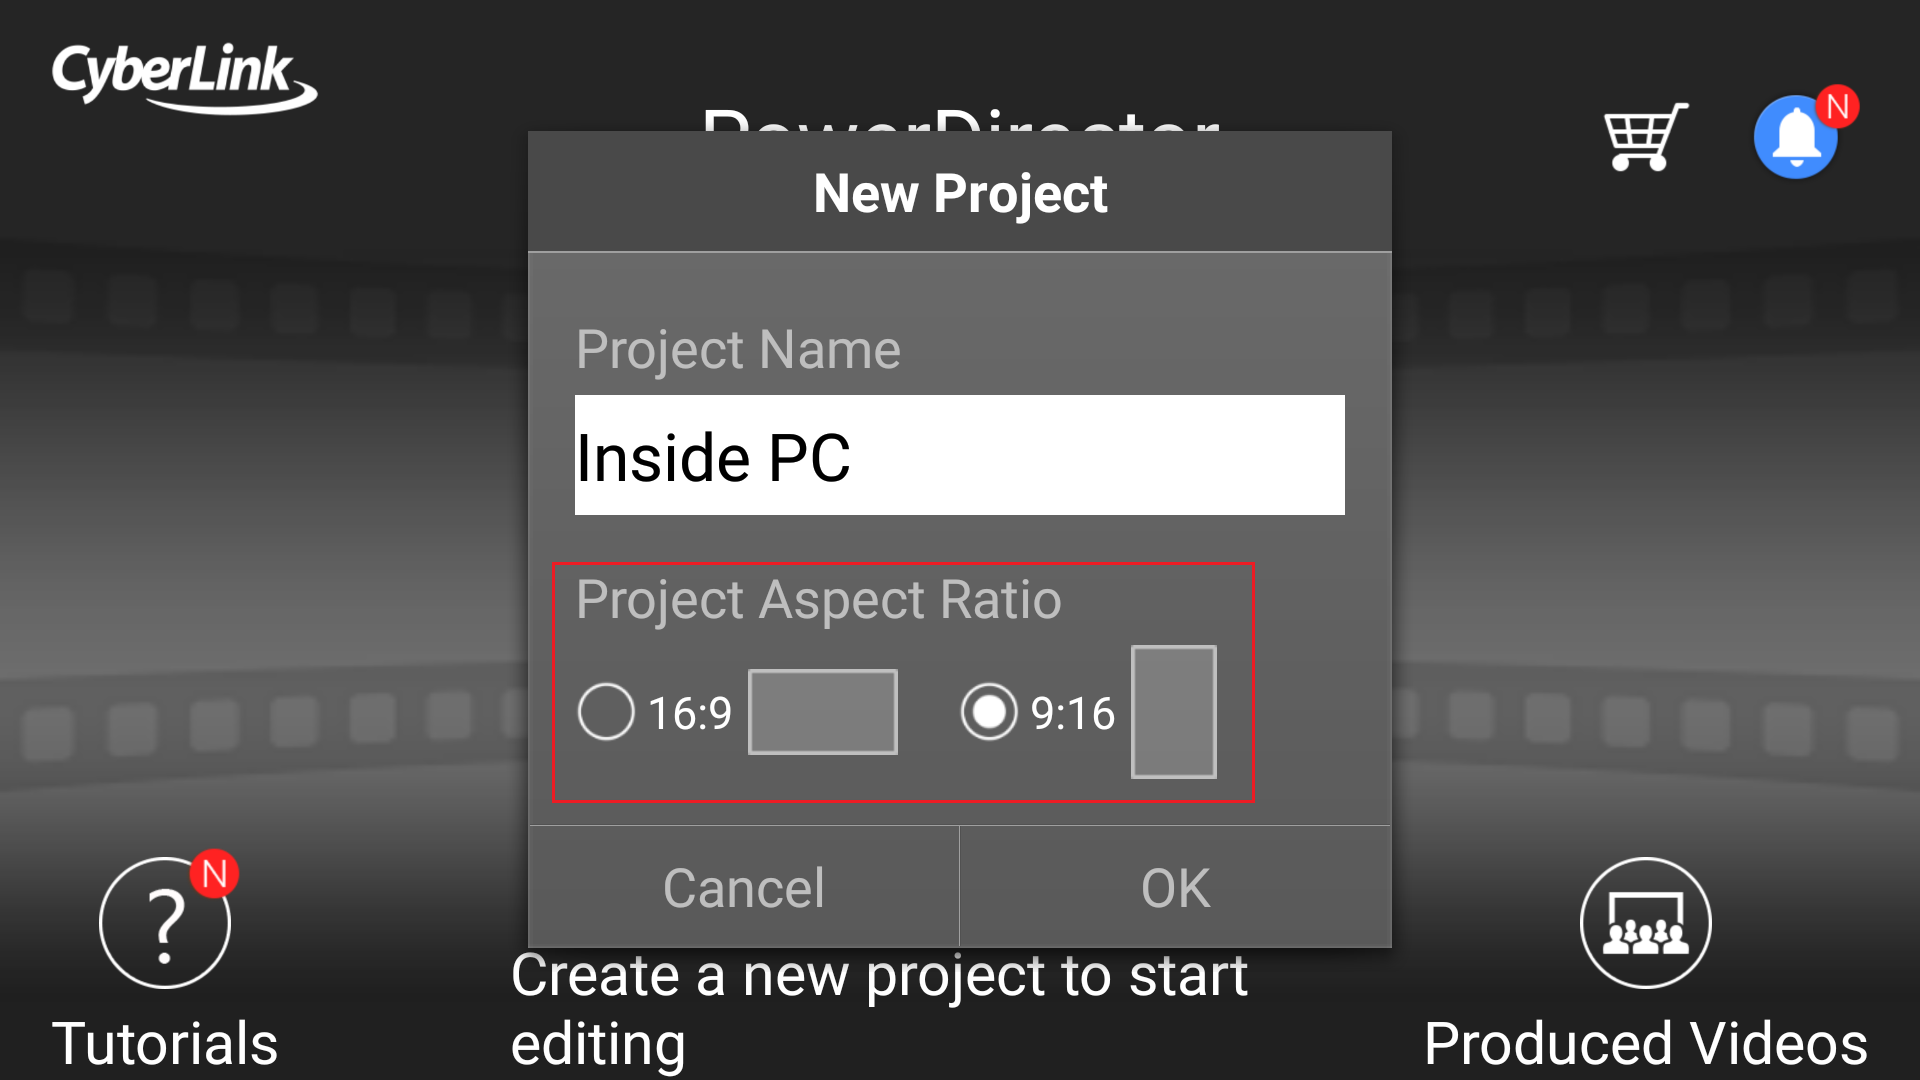
Welcome to Engadget’s new series, Hitting the Books. With less than one in five Americans reading just for fun these days, we’ve done the hard work for you by scouring the internet for the most interesting, thought provoking books on science and tech…

Jay Inslee Demands Climate Action Now: ‘The World’s On Fire’

The Washington governor and 2020 Democratic candidate defended his single-issue campaign Sunday.

Kansas Doctor Sentenced To Life In Prison For Patient’s Opioid Death

Dr. Steven R. Henson was convicted of prescribing “massive amounts of opioids … with little demonstrated need.”

Shiba Inu Marshmallows: So Sugar, Such Delicious

Shiba Inu dogs and marshmallows are two of the sweetest things on the planet, so it only makes sense that they’ve finally been merged together into a single thing. Thanks to the folks at Japanese retailer Felissimo, we now have adorable and squeezy treats made to look like adorable and squeezy dogs.

These squishy guys are printed with a detailed image of a cute and cuddly little dog, complete with a boopable little nose. And if you like chocolate with your marshmallows, you’re in luck. Each one is filled with chocolate paste. While that sounds delicious, I don’t recommend filling your actual dog with chocolate.

They’re available in boxes of nine from the Felissimo website for 1200 yen (~$11 USD), and each marshmallow comes individually wrapped so you don’t have to eat them all in one sitting.

[via My Modern Met]