Elder Scrolls VI Details Will Be Years Away From Being Announced

Despite Bethesda downplaying the existence of The Elder Scrolls VI, the company made a surprise announcement in 2018 and revealed that the game was in its pre-production stages, although the company did warn that it could be a long time before it will be officially announced.

Fast forward to today, two years after the initial announcement, and it seems that we are still not close to hearing more about the game. This is according to Bethesda’s Pete Hines who responded to a question on Twitter about details about The Elder Scrolls VI, in which he replied by saying that it will be “years from now” before details about the game are revealed.

This is because Bethesda is focusing on its next game, Starfield, and until that game has been finished and released, the company is not expected to begin working on The Elder Scrolls VI.

Starfield will be a brand new IP for the company and as it stands, there is still no release date for the upcoming game. However, it has been suggested that it might be skipping the current-gen consoles, meaning that it is being developed for the PS5 and Xbox Series X. The company explained back in 2018 that the decision to announce The Elder Scrolls VI so early was to prevent fans from being disappointed.

It was also to stop fans from asking if the game is in development, although now it seems that the company is being inundated with questions of “when” the game will be released.

Elder Scrolls VI Details Will Be Years Away From Being Announced

, original content from Ubergizmo. Read our Copyrights and terms of use.

Urbanista’s London wireless earbuds are the latest to take on AirPods

Urbanista, the Swedish audio company that names its headphones after various big cities, is back with another model: London. The truly wireless earbuds with active noise cancellation feature a ‘stem’ design similar to the one found on Apple’s AirPods and a number of competing products. The new model joins Urbanista’s other true wireless earbud models, including the Athens, Paris, Tokyo, … Continue reading

Motorola Razr's Android 10 update makes better use of the outer screen

Motorola is finally updating the new Razr to Android 10, but it’s not just an under-the-hood update — it should deliver genuinely functional improvements, particularly when the foldable phone is closed. You can now use more apps on the outer (aka Qui…

Vava's 4K Dash Cam Helped Me Capture the Lawless, Empty Streets of NYC

Vava 4K Dash Cam | $180 | Amazon

Read more…

Reebok Has Brought Back the Jacket Michael Jordan Dissed Just To Be Petty

Reebok Hush Track Jacket | $80

Read more…

How To Post Longer Videos Onto Instagram Stories

Instagram’s Stories feature was largely inspired by Snapchat’s own Stories feature, but it has since gone on to take on a life of its own. For those unfamiliar, Stories is a fun way of sharing short video clips or images that will disappear after 24 hours. This is useful if you have some kind of theme going on in your Instagram profile that you’d rather not disrupt with non-related posts.

The drawback to Stories is that it has a limit in terms of the maximum number of seconds per Story, meaning that if you wanted to share a video longer than 15 seconds in length, you could be out of luck. However, this doesn’t mean that it isn’t impossible, and with this guide, we’ll show you how to post longer videos onto your Instagram Stories.

Method 1 – Using Instagram To Automatically Cut Your Videos

When you upload a video longer than 15 seconds to your Stories, if it is short enough, Instagram will actually cut up that video for you. For example, if you have a video that’s 60 seconds in length, uploading it to Stories will automatically cut that video into four 15 second segments.

Unfortunately, there is a limit of 1 minute, meaning that the maximum number of times Instagram will splice the videos for you is into four 15 second segments. If you have videos under 60 seconds, then this should not be a problem, but if you have videos greater than 60 seconds, then you’ll want to proceed to the other methods listed below to see which works best for you.

Method 2 – Manually Cutting Your Videos

If the method above doesn’t work for you, then you will need to manually cut your videos into either 15 second segments or 60 second segments and let Instagram do the rest. By default, your smartphone will come with some basic video editing tools that will let you cut and trim the video to your desired length.

iOS

  1. Launch the Photos app
  2. Select the video you want to trim and tap Edit at the top right corner
  3. Drag the slider from the left or right to increase or decrease the duration
  4. Tap Done

Android

  1. Launch the Gallery app
  2. Select the video you want to trim and tap the Scissors icon
  3. Tap Trim
  4. Drag the slider from the left or right to increase or decrease the duration
  5. Tap the check mark icon when you’re done

The problem with manually trimming your videos is that your selection of where each segment starts and ends might not be quite as precise as you might like, but in a pinch, it should be good enough to get the job done.

Method 3 – Using A Third-Party App

If you want a quicker and easier way of trimming your videos to upload them to Instagram Stories, then you might need to turn to a third-party app. There are several apps you can choose from, and we’ve listed them below where you can download them for either iOS or Android.

Note: All the apps are free to use but some come with watermarks and ads that you can opt to pay a small fee to remove. You don’t have to, but if you want to remove those limitations then you’ll have to pay for them

CutStory (Download For iOS)

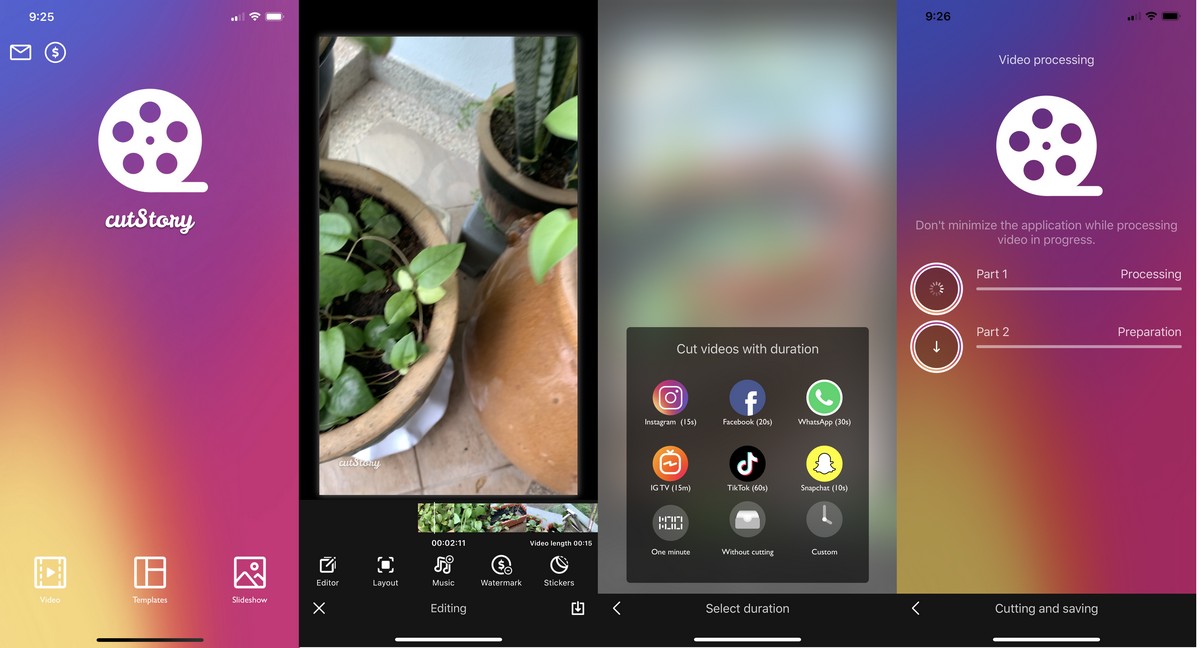
  1. Launch the CutStory app and tap on Video
  2. Select the video you want to trim
  3. Tap the download button to the bottom right corner of the screen and select Instagram Stories
  4. Wait for the videos to be trimmed and processed and it will automatically save it to your phone’s camera roll
  5. You can then launch Instagram and select the trimmed videos to upload them to your Stories

Long Story for IG (Download For iOS)

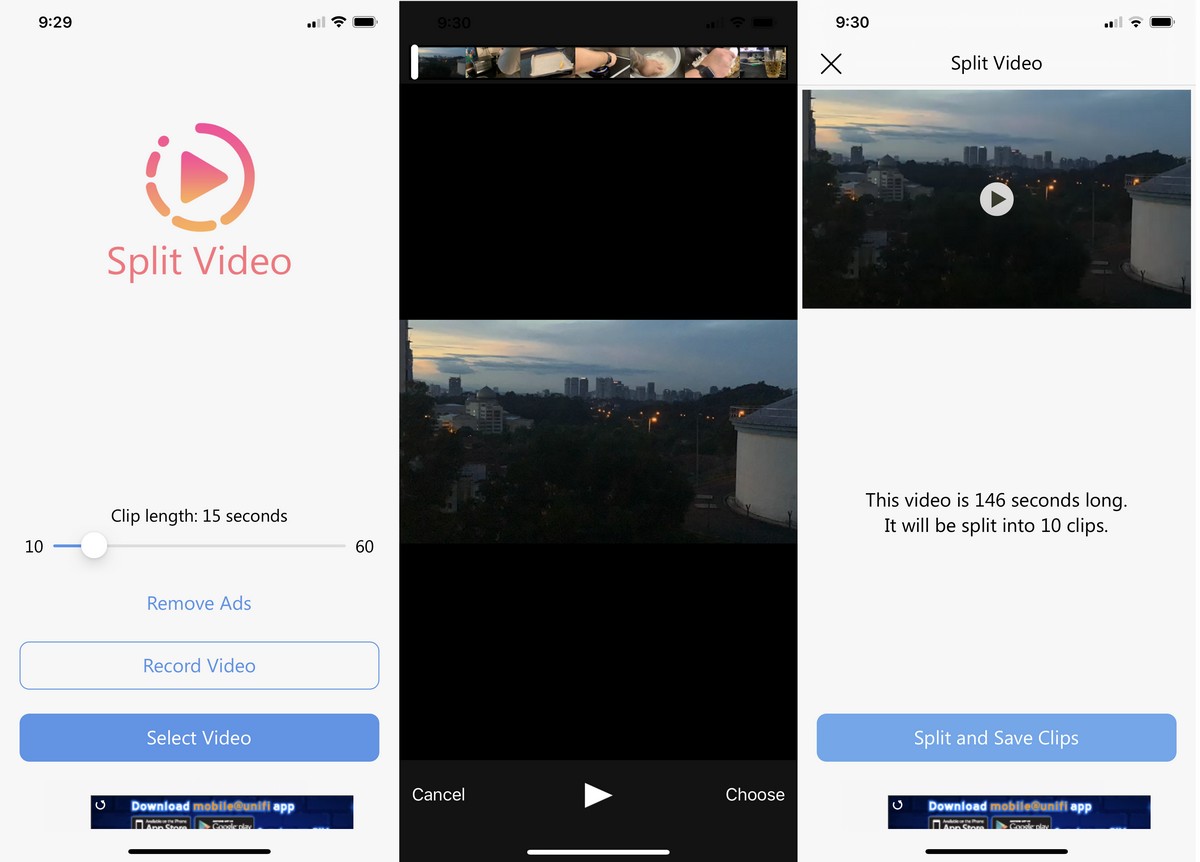
  1. Launch the app and select the video length you want to trim it down to (by default it is set at 15 seconds)
  2. Tap Select Video and choose the video you want to trim
  3. Tap Choose
  4. Tap Split and Save Clips and wait for the video to be processed
  5. You can access the videos in your phone’s gallery and upload them to Instagram Stories

Story Cutter (Download For Android)

  1. Launch the Story Cutter app
  2. Tap Gallery and select the video you want to trim
  3. Select the length for each video segment and tap Select
  4. Once the videos are processed, you can find the split up video segments in your phone’s Gallery

Video Splitter (Download For Android)

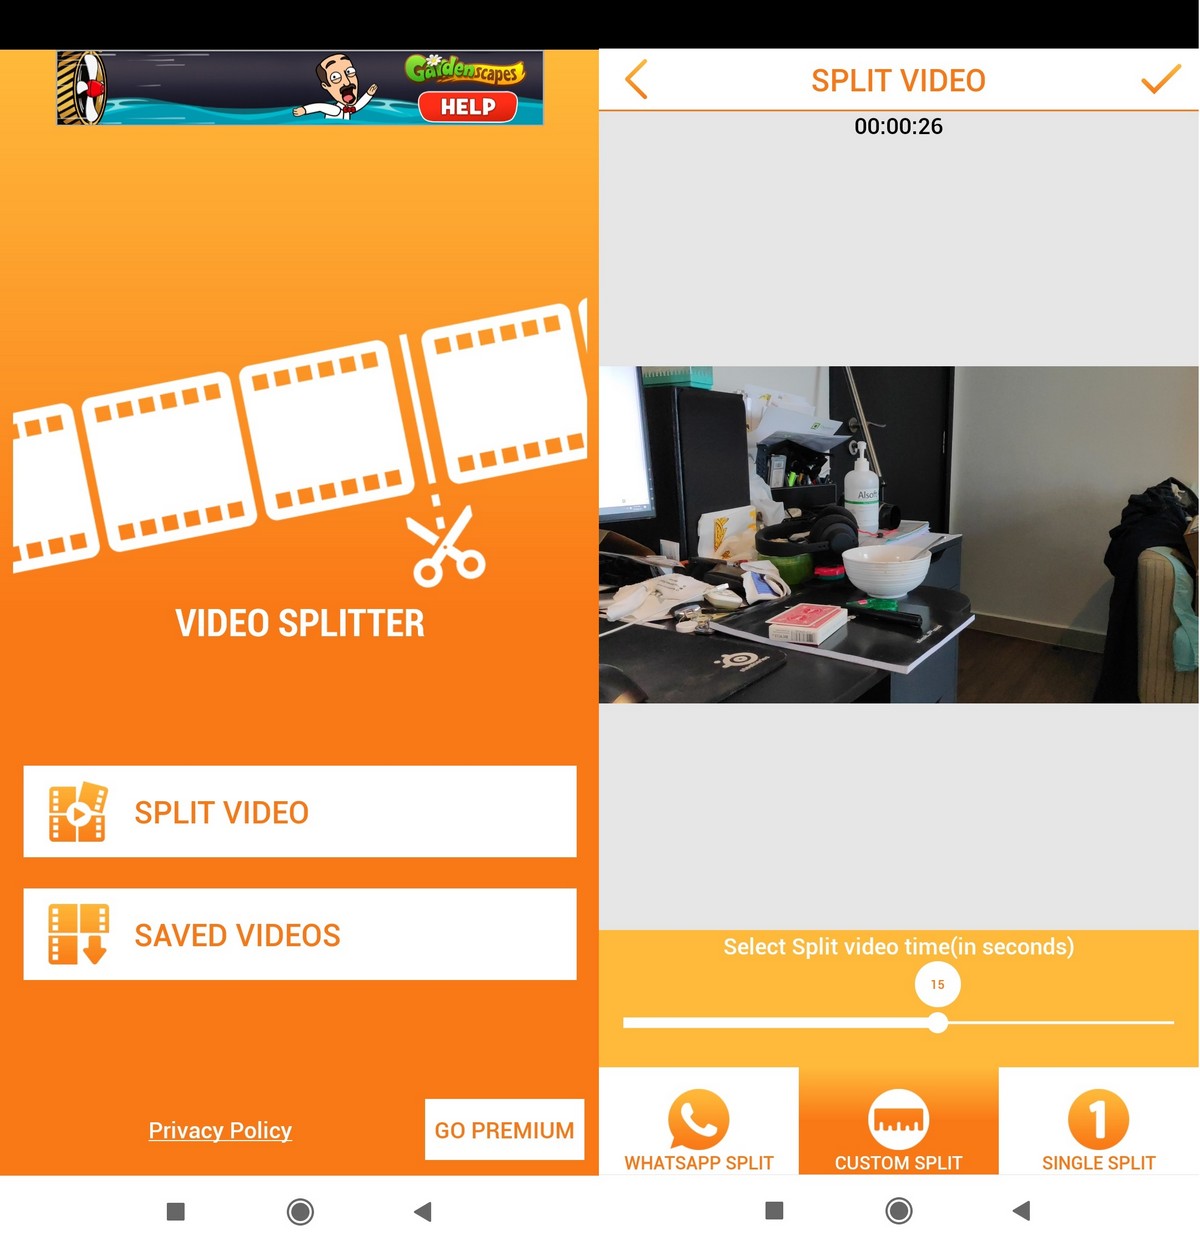
  1. Launch the Video Splitter app
  2. Tap Split Video and select your video
  3.  Select Custom Split and drag the slider to 15 seconds
  4. Tap the Check button at the top right corner and wait for the video to be processed
  5. Once the videos are processed, you can find the split up video segments in your phone’s Gallery

How To Post Longer Videos Onto Instagram Stories

, original content from Ubergizmo. Read our Copyrights and terms of use.

How To Use A Mouse With The iPad

Apple has been positioning the iPad as a productivity tool for a while now, and while many reviews have been largely favorable, many did feel that for the most part, it fell short of actually becoming a full, bonafide laptop replacement. However, that changed with the release of iOS 13.

With iOS 13, Apple finally allowed users to use a mouse with the tablet. However, even then the company tried to position mouse use as an accessibility tool, meaning that it isn’t quite as straightforward as pairing or connecting a mouse and you’re done.

But fret not, by following our guide here, you will be able to pair a mouse with your iPad in a matter of minutes.

Requirements

To connect a mouse to the iPad, you will need:

  • A Bluetooth compatible mouse
  • An iPad running iOS 13 or later

How To Connect A Mouse To The iPad

  1. Go to your iPad’s Settings > Bluetooth and search for your mouse
  2. Once the iPad detects your mouse, click on it to pair it with the tablet
  3. On the left side of Settings, look for Accessibility
  4. Under Physical and Motor, go to Touch > AssistiveTouch and toggle it on

If you’ve followed all the steps above, once AssistiveTouch has been enabled, you should see a mouse cursor on your screen. However, we should point out that the mouse cursor for the iPad is different from your typical pointer. It is simply a circle with a dot in the middle, but you should be able to get used to it in no time.

Adjusting Your Mouse Settings

Once you have your mouse paired and setup with your iPad, you can actually go ahead and customize it further. This includes changing what the mouse buttons do, the size and opacity of the pointer, and also the track speed.

Customize The Pointer

  1. Launch Settings and go to Accessibility
  2. Under Physical and Motor, go to Touch, and under Pointer Devices, select Pointer Style
  3. Drag the slider to change the size of the pointer, or tap color to change the color and opacity of the cursor

Customize Your Mouse Buttons

  1. Launch Settings and go to Accessibility
  2. Under Physical and Motor, go to Touch, and under Pointer Devices, select Devices
  3. Tap on your paired mouse
  4. Tap on the buttons to change what they do. You will be able to choose from a list of available actions

Change The Tracking Speed

  1. Launch Settings and go to Accessibility
  2. Under Physical and Motor, go to Touch, and look for Tracking Speed
  3. Drag the slider to the left to make it slower, and drag it to the right to make it faster

How To Use A Mouse With The iPad

, original content from Ubergizmo. Read our Copyrights and terms of use.

AirPods Studio Could Come With Head And Neck Detection

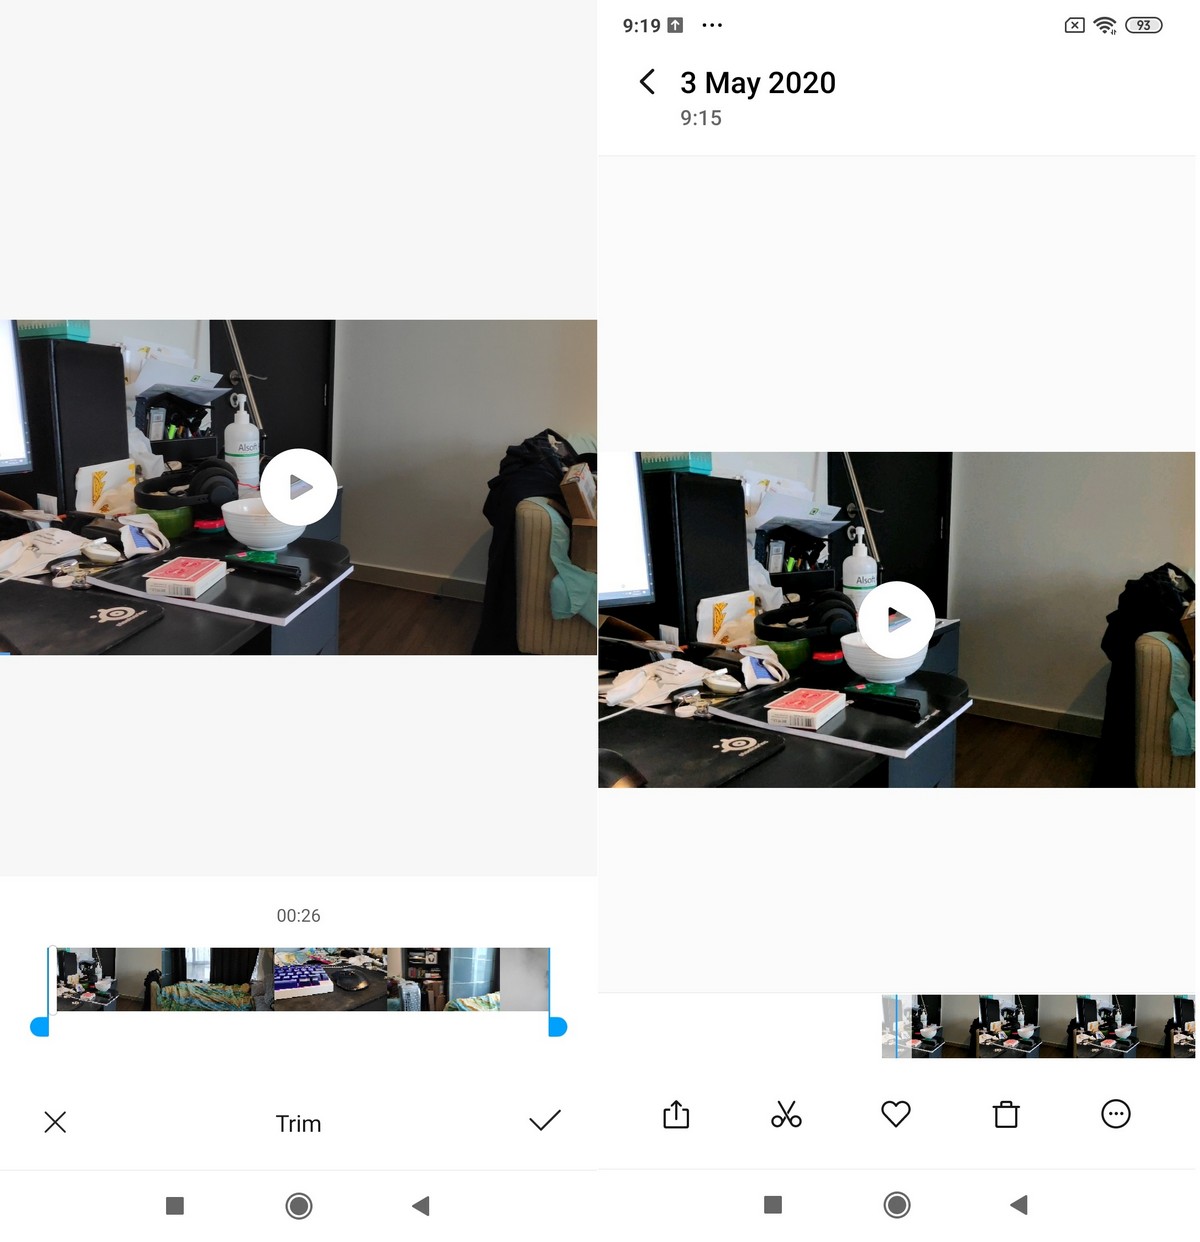
For those who have been following the rumors, you might have heard that Apple could be working on a pair of over-ear headphones called the AirPods Studio. One of the alleged rumored features include the ability to swap out parts like the headband and the earcups themselves.

Whether or not those rumors are true remains to be seen, but in a new report from 9to5Mac, they have learnt from their sources that the AirPods Studio could come with both head and neck detection features. What this means is that when the wearer takes the headphones off their head, there are sensors that can detect that and will automatically pause the song.

The neck detection feature also means that whenever it detects that the headphones are worn around your neck, it will keep them powered on, where it assumes that you might have only taken it off temporarily but will still want to continue listening to music later. The report claims that there will also be additional sensors that can detect the left or right ears and can rotate audio channels accordingly, meaning that there will be no right or wrong way to wear the headphones.

Other features include a transparency mode and active noise cancellation. We expect that Apple should announce the headphones at their online WWDC 2020 event where last we heard, it could be priced around $350.

AirPods Studio Could Come With Head And Neck Detection

, original content from Ubergizmo. Read our Copyrights and terms of use.

14-inch MacBook Pro Has Reportedly Been Delayed To 2021

When Apple announced a refresh of the 13-inch MacBook Pro earlier this month, safe to say that some were surprised. Based on the reviews of the laptop, it appears that many were anticipating that the company was going to release a 14-inch MacBook Pro as per the rumors that we have been hearing.

If you were hoping that maybe the 14-inch model would be announced later this year, prepare to be disappointed because according to a tweet by @L0vetodream, it has been suggested that the 14-inch MacBook Pro could be delayed to 2021 instead. Jon Prosser, another well-known leakster, replied to the tweet where he seemingly confirms it as well.

It is unclear why Apple chose to launch the 13-inch instead of the 14-inch model, but perhaps the 14-inch model wasn’t ready yet. It has been speculated that the 14-inch could replace the 13-inch model the same way the 16-inch model replaced the 15-inch MacBook Pro. However, in 2019 shortly after the launch of the 16-inch MacBook Pro, Apple’s Phil Schiller seemed to shut down the rumors of a 14-inch model, but it continued to persist.

Take it with a grain of salt for now, but if you were hoping to get your hands on a 14-inch MacBook Pro, it looks like you might have to wait until at least 2021, if at all.

14-inch MacBook Pro Has Reportedly Been Delayed To 2021

, original content from Ubergizmo. Read our Copyrights and terms of use.

Sony HT-G700 soundbar with audio upscaling is made for home theaters

Sony has introduced its new HT-G700 soundbar featuring up to 7.1.2-channel surround sound, three front speakers, and Sony’s technology for ‘vertical’ audio reproduction. Sony has packed a large number of features targeting home theater setups into its new soundbar, including a center speaker that aids viewers in hearing video dialog without diminishing other audio. The Sony HT-G700 soundbar features a … Continue reading