Helpful Tip: How to Dry a Wet Phone

This article was written on February 29, 2008 by CyberNet.

It may not have happened to you yet, but chances are that sometime in your life, you may end up dropping your cell phone in water whether it be the kitchen sink, a puddle, or maybe even… the toilet! So what are you supposed to do when something happens to your precious phone? Today’s helpful tip explains two things that you can do should your phone get wet. Our source of information was wikiHow, so checkout their site for additional tips.

Get a bowl of rice…

white rice 
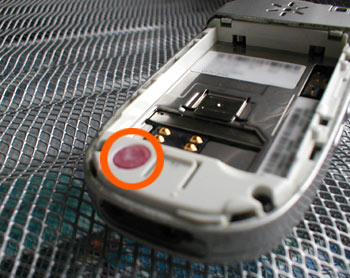
That’s right, get yourself a big bowl of uncooked white rice, take your battery out (and SIM card if you have one), and then bury your phone in the bowl. The rice will soak up the water from your phone and there’s a good chance your phone will work once all of the water is removed.

Use a Hair Dryer on low…

Once again, be sure to remove the battery and your SIM card and don’t turn it on to see if it works! The key here is not to use high heat, but to use the lowest possible setting on the hair dryer. The heat can actually damage the phone even more, so keep that in mind before you go putting it under a heat lamp, in the microwave (this will destroy the phone and possibly the microwave), or blast it with hot air from a dryer.

Additional Tips

  • Most phones have an indicator (many times there are multiple indicators, some which you wouldn’t be able to see, and one  is usually under the battery) which changes color if the phone has been exposed to water. If you were to take your phone back to the place you got it from, they’ll likely check this indicator first. Many insurance plans on phones will not cover damage from water, and this is the way that they’ll check.
    wet phone indicator
    Image Source
  • Be sure your phone is completely dry before you try turning it on for the first time. This means the non-visible inside parts need to be dry too. Give the phone plenty of time to dry both on the outside and the inside.

Drop your phone in water? Tell us what you did, and if it worked!

Copyright © 2011 CyberNet | CyberNet Forum | Learn Firefox

Related Posts:


CyberNotes: Track Packages

This article was written on February 12, 2008 by CyberNet.

CyberNotes
Time Saving Tuesday

I remember when online stores first started popping up everyone was wondering how in the world such a marketplace would continue to exist. At the time online prices were about the same as they were in the retail stores, but shipping costs killed any savings that you would have received. Now things are not only cheaper online, but a lot of stores offer free shipping on purchases.

Now the problem that I encounter the most is keeping track of all the packages that are supposed to be coming to me. Just a few weeks ago I had a package who’s status said that it was delivered, but I never actually received it. Luckily the company that I ordered it from quickly refunded my money, but if I was not tracking the package a lot of time could have passed before I realized that there was an issue.

You can always track packages through the carrier’s website, but there are alternate methods available that make staying on top of multiple orders extremely simple. Here are my four favorite ways to track packages…

–TrackThePack (Homepage)–

This is one of my favorite package tracking services because it sports a clean interface, and is powered by AJAX. To get started you enter in a tracking number, hit the submit button, and you’ll instantly see the results. If you decide against creating an account the tracking numbers will still be stored in their database using your IP address.

TrackThePack

–TrackMyShipments (Homepage)–

Works with UPS, FedEx, DHL, and USPS.

TrackMyShipments is a unique service that makes package tracking a piece of cake. All you have to do is signup for the free service with the email address that you use when ordering your items. Then just forward any emails containing tracking numbers to track@trackmyshipments.com, and the tracking information will magically start appearing in your account.

One of the reasons that I like this service is that all of your information is available from any computer, thereby making it easy to track your packages even when you’re on-the-go. You’ll also get quick access to the email that you forwarded to the service in case you need to grab additional order information.

TrackMyShipments

[via Lifehacker]

–iSnoop (Homepage)–

Works with UPS, FedEx, DHL, and USPS.

When you track packages with iSnoop you’re provided with an easily bookmarkable URL so that you can jump back to see your tracking status at anytime. You’ll also see how your package has moved from one point to another via Google Maps.

The most notable feature, in my opinion, is the RSS tracking option. Each item that you track on iSnoop will have an RSS feed available so that you can receive tracking updates right in your feed reader. If you’re always buried in your feed reader I think this is a great way to keep up-to-date on your packages’ progress.

Tip: If you’re running Vista there’s also a sidebar gadget available using the data from iSnoop.

iSnoop

–Track Package Extension (Homepage)–

Firefox users get the pleasure of having this extension available at their fingertips. You can use it to recognize tracking numbers on a website or in an email, and then have it take you to the carrier’s official site to see the progress. The extension will also keep a list of the packages you’ve tracked in the past to provide an efficient way of tracking your existing packages:

Track Package Extension

–Overview–

There are likely dozens if not hundreds of different ways to track your packages, and now we would like to hear what your favorite tools are! Hit us up in the comments below with the different ways you stay on top of your online orders.

Copyright © 2011 CyberNet | CyberNet Forum | Learn Firefox

Related Posts:


CyberNotes: XP Tips & Tricks

This article was written on January 07, 2008 by CyberNet.

CyberNotes
Microsoft Monday

XP Tips and Tricks Many of our Microsoft Monday posts over the last several months have focused on Windows Vista — after all, it is the latest operating system from Microsoft. While it’s the “latest and greatest” as they say, we know many of you still use and prefer Windows XP. Today we thought we’d spend some time going over a few Windows XP tips. Some of the tips you may be well familiar with while others will be completely new to you. This will be the first in a two part series, so stay tuned for the 2nd edition.

Many of these tricks use the Windows Registry Editor, which you can start by pressing WinKey+R and type regedit into the box.

Note: Some of these tips may work in Vista, but we have not tested them in Vista.

–Rename the Recycle Bin–

Want to rename the Recycle Bin? Here’s what you gotta do:

  1. Run the Registry Editor and navigate to HKEY_CLASSES_ROOT\ CLSID\ {645FF040-5081-101B-9F08-00AA002F954E}
  2. Double-click on (Default), and change the name of the Recycle Bin. Close the Registry, and press F5 on the desktop to refresh the icon.

–Network Sharing–

When you’re looking at files on a network drive you might have noticed that it can take a rather long time (up to 30 seconds). What happens is XP checks to see if the other PC has any scheduled tasks. You can disable that by:

  1. Run the Registry Editor and navigate to HKEY_LOCAL_Machine\Software\Microsoft\Windows\ CurrentVersion\Explorer\RemoteComputer\NameSpace.
  2. Delete the {D6277990-4C6A-11CF-8D87-00AA0060F5BF} key. Close the Registry.
  3. While you’re there you can also delete the {2227A280-3AEA-1069-A2DE-08002B30309D} key if you don’t use printer sharing.
  4. Reboot your computer.

–Excessive Printing–

This probably isn’t for home users, but for all the people out there that do a lot or printing this is something you should consider doing. By tweaking this Registry setting the printing process will have a higher priority. Here’s the details:

  1. Run the Registry Editor and navigate to HKEY_LOCAL_MACHING\SYSTEM\CurrentControlSet\Control\Print.
  2. Create a new DWORD called SpoolerPriority, and give it a value of 1.
  3. Reboot your computer.

–Disable Last Access Time Stamp–

This small little tweak is a great one, because it disables a feature that most people never even use. By default Windows always keeps track of the “Last Accessed” date in the file or folder’s properties. If you’re constantly opening and closing files you’re causing some additional work for Windows since it has to update the last accessed date each time. If you never use that property feel free to disable it:

  1. Run the Registry Editor and navigate to HKEY_LOCAL_MACINE\SYSTEM\CurrentControlSet\Control\ FileSystem.
  2. Create a new DWORD called NtfsDisableLastAccessUpdate, and give it a value of 1.
  3. Reboot your computer.

–Remove Text from Icons–

I would have to put this trick up near the top of my favorites list. With it you can prevent the text from appearing below icons on the desktop. If you’re looking to clean up your desktop a bit this could be the perfect way:

  1. Right-click on an icon, and choose the Rename option. Delete all of the text.
  2. Hold down the Alt key and type 0160 (note: you shouldn’t see any text being typed). That will essentially make a space character the file name. Press Enter to save the results.
  3. You can repeat this for several icons, but there is one catch. You probably know that you can’t have multiple icons in the same folder (or on the desktop) with the same name. To get around that for a second shortcut you can do Alt+0160 + Alt+0160. That will essentially create two spaces for the filename, and for a third shortcut you could do Alt+0160 + Alt+0160 + Alt+0160. As you can see this would get tedious rather quickly, but for a handful of shortcuts it is pretty nice.

Copyright © 2011 CyberNet | CyberNet Forum | Learn Firefox

Related Posts:


Convert Images to ASCII Art, in Color!

This article was written on October 10, 2007 by CyberNet.

Image to ASCII Converter

Being the geeks that we are I’m sure you’ve tried at one time or another to create some sweet ASCII art. When you look at some of the ASCII art that has been done it almost looks like it should be simple, but there is an insane amount of time that is spent getting the spacing and character density just right.

You can now be the envy of all your geeky followers friends by generating your very own gallery of ASCII art. We’re not talking something as simple as the last trick we showed you either, instead this is a full-blown software application. It’s called ASCII Generator, and I found out about it today while doing our Daily Downloads. After I looked into it I knew that I had to give it a shot.

The nice thing is that ASCII Generator is an open source project, and doesn’t require any installation to run it. Once you have loaded an image into the generator it will pump a bunch of text into the main content area. There is the “Size” option on the top toolbar that can be used to decide how many characters are on every line, and the more characters you have the more detail you’ll see.

Once you’ve got all of the settings adjusted you’ll be able to save your artwork as an image or text file. The sweet thing is that it also adds color to the text to help give the ASCII art a more photo-like effect.

Below you’ll see an image that I converted of an extremely colorful garden. I set the Size as large as it would go so that I could capture as much detail in the photo as possible. Think about how long it would have taken to make something like that without the generator. :D

ASCII Generator Homepage
Download Page

Here’s a garden that I converted (click to enlarge)
ASCII Garden

Copyright © 2011 CyberNet | CyberNet Forum | Learn Firefox

Related Posts:


7 Ways to Download Free Independent Music

This article was written on November 02, 2009 by CyberNet.

If you consider your music tastes a little more adventurous than FM radio, you probably already know that the internet is a gold mine for good yet rather unknown music. It has allowed independent bands to flourish and often, they’re more than happy to put out some free MP3′s to get the word out about their songs. In this article, we’ll be taking a look at a handful of sources for free and legal MP3′s across all music genres.

emusic.jpgeMusic’s Daily Download
Every day, this page features a new free MP3 that you can download without signing up. Since eMusic is a big name in online music, you can get some good freebies here as long as you’re into the genre that’s being featured.
Link

flyfi.jpgFlyFi’s Free Music Fridays
Formerly named Goombah, this service not only brings you fifteen new MP3s every Friday but also suggests downloads based on what’s in your iTunes library. The downside is that FlyFi’s iTunes Helper is always running in the background, whether iTunes is active or not. You can opt in to FlyFi’s New Music Friday newsletter if you’d like to receive new MP3s via e-mail.
Link

lastfm.jpgLast.fm’s Free Music Downloads
Aside from tracking your listen habits and streaming music, Last.fm also has a section of their site dedicated to free MP3s. You can filter their catalog by genre and – if you’re logged in – get personalized recommendations.
Link

we7.jpgwe7
Do you remember Spiralfrog? They offered their users free DRM’ed downloads of mainstream music that was supported by advertising. While that service is long gone, we7 is a similar site with one big difference: their downloads are DRM-free 192kbps MP3s. There’s a big buzzkill however… it’s only available in the UK.
Link

bandcamp.jpgBandcamp
Bandcamp is a music hosting service that features bands on its homepage. And although not every song on the site can be downloaded for free, there are still more than enough freebies left to grab. If you’re excited about a band you found, know that their albums are usually available for download on a pay-what-you-want basis.
Link

amiestreet.jpgAmie Street
Even though Amie Street is a paid music service, their model is entirely different than iTunes’. Much like auctions, the prices of their MP3s rise when their popularity goes up. But here’s the good part: all songs start as free downloads, so if you’re fast you can get great albums absolutely free. Currently, you’re being offered a whopping 75 free songs upon signup. The site will also recommend songs to you by importing data from services such as iTunes, Last.fm, Pandora or Facebook, but of course it’s only as good as the algorithm behind it.
Link

insomniaradio.jpgInsomnia Radio’s Daily Dose
This is one of many podcasts dedicated to bringing you new music every day. If you like a song you heard, you can head over to the Daily Dose website to check if there’s a free download available for that song. Similar podcasts include IndieFeed‘s genre-based podcasts and NPR’s The Current Song of the Day.
Link

Copyright © 2011 CyberNet | CyberNet Forum | Learn Firefox

Related Posts:


CyberNotes: Opera Tips, Tricks, and Keyboard Shortcuts

This article was written on March 21, 2007 by CyberNet.

CyberNotes
Web Browser Wednesday

While I have a tendency to use the Firefox browser most of the time, I do use Opera quite a bit as well. Opera is kind of my casual browser because it is slim, efficient, and yet powerful while Firefox offers the extensibility that I need when plowing my way through hundreds of different sites I visit everyday. I don’t really get around to playing with all the different tweaks that lie under-the-hood of Opera, but I think I have some that you may not yet know about.

I’ve already covered some speed enhancements for Opera in a previous article, so the focus here is is going to be a little bit different. I’m going to dive into the opera:config which is similar to Firefox’s about:config screen. In both browsers that is where all of the hidden gems lie that most people are afraid to tinker with, and as a result you could really miss out on some great tweaks.

In my opinion Opera’s opera:config screen is a little more formal than what Firefox has to offer. To get to the configuration screen you simply have to type opera:config in the address bar and there you’ll see a bunch of categories that can be expanded to reveal corresponding settings:

Opera Config

It’s easy to get the hang of, and if you ever mess something up you can always press the “Default” button next to an option to return that setting back to its original value.

A short description for all of the settings listed on the opera:config screen can be found here, and you’ll notice on that page that all of the settings are hyperlinked. Those links will only work in Opera because they will take you directly to the that option on the configuration page. The few tweaks that I mention below also use hyperlinks to help you find the setting quickly.

—Add Thumbnail Previews to Ctrl+Tab Window Cycle—

Opera ThumbnailsThis is probably one of the cooler features for switching tabs, and for some reason it isn’t enabled by default in Opera. If you want to switch tabs in Opera you can use the Ctrl+Tab key combination to do so. It will pop open with a tab switcher that is purely text-based. The screenshot to the right was taken after I enabled a setting in opera:config to show thumbnails along with their corresponding titles.

The thing I like about this is that it only shows three thumbnails on the right-side of the list so that it doesn’t get too cluttered. The thumbnail in the middle is the one that you currently have selected, and the one above and below it are the tabs before and after it, respectively.

The thing that I don’t like about it is that there is no border at all around the tab switcher. It only has a white background that can make it a little more difficult for your eyes to visualize the boundaries.

To turn the thumbnail preview on for the tab switcher all you need to do is enter opera:config#UserPrefs|UseThumbnailsinWindowCycle into the address bar, and then check the corresponding box.


—Disable Opera’s BitTorrent Client—

I recently saw this configuration option over at Opera Watch, and many Opera users that I talk to say that it is nice having a BitTorrent client built-into the browser but it doesn’t work nearly as well as a standalone program. For that reason there is an opera:config setting to prevent Opera from handling BitTorrent downloads itself:

To disable the BitTorrent client in Opera:

  1. Copy and paste the following into the address bar (the URL bar): opera:config#BitTorrent|Enable
  2. Unselect “Enable”
  3. Click “Save”

To use another BitTorrent client with Opera:

  1. Go to Tools > Preferences > Advanced > Downloads
  2. Unselect “Hide file types opened with Opera”
  3. Type “torrent” in the Quick find box
  4. Double-click the line that looks like this: application/x-bittorrent torrent
  5. Select “Open with default application”
  6. Click “OK”


—Opera’s Keyboard and Mouse Shortcuts—

  • Ctrl+H sends Opera to the System Tray.
  • Holding down the right mouse button and using the scroll wheel will bring up the tab switcher that is mentioned above. This makes is really easy to switch between tabs!
  • Going back and forward in Opera is really easy. To go back just hold down the right mouse button and then press the left one, or to go forward just hold down the left mouse button and press the right one.
  • Pressing the period (.) key will initiate a Find As You Type search feature just like in Firefox.
    Opera Search
  • Shift+Left Click on a tab to close it.
  • Ctrl+B will paste a URL an already copied URL onto the clipboard and press enter for you. Thanks for the tip ResearchWizard!
  • Ctrl+Z will undo the last closed tab.


—Cascading/Tiling Windows—

This is one thing that Firefox will never be able to do because Opera is built using a Multiple Document Interface (MDI) that lets you cascade, tile, and minimize windows all from within the window. There is an extension for Firefox that tries to replicate this feature, but it doesn’t quite cut it for me.

Actually, this is one of the biggest reasons that I use Opera in my casual browsing. If I come across two items that I want to compare I can put them side-by-side very easily with tiling. To use this feature just right-click on any tab, go to the Arrange menu, and choose the option that you want to do:

Opera Cascade

Here is what it looks like when I tile a few different windows:

Opera Tile


—Overview—

Opera is full of all kinds of tweaking goodness that is just waiting to be exposed. I’m sure some of you have used Opera more than me so if you know of any great tweaks please make sure to mention them in the comments so that we can all benefit from them! I’ll go ahead and leave you now with a few sites that may help you on your journey for finding more tips and tricks:

Copyright © 2011 CyberNet | CyberNet Forum | Learn Firefox

Related Posts:


CyberNotes: Create a Custom Software Update Notifier

This article was written on October 11, 2007 by CyberNet.

CyberNotes
Tutorial Thursday

One of the most common things that I’ve been getting asked is how people can stay up-to-date on the latest software. I got really excited about the free UpdateStar application which I mentioned last week, but it still didn’t have information on a lot of the software that I used.

There are hundreds of sites out there that provide RSS feeds for downloads, and I began to think to myself that there had to be a good way to use some of those feeds to my advantage. Then Yahoo! Pipes came to mind since I had just used that last week to show how to translate RSS feeds, and it works perfectly in this situation.

–Overview–

What we’re going to do with Yahoo! Pipes is combine several feeds from popular download sites into one central feed. I recommend a handful of sites at the end of this article that should offer exactly what you’re looking for.

Then we’re going to use Yahoo! Pipes to sift through every item in each of the feeds, and pull out only the items that interest us. Because of the nature of Yahoo! Pipes it will only take a second to go back and add more things to watch for, so don’t worry if you forget to put an app on the list to be monitored.

–Instructions–

  1. Go to the Yahoo! Pipes homepage, and begin creating a new pipe.
  2. Drag the “Fetch Feed” item over onto the grid (located under the Sources menu):
    Software Update Notifier 1
  3. Add the feeds you want to monitor for the downloads (a recommended list can be found at the end of this article). To add multiple feeds just use the plus sign located next to “URL”.
    Software Update Notifier 2
  4. Drag the “Filter” item over onto the grid (located under the Operators menu):
    Software Update Notifier 3
  5. Adjust the filter so that it will only “Permit” a feed item to make it through if it matches one of the names you are looking for. You can add multiple names to search for by hitting the plus sign next to “Rules”. Just make sure each one has the “item.title” selected.
    Software Update Notifier 4
  6. Now you just have to connect the dots, literally. When you’re done hit the “Refresh” link at the bottom to see a live preview of what the resulting feed will look like. Don’t be surprised if you don’t see any items because there may not have been updates to your programs in a little while.
    Software Update Notifier 5
  7. Go ahead and hit the “Save” button in the upper-right corner of the screen, and give your Pipe a name. Then click the “Back to My Pipes” link towards the top, and you should see your new feed listed there. Click on it, and then subscribe to it with your feed reader!

–Feeds–

There are hundreds of different download sites that you can subscribe to, but that’s not really necessary. Below is a list of five different feeds that should take care of all your needs. All you need to do is copy and paste each of the URL’s that I provide into Step 3 above.

  1. Download.com: http://www.download.com/3409-2001-0-10.xml?tag=lr_rss
  2. Fileforum.com: http://fileforum.betanews.com/rss2
  3. MajorGeeks.com: http://majorgeeks.com/news.xml
  4. FileHippo.com: http://filehippo.com/rss/
  5. CyberNetNews.com: http://feeds.cybernetnews.com/CyberNetDailyDownloads

–Tips–

  • One feed will probably be enough, and that way you eliminate the possibility of receiving duplicate entries in the feed which you can see happened to me in Step 6 above. I like to know as soon as possible when new programs are released (for obvious reasons), and having multiple feeds lets me do that. I recommend the MajorGeeks feed if you are going to choose just one of them.
  • Let’s say you have something that you’re tracking called “ER”. You can’t just enter that into the filter because every title that has “er” somewhere in the words will match. To get around this just put spaces before and after the “ER” in the filter so that it is treated as a word.

Copyright © 2011 CyberNet | CyberNet Forum | Learn Firefox

Related Posts:


Just got an iPad? The best apps, accessories, and tips

So, Santa stuffed an iPad into your stocking on Christmas (insert mythical figure / appropriate receptacle / holiday of choice), and you’re wondering what to do with the thing? First of all, congratulations! The iPad can be a wonderful, loyal companion and friend, but it can also take a while to warm up to. As we always say, a device is only as good as its apps, both literally and figuratively: it’ll take some time to figure out what you want to get from the iTunes Store that will flesh out your experience, but it will also take some time to see which nooks and crannies of your life the iPad can fill, and what roles you’ll want it to take over from your laptop and phone. Follow along after the break as we show you how to wring the most out of your shiny new tablet.

Continue reading Just got an iPad? The best apps, accessories, and tips

Just got an iPad? The best apps, accessories, and tips originally appeared on Engadget on Mon, 27 Dec 2010 18:18:00 EDT. Please see our terms for use of feeds.

Permalink   |   | Email this | Comments

Just got an Android phone? The best apps, accessories, and tips

Taking a smartphone out of the box for the first time can elicit a wide spectrum of emotions, starting with unadulterated excitement that can quickly devolve into panic, chaos, and confusion: what do you do now? How do you make it awesome? How do you emanate an air of “cool” on the subway by using apps specifically designed to make you look like a badass? Well, fear not, newly-minted Android smartphone owner: as always, we’ve got your back. Read on for all the apps, accessories, and tips you should be investigating right this very second.

Continue reading Just got an Android phone? The best apps, accessories, and tips

Just got an Android phone? The best apps, accessories, and tips originally appeared on Engadget on Mon, 27 Dec 2010 17:20:00 EDT. Please see our terms for use of feeds.

Permalink   |   | Email this | Comments

Ajax Spell Checker in Opera Supports 27 Languages

This article was written on March 30, 2007 by CyberNet.

Firefox is known for having its inline spell checker that underlines misspelled words as you type them. I truly believe that this feature in Firefox has helped the Internet as a whole become more readable by reducing the number of misspellings in even the simplest things, like comments.

Mozilla does provide multiple languages for their dictionaries, but Opera also gets some of its own Ajaxy goodness with a script that has been made up to support spell checking in 27 different languages. Here is everything the script has to offer:

  • It’s blazing fast since JavaScript is stored locally
  • Inline and dynamic
  • AJAX is used to send and receive data
  • Support for 27 languages
  • Ability to switch language dynamically

If it sounds like something you would like to use just follow these simple steps:

  1. Download the files here and put them in a folder such as My Documents/OperaScripts.
  2. In Opera go to Tools > Preferences > Advanced > Content > JavaScript Options > Choose… and select the folder from Step 1.
  3. Click OK, and then load a page with a text field in it. Click in that field and you should see the spell checker button similar to what is pictured below.

I had it installed in my Opera within 10 or 15 seconds, and at first I was wondering where the heck the spell checker was. Of course, being a computer geek I never feel like reading instructions or anything so I kept trying to figure out why the spell checker wasn’t showing up! Ahh, then I realized that you have to click in a text field and then a little tab will show up below that field, and clicking on the two-way arrow initiates the spell check:

Opera Spell Check

It is still nice to have the inline spell check in Firefox, but this is definitely a step in the right direction for current Opera users. There is also a preferences file that you can download and use with the script so that you can choose to use the spell checker from Gmail (you have to be logged in), Orangoo, or fearphage. Also, if you only enable one language in the preferences then the drop-down box will be completely removed. That way it doesn’t take up quite so much room.

Maybe when Opera 10 rolls around it too will have inline spell check built-in, but until that time this is one script that I will definitely keep installed! Hopefully Opera 10 will also have a management screen for scripts that you currently have installed. :)

Source: Opera Watch

Copyright © 2010 CyberNet | CyberNet Forum | Learn Firefox

Related Posts: